Mac Proxy Settings Guide: Configure a macOS Proxy with Rola IP

Sep 18, 2026 · Guides · 14 min read
Mac proxy settings let you configure HTTP and HTTPS request proxies, SOCKS proxies, or automatic configuration through a PAC file. For Rola IP users, the complete workflow is to choose a proxy network in the dashboard and copy the connection parameters, enable the matching protocol in the Proxies panel for the current Wi-Fi or Ethernet service, and then verify the exit IP, location, and session behavior through both the browser and command line.
The macOS system proxy only affects applications that honor the system proxy settings. Some command-line tools, VPNs, browser extensions, and applications with their own network stacks may use separate configurations. Therefore, seeing a changed browser exit IP does not prove that every application is using the proxy. This guide covers the graphical interface, Terminal, PAC, bypass rules, and troubleshooting.
TL;DR
- On macOS Ventura and later, go to System Settings > Network > Current Network > Details > Proxies.
- Enable only the required Web Proxy, Secure Web Proxy, or SOCKS Proxy option based on the protocol provided in the Rola IP dashboard.
- After saving, first check the public exit IP and then test a normal HTTPS website. Location, network type, and sticky-session behavior must be verified separately.
- If only some applications do not use the proxy, check whether those applications ignore the system proxy instead of repeatedly changing the Mac settings.
What Are Mac Proxy Settings?
Mac proxy settings determine whether network traffic from applications that support the system proxy is sent to a proxy server first and then forwarded to the destination website. Websites typically see the proxy exit IP instead of the direct public IP of your current network.
Apple’s English Mac proxy server settings guide divides configuration into automatic discovery, automatic PAC configuration, and manual proxy settings. In manual mode, you enter the server address and port for the selected protocol and enable username-and-password authentication when required.
Which Applications Does the System Proxy Cover?
Applications such as Safari and Chrome that honor the system proxy usually read the macOS network-service configuration. curl, Python, some Electron applications, VPN clients, and proxy extensions may instead read environment variables or their own proxy settings. During testing, distinguish between “the system proxy works” and “one specific application has been configured successfully.”
How Do the Paths Differ Between Newer and Older macOS Versions?
| macOS Version | Settings Path |
|---|---|
| Ventura 13 and later | Apple menu > System Settings > Network > Current Network > Details > Proxies |
| Monterey 12 and earlier | Apple menu > System Preferences > Network > Current Network > Advanced > Proxies |
Interface labels may change between macOS versions, but the key object is always the currently active network service. A proxy configured for Wi-Fi is not automatically written to a separate Ethernet adapter.
Which Proxy Protocol Should You Choose on Mac?
| macOS Option | Primary Use | Configuration Note |
|---|---|---|
| Web Proxy (HTTP) | Assigns a forward proxy for HTTP requests | This does not mean HTTPS destination traffic will automatically use the same setting. |
| Secure Web Proxy (HTTPS) | Assigns a proxy for HTTPS requests | The name indicates that the proxy setting applies to HTTPS requests; it should not be used to assume that the client-to-gateway connection necessarily uses TLS. |
| SOCKS Proxy | Forwards traffic from applications that support SOCKS | DNS resolution and username-authentication support also depend on the client implementation. |
| Automatic Proxy Configuration | Uses a PAC URL supplied by an administrator | A successfully downloaded PAC file does not prove that its rules are correct or that the browser has adopted them. |
| Auto Proxy Discovery | Automatically discovers configuration on managed networks | Do not enable it together with unknown manual proxy settings while troubleshooting. |
When using Rola IP, follow the connection information generated by the dashboard and the documentation for the selected product. For an initial setup, do not enable HTTP, HTTPS, SOCKS, and PAC at the same time; otherwise, it becomes difficult to determine which path is actually being used when something fails.
What Do You Need Before Configuring Rola IP?
Prepare the following information before you begin:
- The name of the network service currently used by the Mac, such as Wi-Fi or USB Ethernet.
- The Rola IP proxy network type.
- The Host, Port, Username, and Password generated by the dashboard.
- The target country or session parameters, plus the product scope to which those parameters apply.
- A baseline public IP recorded before changing the settings. Open the ipify public IP endpoint in the browser you plan to test, and save its result.
Record existing proxy, VPN, and Private Relay settings before you begin. On a managed Mac, check whether you are allowed to change them. A VPN or Private Relay can affect the baseline, so keep its state consistent during comparison.
The Rola IP Quick Start explains where to find the connection parameters and how to perform a basic test. The rotating-network options covered here are residential, datacenter, and mobile proxies. Their account markers and location options differ; generate connection details for the selected product instead of reusing another product’s username format.
How to Configure Mac Proxy Settings with Rola IP
The steps below use the English macOS interface. The screenshots illustrate panel locations and include an existing local-proxy configuration. Addresses such as 127.0.0.1 and ports shown in those screenshots are not Rola IP gateway credentials; use the connection details generated for your account.
Step 1: Choose a Rola IP Proxy Network
Sign in to the Rola IP dashboard and choose the network that matches your task. For regional website checks that require a residential exit network, review residential proxies. For authorized API checks or bulk data requests, compare rotating datacenter networks. For checks that require a mobile-carrier exit IP, select a mobile network; this does not emulate a mobile device or browser. Do not mix the port or username rules from different products.
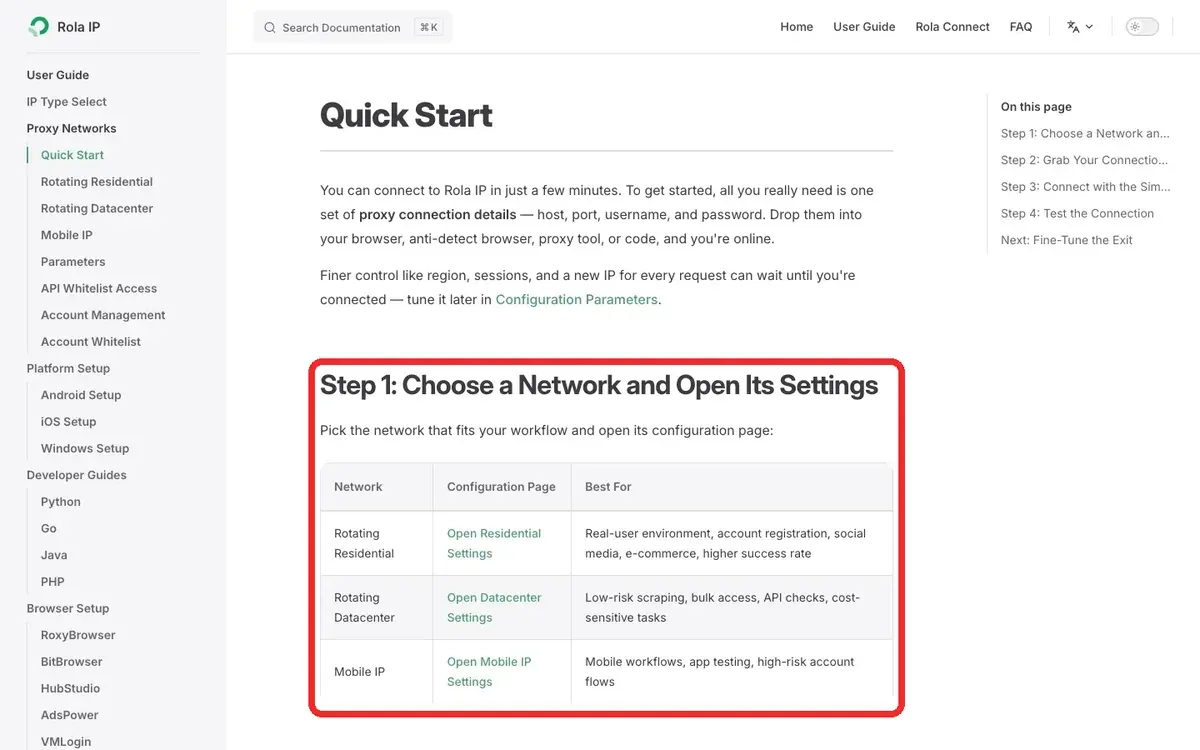
Figure 1: The Rola IP Quick Start page shows where to select a proxy network and access connection information.
Step 2: Copy the Connection Parameters
Copy the Host, Port, Username, and Password from the dashboard. If you need country, city, sticky-session, or per-request rotation settings, use the format for the current network shown in Rola IP proxy parameters. The parameter documentation checked on September 17, 2026 supports country targeting for rotating residential, rotating datacenter, and mobile networks. State and city targeting apply only to rotating residential proxies. A session identifier follows the underscore in the account name; it is not a separate -sessionid- parameter. Keep the same session identifier for a workflow that needs continuity, and avoid per-request rotation during that workflow.
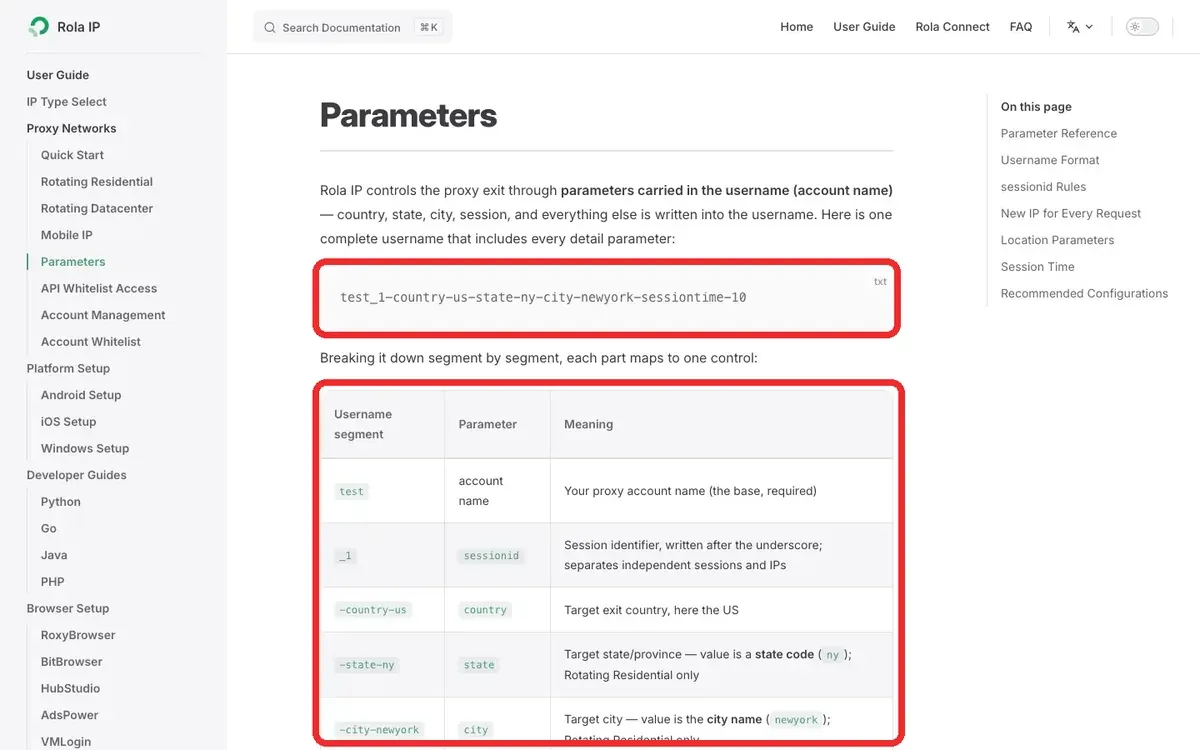
Figure 2: The Rola IP Parameters page is used to verify country, city, session, and rotation parameters.
Step 3: Open System Settings
Click the Apple menu in the upper-left corner of the screen and select System Settings. Do not change your VPN, Private Relay, or browser extensions first. Record their current state so you can restore it if a problem occurs.
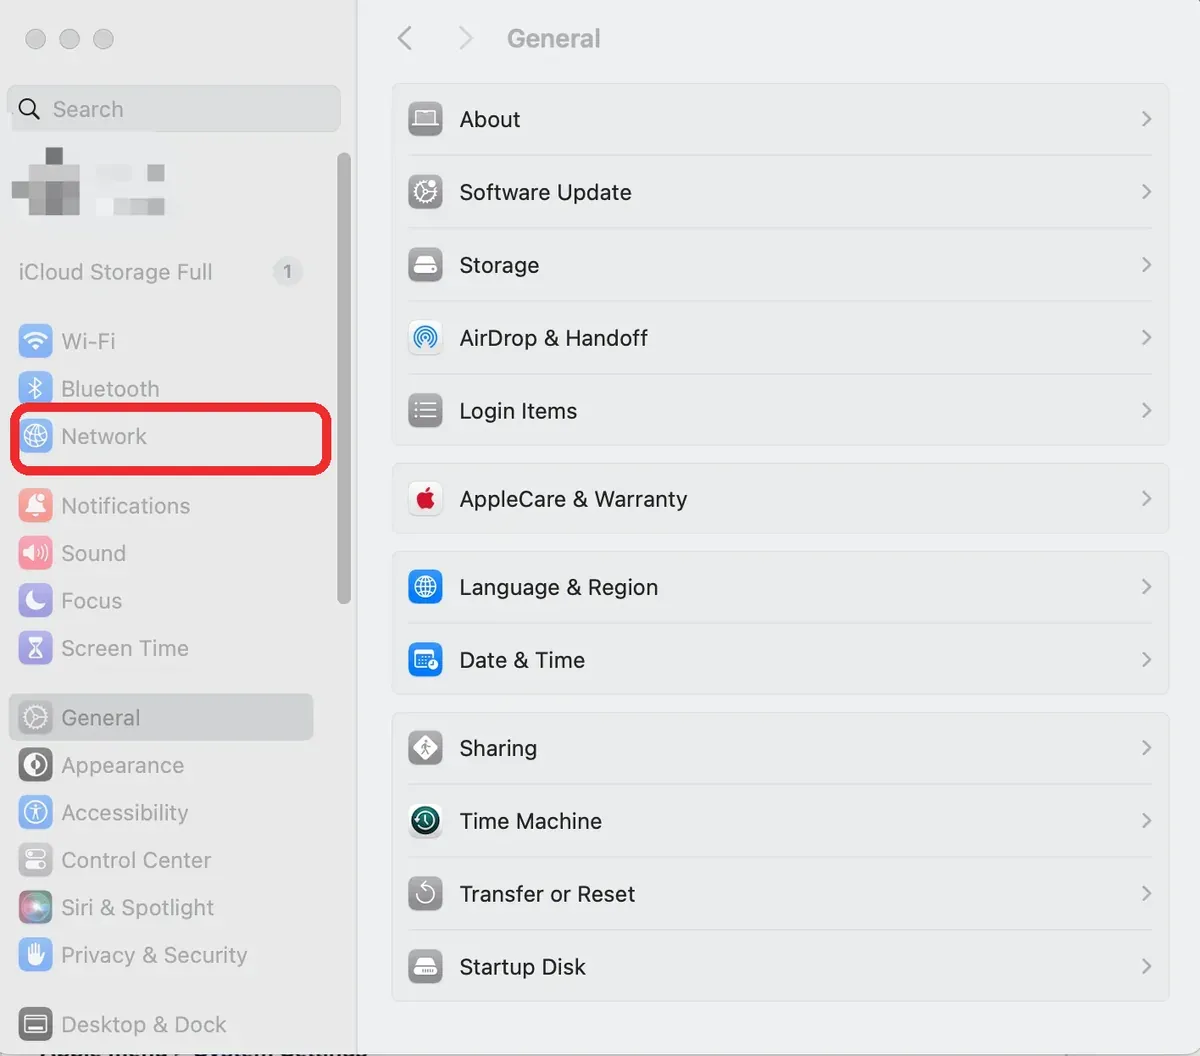
Figure 3: System Settings is open; select Network in the sidebar to continue.
Step 4: Open Details for the Current Network Service
In the sidebar, select Network, click the Wi-Fi, Ethernet, or other network service currently in use, and then click Details. Proxy settings are bound to a network service, so you need to check them separately after switching to another service.
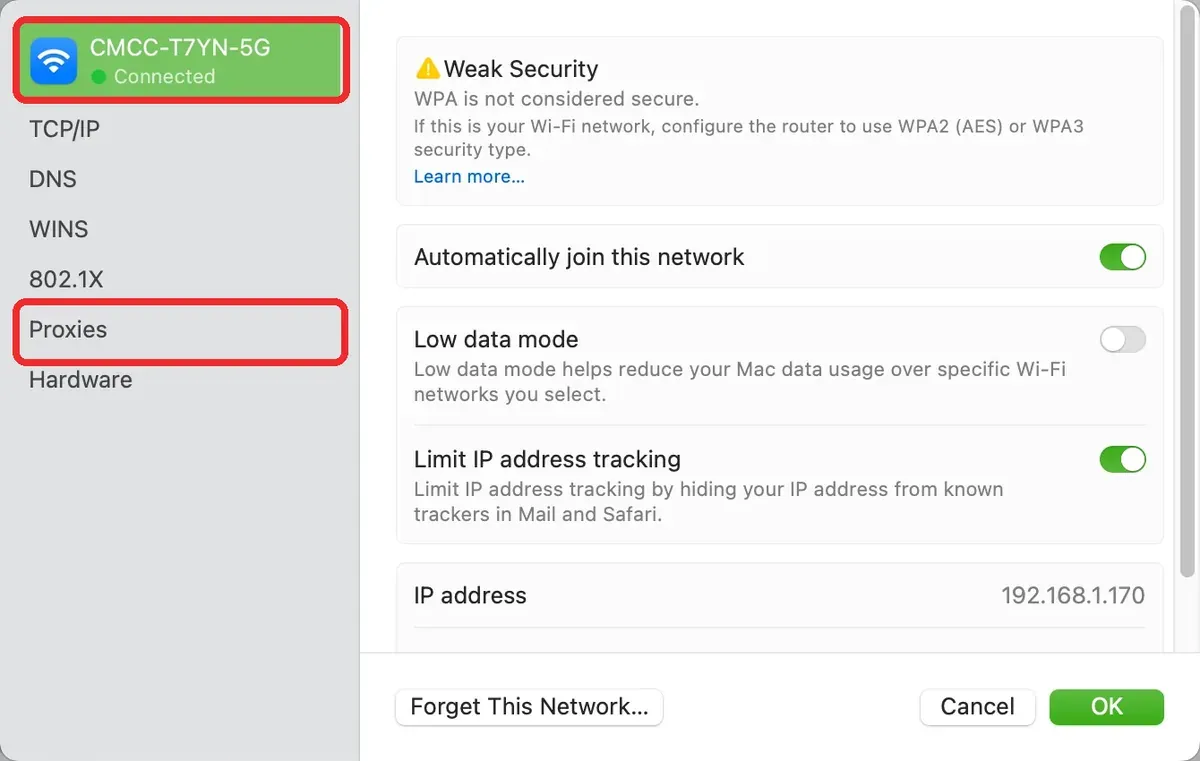
Figure 4: Network > Current Network > Details.
Step 5: Open the Proxies Panel
In the Details window, select Proxies. First take a screenshot of, or record, the currently enabled options, PAC URL, and bypass list. If the device is managed by a company MDM or configuration profile, confirm the administrator’s requirements before making changes.
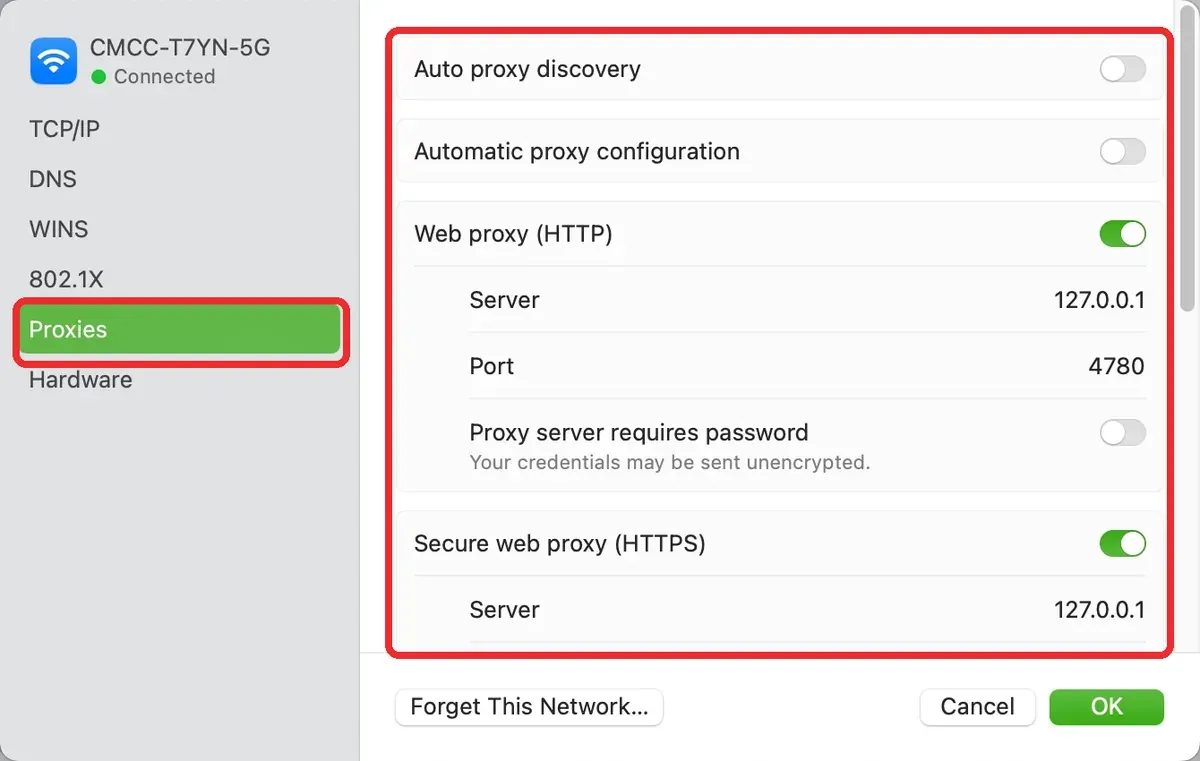
Figure 5: The upper section of the Proxies panel. Scroll to reach the remaining protocol and bypass options.
Step 6: Enable the Protocol That Matches the Rola IP Parameters
If the dashboard provides an HTTP forward proxy and the browser needs to handle both HTTP and HTTPS requests, you will typically need to configure Web Proxy and Secure Web Proxy separately using the Host and Port specified by the dashboard. If the dashboard provides SOCKS5, enable SOCKS Proxy. For password-authenticated SOCKS5, verify support in the intended application first: writing credentials into macOS does not guarantee that the application can use them. Do not change the proxy address to another protocol simply because the destination URL uses HTTPS.
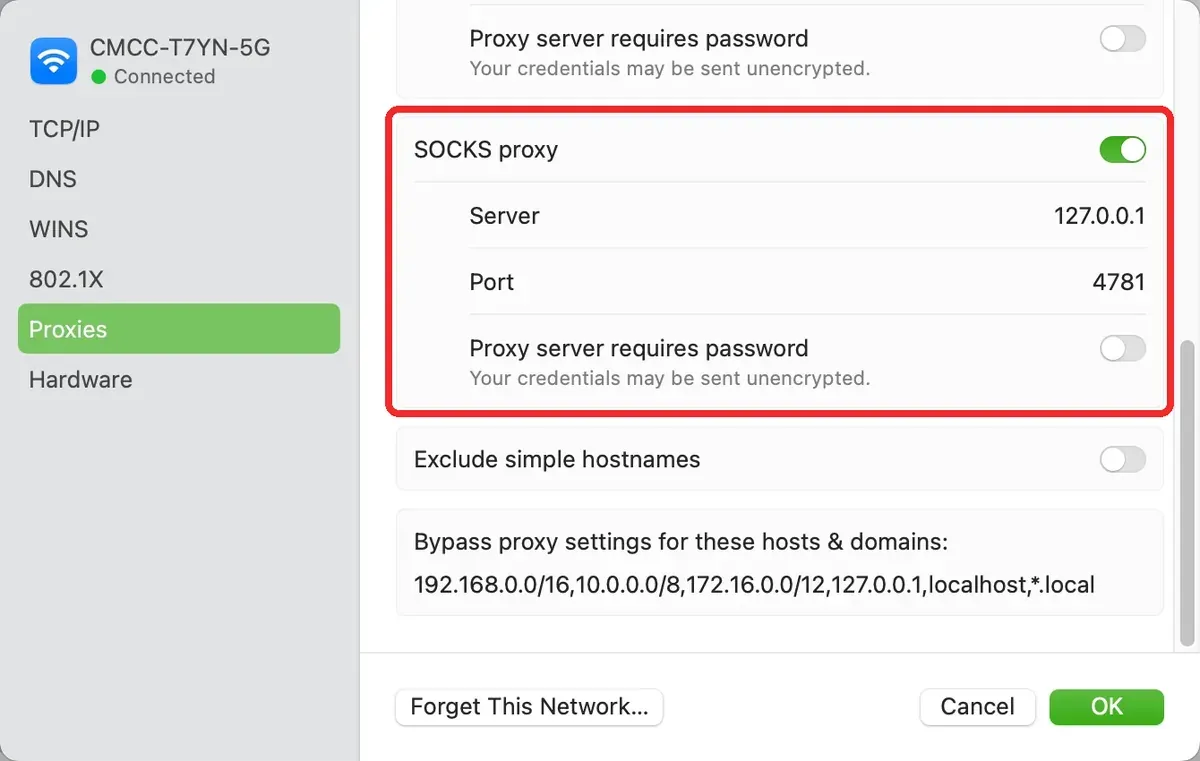
Figure 6: SOCKS server, port, and bypass fields. The displayed loopback address belongs to a local proxy; replace it with your own endpoint and enable only the required protocol.
Step 7: Enter the Server, Port, and Authentication Information
Enter the server address and port generated by the Rola IP dashboard in the corresponding fields. If authentication is required, enable Proxy server requires password, then enter the complete Username and Password. The username may already contain country and session parameters, so copy it as a whole and do not remove underscores or hyphens.
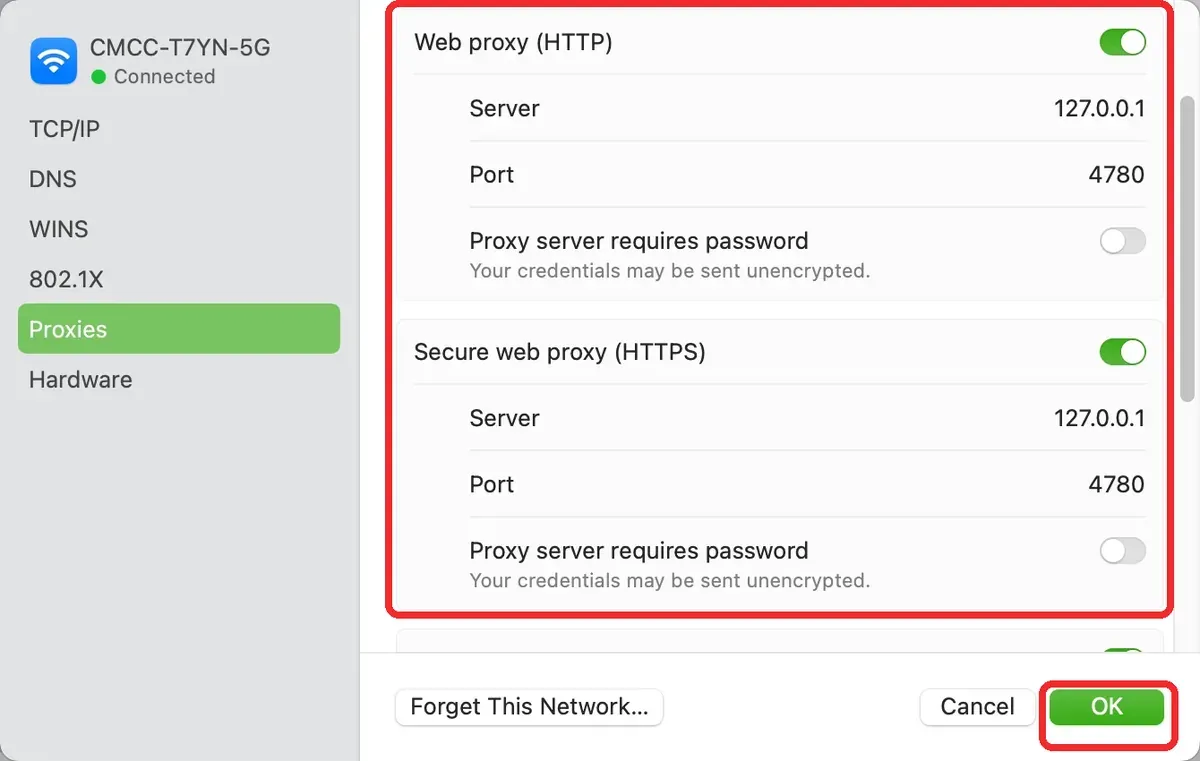
*Figure 7: HTTP and HTTPS fields showing an existing local proxy at 127.0.0.1:4780, with authentication off.
Step 8: Check the Bypass List and Save
Domains listed under Bypass proxy settings for these Hosts & Domains connect directly. Keep localhost, 127.0.0.1, and any internal addresses that genuinely need direct access. Do not accidentally add your test website or a wildcard to the bypass list. When everything is confirmed, click OK.
Step 9: Verify the Exit IP and Normal HTTPS Access
Reload the ipify endpoint used for the baseline and compare the returned public IP with the saved result. Then open a normal HTTPS website and confirm that browsing and certificate validation work correctly. An IP-checking page only proves the exit address observed by that request. Country, network type, and session persistence must be verified separately with appropriate data sources and repeated requests.
How to Check Mac Proxy Server Settings in Terminal
Read the current status first instead of overwriting the configuration:
networksetup -listallnetworkservices
networksetup -getwebproxy "Wi-Fi"
networksetup -getsecurewebproxy "Wi-Fi"
networksetup -getsocksfirewallproxy "Wi-Fi"
networksetup -getautoproxyurl "Wi-Fi"
networksetup -getproxyautodiscovery "Wi-Fi"
networksetup -getproxybypassdomains "Wi-Fi"
scutil --proxy
networksetup reads settings for a specific network service, while scutil --proxy shows the current dynamic proxy state. The service name is not always Wi-Fi, so run -listallnetworkservices first and then replace the service name in the following commands.
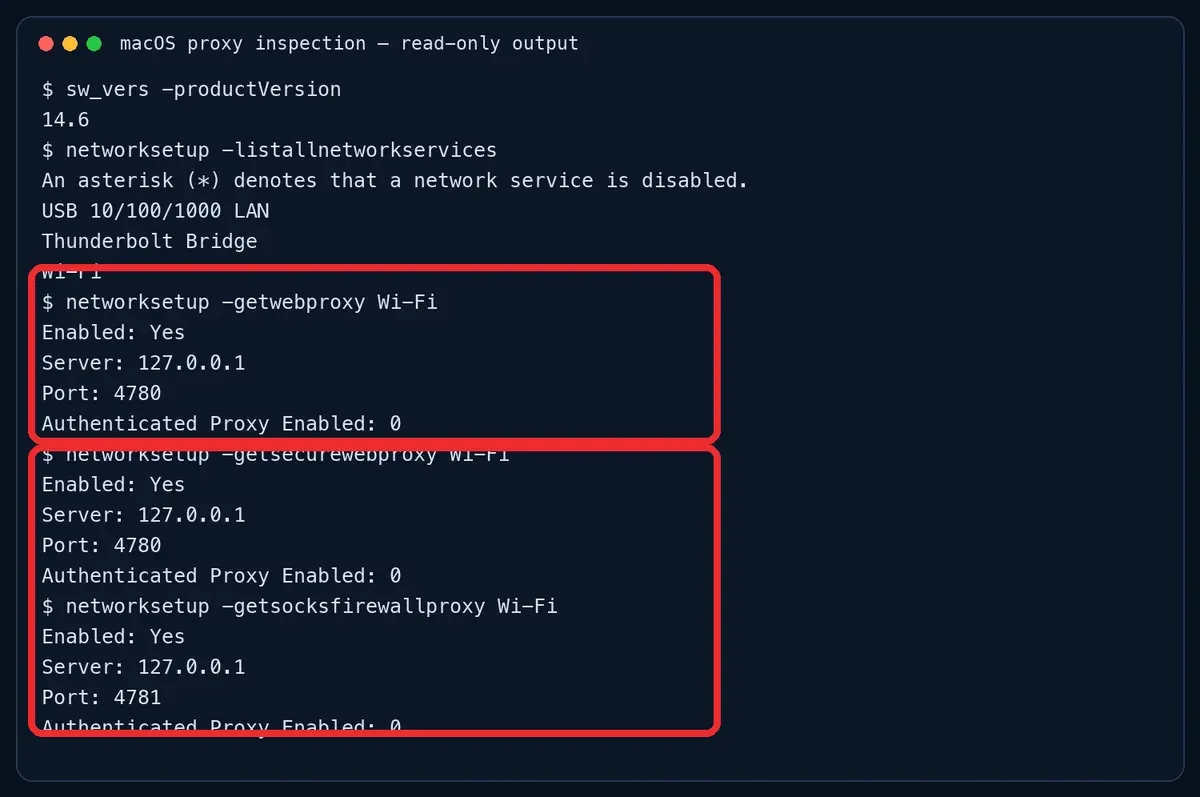
Figure 8: Illustrative networksetup output for a local proxy configuration. This is not evidence of a successful Rola IP connection.
How to Configure a Rola IP Proxy Through Terminal
The graphical interface is better suited to storing authentication credentials, while Terminal is useful in auditable test environments. The scripts below are intended for the default macOS zsh shell. The example address is not a real Rola IP gateway. Before running the commands, replace it with values generated by the dashboard and confirm the network-service name.
Configure HTTP and HTTPS Request Proxies
This configures an HTTP forward-proxy endpoint for both request types. Disable any unrelated SOCKS or automatic proxy configuration first, unless your administrator requires it.
SERVICE="Wi-Fi"
ROLA_PROXY_HOST="proxy.example"
ROLA_PROXY_PORT="1000"
ROLA_PROXY_USER="copy-the-username-generated-by-your-console"

read -s "ROLA_PROXY_PASSWORD?Proxy password: "
echo

sudo networksetup -setwebproxy \
  "$SERVICE" "$ROLA_PROXY_HOST" "$ROLA_PROXY_PORT" on \
  "$ROLA_PROXY_USER" "$ROLA_PROXY_PASSWORD"

sudo networksetup -setsecurewebproxy \
  "$SERVICE" "$ROLA_PROXY_HOST" "$ROLA_PROXY_PORT" on \
  "$ROLA_PROXY_USER" "$ROLA_PROXY_PASSWORD"

unset ROLA_PROXY_PASSWORD

networksetup -getwebproxy "$SERVICE"
networksetup -getsecurewebproxy "$SERVICE"
read -s hides the terminal input, but the password is still briefly used as a networksetup process argument. On shared devices, managed devices, or when using highly sensitive credentials, prefer the graphical interface or an administrator-approved credential-management method.
Configure a SOCKS5 Proxy
Use this only when the Rola IP dashboard explicitly provides SOCKS5 parameters:
SERVICE="Wi-Fi"
ROLA_PROXY_HOST="proxy.example"
ROLA_PROXY_PORT="1080"
ROLA_PROXY_USER="copy-the-username-generated-by-your-console"

read -s "ROLA_PROXY_PASSWORD?Proxy password: "
echo

sudo networksetup -setsocksfirewallproxy \
  "$SERVICE" "$ROLA_PROXY_HOST" "$ROLA_PROXY_PORT" on \
  "$ROLA_PROXY_USER" "$ROLA_PROXY_PASSWORD"

unset ROLA_PROXY_PASSWORD

networksetup -getsocksfirewallproxy "$SERVICE"
Do not enable multiple proxy types that you do not need. Some applications do not support username authentication for the macOS system SOCKS proxy. Even if the command writes the settings successfully, you must still verify the result in the actual application.
Check the options available on your Mac with networksetup -help. A shell syntax check alone cannot verify authentication, gateway reachability, or application behavior.
How to Test a Rola IP Connection Without Interference from the System Proxy
First use curl -q --noproxy "*" to establish a direct-connection baseline, and then specify the proxy explicitly. -q must be the first curl option so that curl does not read its default configuration. --noproxy "" prevents NO_PROXY from bypassing the explicitly specified proxy. The example below tests an HTTP forward proxy. Use the HTTP endpoint and port from your connection details. It uses interactive password input to avoid writing the password directly into command history. The expanded password is still passed as a process argument, so use this method only in a trusted local test environment.
ROLA_PROXY_HOST="proxy.example"
ROLA_PROXY_PORT="1000"
ROLA_PROXY_USER="copy-the-username-generated-by-your-console"
read -s "ROLA_PROXY_PASSWORD?Proxy password: "
echo

# Direct baseline: disable curl-level proxies for this URL.
curl -q --noproxy "*" --connect-timeout 10 --max-time 30 \
  "https://api64.ipify.org?format=json"

# Explicit Rola IP path: prevent NO_PROXY from bypassing the proxy.
curl -q --noproxy "" \
  --proxy "http://${ROLA_PROXY_HOST}:${ROLA_PROXY_PORT}" \
  --proxy-user "${ROLA_PROXY_USER}:${ROLA_PROXY_PASSWORD}" \
  --connect-timeout 10 --max-time 30 \
  "https://api64.ipify.org?format=json"

unset ROLA_PROXY_PASSWORD
For a SOCKS5 endpoint, change the --proxy value in the second command to "socks5h://${ROLA_PROXY_HOST}:${ROLA_PROXY_PORT}" and use the SOCKS5 port provided for your account. socks5h asks the proxy to resolve the destination hostname; socks5 resolves it locally. Keep the same authentication and timeout options.
These commands control only curl’s application-level proxy behavior. They do not automatically bypass a VPN, transparent gateway, or enterprise security device. A successful request through the explicitly configured proxy confirms that curl can use that endpoint. A changed public IP is useful corroboration, but IP comparison alone cannot establish routing or prove the country, ASN, network type, or session persistence. A rotating direct connection can change IPs, and a proxy can sometimes share the direct exit address.
How to Set Up PAC and Automatic Proxy Configuration
Enable Automatic Proxy Configuration only when an administrator or proxy service explicitly provides a PAC URL. Following Apple’s official process, enable the option in the Proxies panel and enter the URL. A successful download is only an initial check. You still need to verify the PAC JavaScript syntax, the rule returned for the target URL, and whether the browser actually used that result.
curl -q --fail --location --connect-timeout 10 --max-time 30 \
  "https://proxy.example/proxy.pac"
The presence of FindProxyForURL does not mean the rules are correct. If the PAC file returns DIRECT, loading the file successfully will not test the proxy connection.
How to Bypass the Mac Proxy for Specific Domains
Add domains that genuinely require direct access under Bypass proxy settings for these Hosts & Domains in the Proxies panel. Apple’s official documentation supports individual domains, wildcard domains, and subdomain forms such as apple.com, *.apple.com, and store.apple.com.
Keep the bypass list as small as possible. If you add the test website to the list, the browser will connect directly and may make you think the proxy configuration is not working. Whether enterprise intranet domains, localhost, and RFC 1918 private addresses should bypass the proxy depends on your organization’s network policy.
How to Change or Disable a Mac Proxy
Disable It in the Graphical Interface
Return to System Settings > Network > Current Network > Details > Proxies, turn off the enabled Web Proxy, Secure Web Proxy, SOCKS Proxy, PAC, or Auto Discovery options, and click OK. On managed devices, MDM may write the configuration back automatically; do not bypass administrator policy.
Disable It in Terminal
SERVICE="Wi-Fi"
sudo networksetup -setwebproxystate "$SERVICE" off
sudo networksetup -setsecurewebproxystate "$SERVICE" off
sudo networksetup -setsocksfirewallproxystate "$SERVICE" off
sudo networksetup -setautoproxystate "$SERVICE" off
sudo networksetup -setproxyautodiscovery "$SERVICE" off
After disabling the proxy, run the relevant networksetup -get... commands and scutil --proxy again. Do not rely only on whether one application appears to have recovered, because that application may have its own proxy cache or environment variables.
How to Troubleshoot Mac Proxy Settings That Are Not Working
| Symptom | More Likely Cause | Check in This Order |
|---|---|---|
| No websites open | Incorrect Host, Port, or protocol, or an unreachable gateway | Direct baseline, DNS, TCP port, dashboard status |
| 407 response | The proxy requires authentication; credentials may be missing or invalid | Username, Password, allowlist, authentication method |
| curl works but the browser fails | The browser is reading different settings, PAC, an extension, or a policy | System Settings, extensions, chrome://policy |
| Browser works but one application fails | The application ignores the system proxy or uses its own network stack | In-app proxy, environment variables, port forwarding |
| IP does not change | The request is bypassed, the proxy is not enabled, or the application did not adopt the setting | Bypass list, current network service, application path |
| Location is not as expected | Username location parameters do not apply or resource results differ | Parameter format, product support scope, repeated checks |
| Settings revert automatically | MDM, a configuration profile, VPN, or proxy client rewrites them | Profiles, VPN, startup items, administrator policy |
| Failure occurs only on the corporate network | Exit allowlist, port, or firewall restrictions | Record the corporate exit IP and contact the administrator |
Rola IP Parameters Are Correct but the Connection Still Fails
First confirm that the proxy details belong to the current product, that account information and passwords have not been mixed, and that the current public exit has been added to any required allowlist. Then separate endpoint reachability from authentication. After replacing the placeholders with your gateway details, use:
dscacheutil -q host -a name "proxy.example"
nc -vz -G 10 "proxy.example" 1000
A DNS result confirms that the gateway name resolves. A successful TCP check confirms that the port accepts connections; it does not validate proxy authentication. Next, run the explicit curl test above. A name-resolution error points to DNS, a timeout or refusal points to reachability or the port, and an HTTP 407 response points to proxy authentication.
If you use Rola Connect to manage the system proxy, check its active settings as well: the client may replace manual settings when switching connections.
Some Applications Ignore the System Proxy
This is one of the most common misunderstandings about macOS proxies. If an application has its own proxy configuration, enter the Rola IP parameters inside the application. If it supports a local HTTP or SOCKS proxy endpoint, refer to the Rola Connect port forward guide. Do not repeatedly overwrite the global proxy just because one application connects directly.
Conflicts Between iCloud Private Relay, VPN, and the Proxy
Private Relay, VPNs, browser extensions, and the system proxy may control different traffic. During troubleshooting, keep only one configuration source active at a time. A managed device or enterprise network may require a VPN to access the PAC file or proxy gateway, so confirm organizational policy before disabling it.
Mac Proxy Security Checklist
- Use only approved proxy services, and do not expose real passwords in screenshots, command history, or shared documents.
- Do not use
curl -kor disable TLS certificate verification to hide connection problems. - Do not treat a proxy as a guarantee of end-to-end encryption or anonymity; destination HTTPS, DNS, and application behavior must still be evaluated separately.
- Record the original settings before making changes. After testing, restore the required original configuration, disable temporary proxy settings, and unset temporary credential variables.
- Free public proxies are not suitable as a production diagnostic baseline because their addresses, logging policies, and operators are often unverifiable. Use proxies only in accordance with target website terms, organizational network policy, and applicable laws.
Conclusion
The key to configuring mac proxy server settings correctly is to use the current network service, enable only the protocols you need, and verify connectivity, authentication, exit attributes, and application coverage separately. Rola IP users should copy the complete parameters from the dashboard, validate the proxy path with controlled commands first, and then write the settings into macOS.
If the browser works but another application fails, check the application’s own proxy and authentication support before changing the system configuration.
Ready to configure your connection? Visit Rola IP, sign in to your account, generate the endpoint and credentials for your selected network, and complete the browser and curl checks above before using the proxy in your workflow.