Safari Browser Proxy Settings: Mac, iPhone, and iPad

Aug 20, 2026 · Guides · 9 min read
Safari browser proxy settings are not stored in a separate Safari-only profile. On a Mac, Safari opens the proxy controls for the active macOS network service. On an iPhone or iPad, the built-in manual proxy is configured for the Wi-Fi network you are currently using. This guide shows you where to enter the server, port, and credentials, how to verify the new exit IP, and how to undo the configuration safely.
| Device | Fastest path | Normal scope |
|---|---|---|
| Mac through Safari | Safari > Settings > Advanced > Change Settings next to Proxies | Safari and other apps that honor the selected macOS network service |
| Mac through System Settings | System Settings > Network > active service > Details > Proxies | The selected Wi-Fi or Ethernet service |
| iPhone or iPad | Settings > Wi-Fi > Info beside the connected network > Configure Proxy | That saved Wi-Fi network |
Before changing anything, take a screenshot of the existing proxy panel or record every option that is enabled. That gives you a reliable restore point if the new configuration prevents pages from loading.
Documentation reviewed: August 19, 2026. Menu labels may differ on older operating systems or when the device language is not English.
How Safari Proxy Settings Work
On a Mac, Safari sends web requests through the proxy rules attached to the active network service. Its proxy button therefore opens macOS Network settings instead of an independent Safari proxy engine. The change may affect other compatible apps, although apps with their own network stack can ignore it.
On an iPhone or iPad, HTTP Proxy is saved with one Wi-Fi network. Another Wi-Fi network does not inherit it, and the ordinary setting does not configure cellular traffic.
What You Need Before You Start
A working setup normally requires:
- Proxy hostname or IP address
- Port number
- Provider-specified protocol
- Username and password, unless the provider uses IP allowlisting
- A full PAC URL when using automatic configuration
- A page for checking the public IP before and after the change
ROLA IP users can obtain the host, port, username, and password from the proxy quick start. Add location or session parameters only after the basic connection works.
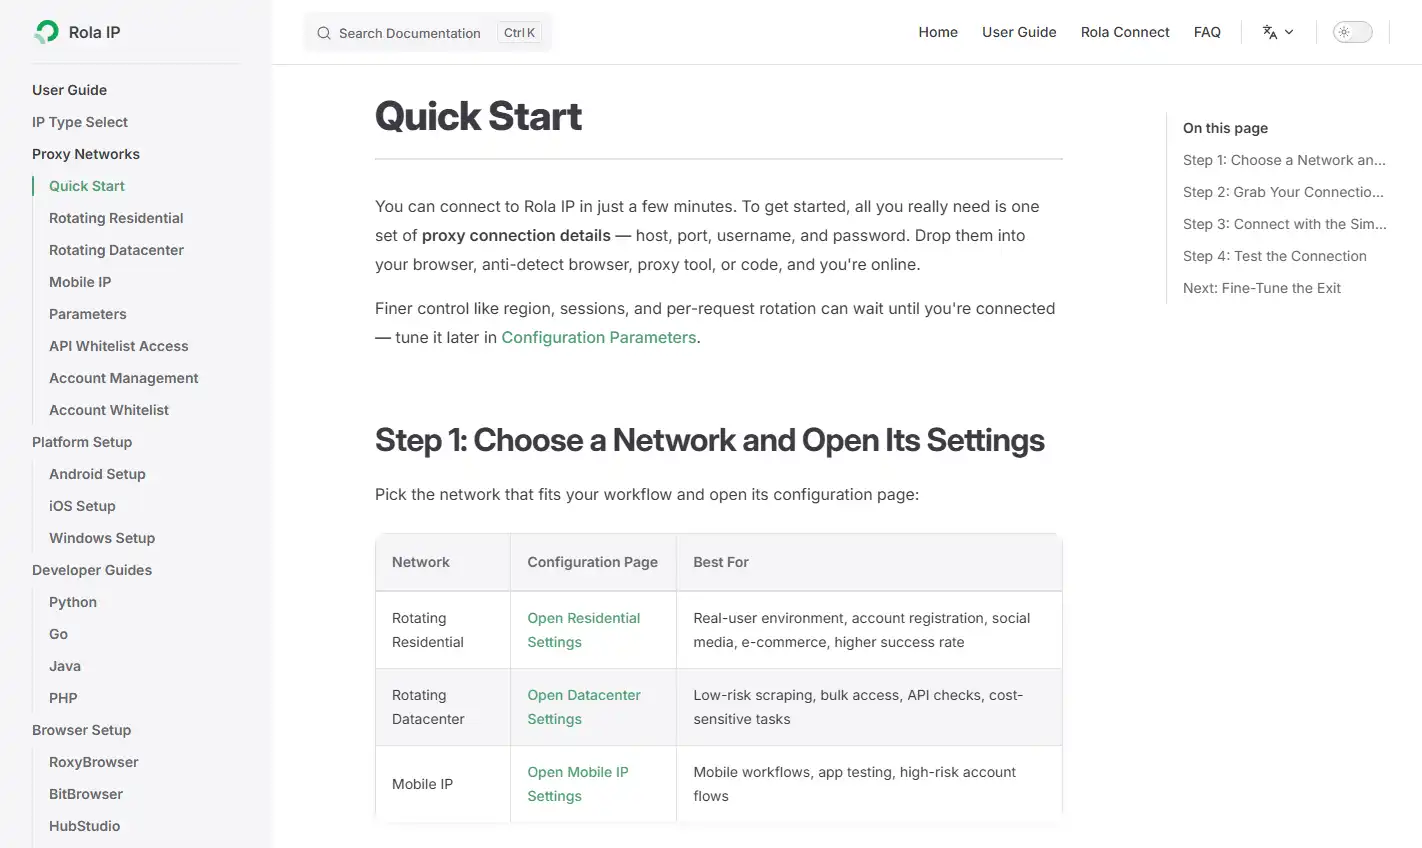
ROLA IP Quick Start shows where users begin before copying their connection details.
| Provider value | Safari or macOS field | Safe example |
|---|---|---|
| Host or endpoint | Proxy server | proxy.example.com |
| Port | Port | 12345 |
| Username | User name | user-country-us |
| Password | Password | example-password |
| PAC address | Automatic proxy configuration URL | https://example.com/proxy.pac |
The examples above are placeholders. Never publish a live endpoint, password, allowlisted address, or full account name in a screenshot.
How to Configure Safari Proxy Settings on Mac
Both routes below open the same macOS proxy panel.
Method 1: Open Proxy Settings from Safari
- Open Safari.
- Choose Safari > Settings from the menu bar.
- Select Advanced.
- Click Change Settings next to Proxies.
- macOS opens the Network proxy settings for you.
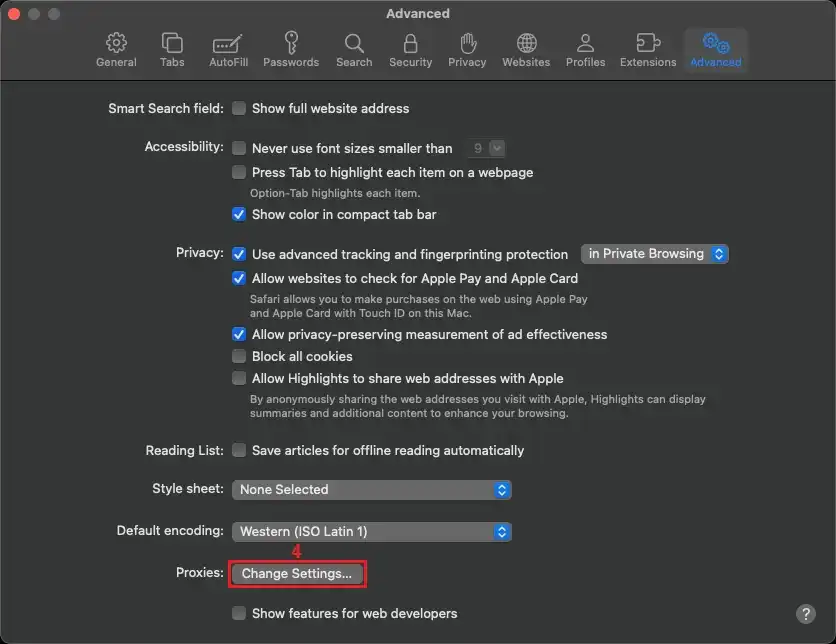
In Safari’s real Advanced settings screen, Change Settings beside Proxies opens the macOS network controls.
Method 2: Open Proxy Settings from macOS
- Open the Apple menu > System Settings.
- Select Network in the sidebar.
- Select the Wi-Fi or Ethernet service marked as connected.
- Click Details.
- Select Proxies.
Older macOS releases may use System Preferences > Network > Advanced > Proxies.
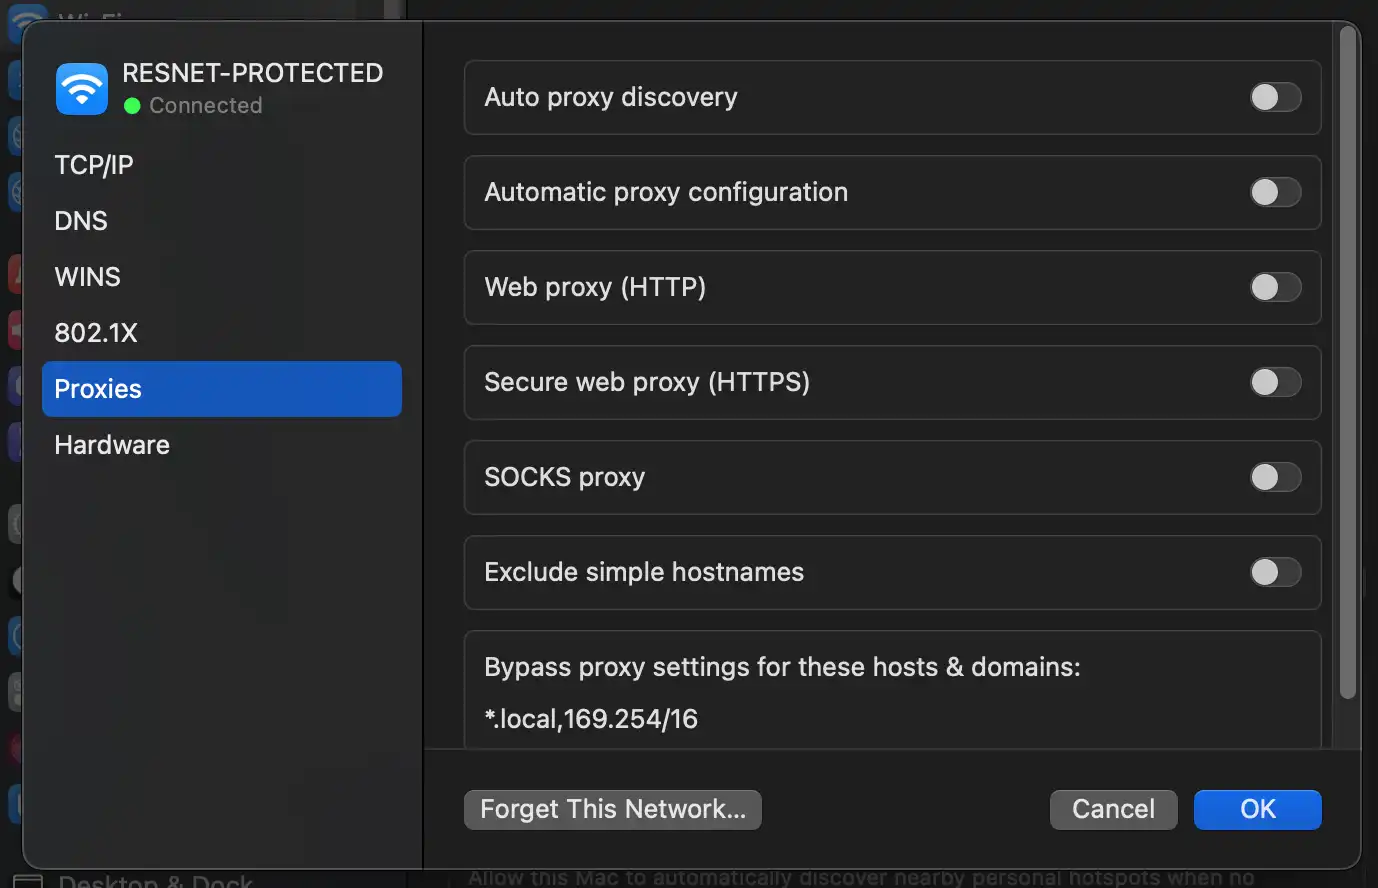
The real macOS Proxies panel lists automatic discovery, PAC, HTTP, HTTPS, SOCKS, and bypass controls for the selected network.
Configure an HTTP or HTTPS Proxy
The macOS proxy panel offers separate controls for Web proxy (HTTP) and Secure web proxy (HTTPS). Enable only the services your provider tells you to use.
- Select the required proxy service.
- Enter the proxy server address.
- Enter the port.
- If credentials are required, enable Proxy server requires password.
- Enter the username and password.
- Click OK, then confirm or apply the network change if prompted.
Follow the provider’s protocol instructions rather than choosing a service only from the endpoint text. If both HTTP and HTTPS traffic must use the proxy, the provider may require entries under both services. Do not enable unrelated options just in case.
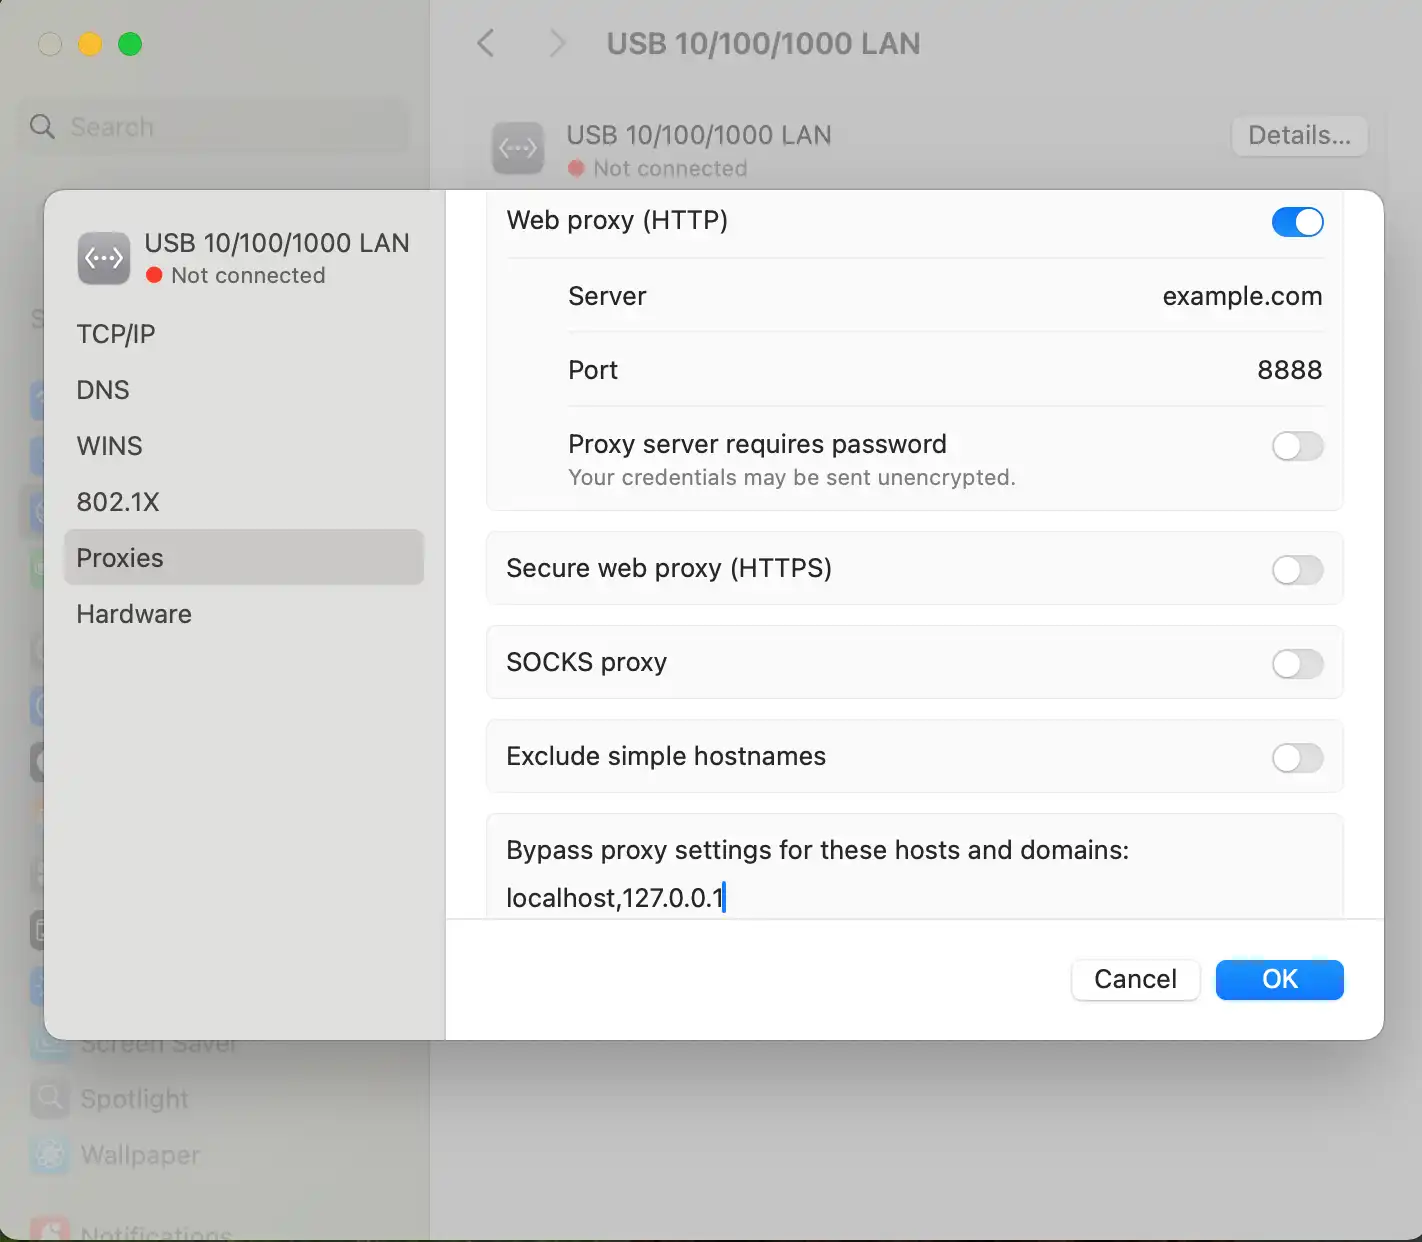
A real macOS HTTP proxy form showing where the server, port, password option, and bypass list appear. The visible values are safe examples, not live ROLA IP credentials.
Advanced Mac Settings: SOCKS, PAC, and Bypass Rules
Use the advanced options only when the provider or network administrator requires them.
| Option | Use it when | Main risk |
|---|---|---|
| Web proxy (HTTP) | The provider supplies an HTTP endpoint for web traffic | Wrong protocol, port, or authentication prevents requests |
| Secure web proxy (HTTPS) | The provider instructs you to configure secure web traffic separately | It should not be selected based on guesswork |
| SOCKS proxy | The provider explicitly supports a compatible SOCKS endpoint | The iPhone HTTP Proxy screen is not an equivalent SOCKS control |
| Automatic proxy configuration | You have a valid PAC URL | An invalid or unreachable PAC file can break routing |
| Auto proxy discovery | Your organization publishes discoverable proxy settings | It is not a replacement for a provider-supplied manual endpoint |
Configure a SOCKS Proxy on Mac
Enable SOCKS proxy, enter the supplied server and port, and add authentication if required. Confirm the SOCKS version and authentication method with the provider.
Use a PAC File
Select Automatic proxy configuration and enter the complete PAC URL. A PAC file can proxy some hosts and return DIRECT for others. Auto proxy discovery is separate and should be enabled only when the network is configured for it.
Add Bypass Rules
The bypass field sends selected hosts directly. Safe examples include localhost, 127.0.0.1, and internal.example. Keep the list narrow so it does not bypass more traffic than intended.
How to Configure Safari Proxy Settings on iPhone or iPad
Safari proxy settings on an iPhone or iPad are located under the connected Wi-Fi network, not under Settings > Safari.
Configure the Proxy on iPhone
- Open Settings > Wi-Fi.
- Confirm that the intended network is connected.
- Tap the Info button beside that network.
- Scroll to HTTP Proxy and tap Configure Proxy.
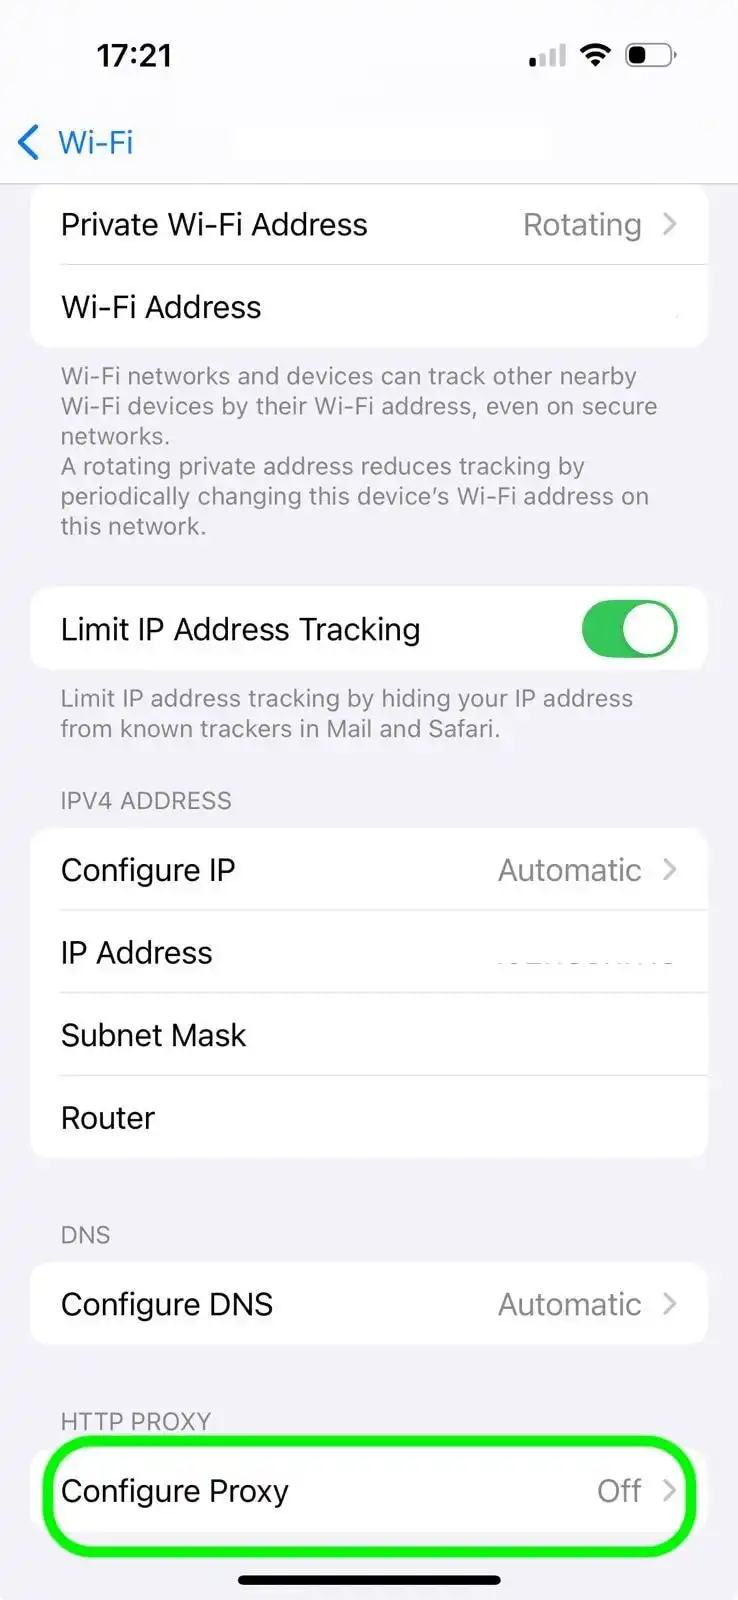
On a real iPhone, Configure Proxy appears near the bottom of the connected Wi-Fi network’s details.
- Select Manual.
- Enter the server and port.
- Enable Authentication only when required.
- Enter the username and password.
- Tap Save.
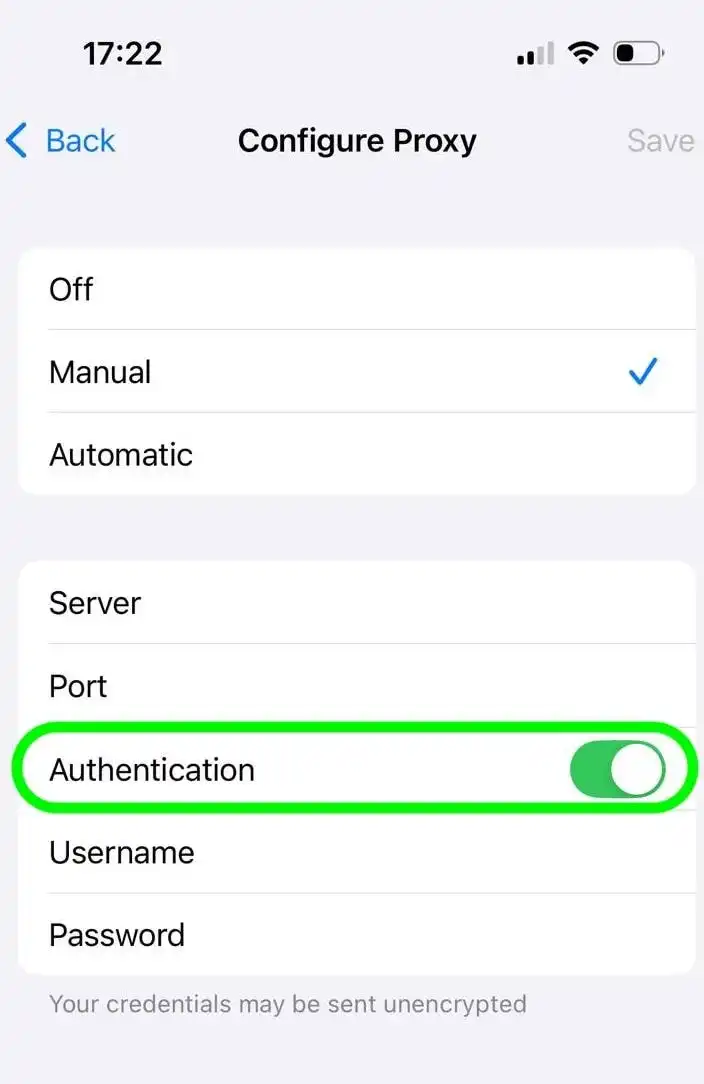
The real iPhone Manual screen contains the server, port, authentication, username, and password fields used by Safari on that Wi-Fi network.
After saving, test Safari. If nothing loads, select Off while checking the host, port, and credentials.
Configure the Proxy on iPad
The route is the same on iPadOS, but the Settings app normally uses a wider split-pane layout.
- Open Settings > Wi-Fi.
- Find the connected network.
- Tap its Info button.
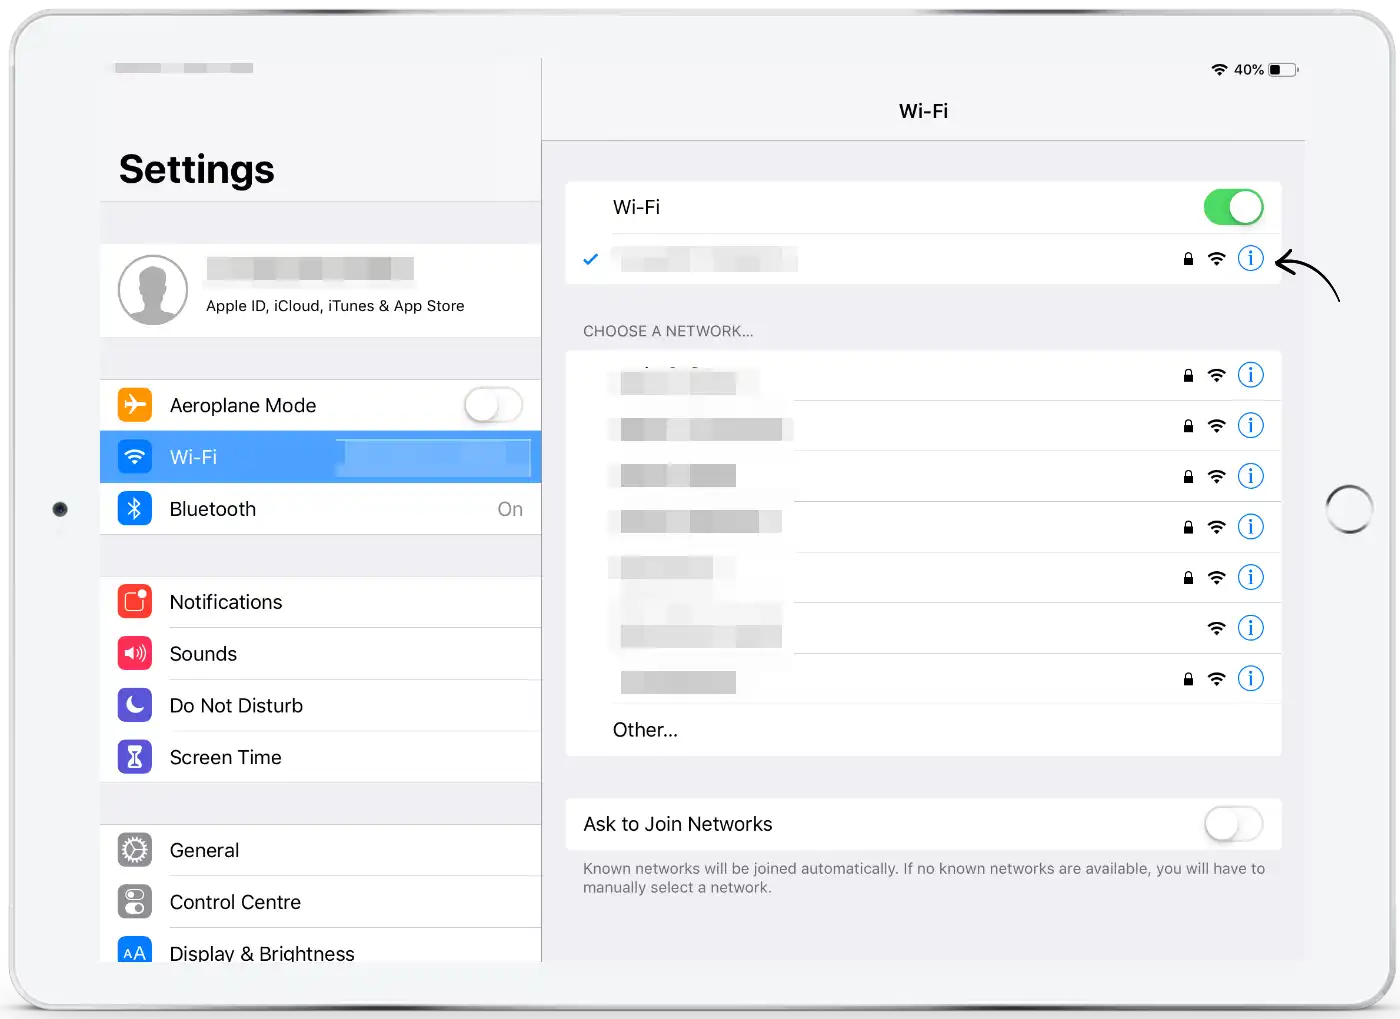
A real iPad Settings screen showing where to open the connected Wi-Fi network’s details.
- Scroll to HTTP Proxy and tap Configure Proxy.
- Select Manual.
- Enter the server and port.
- Enable Authentication and enter credentials only when required.
- Tap Save.
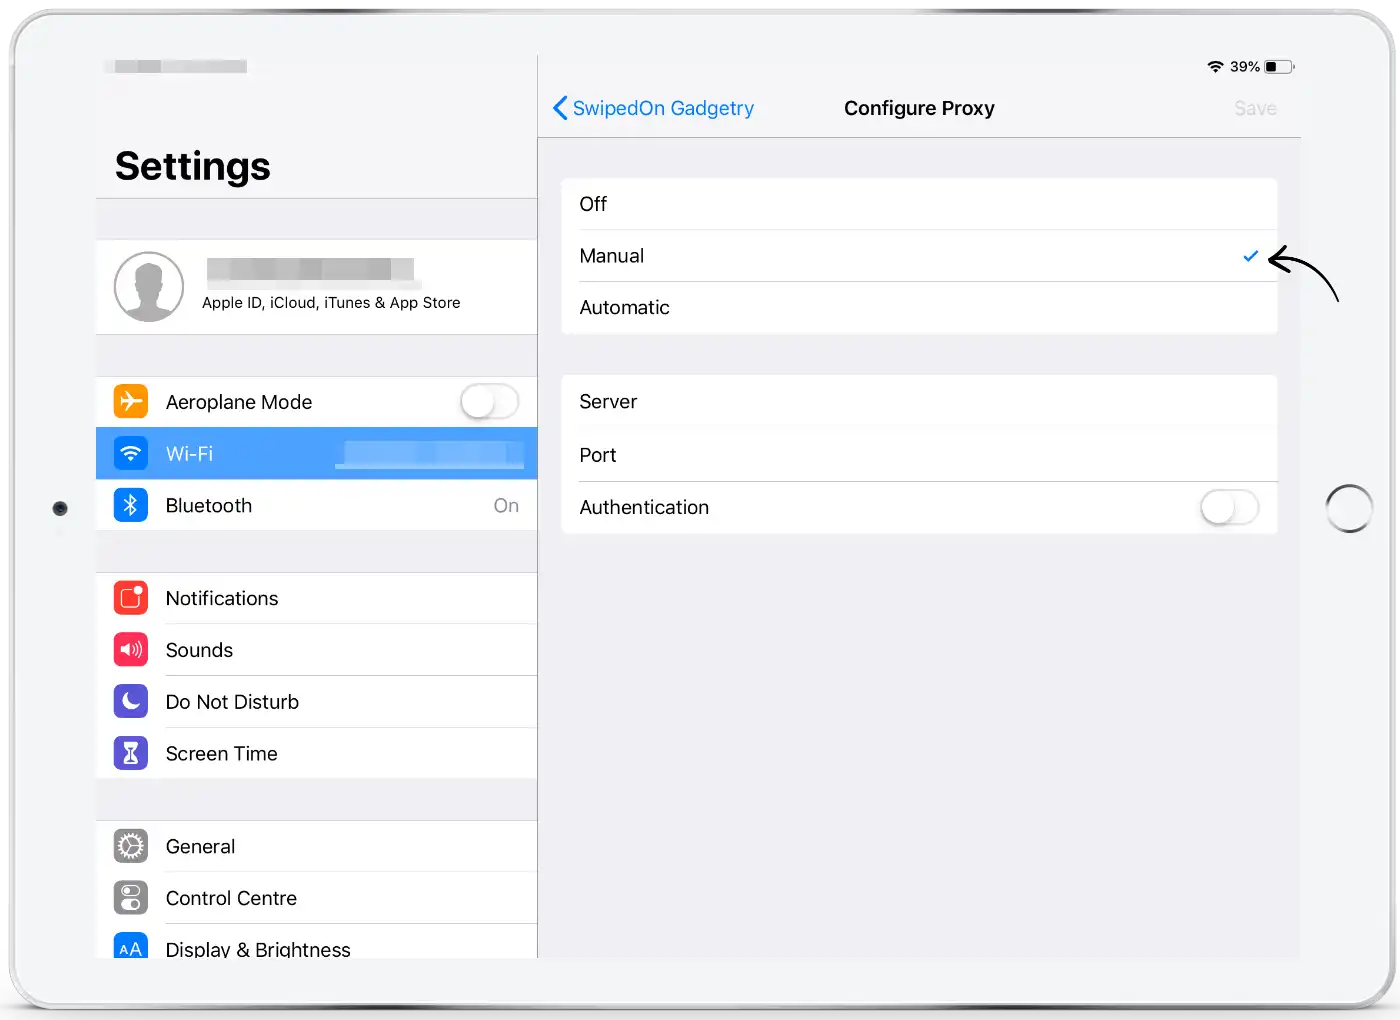
The real iPad Manual screen uses the same proxy fields as iPhone, displayed in iPadOS’s wider layout.
After saving, test Safari. If nothing loads, select Off while checking the host, port, and credentials.
Use Automatic Proxy Configuration on iPhone or iPad
If an administrator or provider supplies a PAC address:
- Return to Configure Proxy.
- Select Automatic.
- Enter the complete PAC URL.
- Save the setting and test Safari.
The configuration remains associated with that Wi-Fi network. You may need to repeat it after joining a different network.
How to Verify That the Safari Proxy Works
A page loading does not prove that Safari used the proxy. Verify the exit address.
- Before enabling the proxy, open what is my IP and record the public IP, country, ISP, and ASN.
- Apply the proxy settings.
- Close and reopen Safari.
- Run the same check again.
- Confirm that the visible network details match the expected proxy endpoint or location.
- Open a normal HTTPS site to make sure secure browsing also works.
| Check | Before proxy | After proxy | Pass condition |
|---|---|---|---|
| Public IP | Your direct address | Proxy exit address | Changes as expected |
| Country or region | Original location | Requested proxy location | Matches the selected endpoint |
| ISP or ASN | Local connection | Proxy network | Reflects the expected proxy pool |
| HTTPS page | Loads directly | Loads through the proxy | No connection or certificate error |
With a rotating proxy, verify the expected country, network pool, and session behavior rather than one permanent IP. A changed IP does not erase cookies, account history, browser storage, or device characteristics.
How to Disable or Reset the Safari Proxy
Disable the Proxy on Mac
- Return to System Settings > Network > active service > Details > Proxies.
- Turn off the manual proxy, PAC, or discovery options you enabled.
- Click OK and confirm the change.
- Repeat the IP check to confirm that the direct connection has returned.
Restore any option that was already required by your organization.
Disable the Proxy on iPhone or iPad
- Open Settings > Wi-Fi.
- Tap the information button beside the connected network.
- Open Configure Proxy.
- Select Off.
- Tap Save, then test Safari again.
Safari Proxy Not Working: Symptoms and Fixes
Diagnose one visible symptom at a time.
| Symptom | Likely cause | How to verify | Fix |
|---|---|---|---|
| Safari cannot load any page | Wrong host, port, protocol, or unreachable endpoint | Compare every field with the provider dashboard | Correct the endpoint or temporarily disable the proxy |
| Password prompt repeats or error 407 appears | Invalid credentials, username format, or authentication method | Recopy the credentials and check whether IP allowlisting is required | Replace the credentials or update the allowlist |
| Public IP does not change | Wrong network service or a PAC rule returns DIRECT |
Check the active Wi-Fi/Ethernet service and PAC behavior | Configure the active service or correct the PAC rule |
| Mac works but iPhone does not | The endpoint is not compatible with the iPhone HTTP proxy or the wrong Wi-Fi is selected | Confirm the network and provider protocol | Use a compatible HTTP endpoint and re-enter the fields |
| HTTP works but HTTPS pages fail | Protocol mismatch, interception, or certificate problem | Compare an HTTP page with a normal HTTPS page | Follow the provider’s secure-proxy instructions; do not install an untrusted root certificate |
| Proxy stops after changing Wi-Fi | The iPhone setting is saved per network | Inspect the new network’s details | Configure that network separately |
| Results are inconsistent while a VPN or privacy service is active | More than one service is changing the route | Disable one service temporarily and retest | Use one approved routing configuration during diagnosis |
| Public Wi-Fi sign-in page does not appear | The proxy blocks the captive portal | Select Off temporarily | Complete the Wi-Fi sign-in, then restore the proxy |
You can also run the endpoint through a proxy checker before repeatedly changing Safari. This separates an invalid or unavailable proxy from a device-configuration problem.
Which Proxy Type Should You Use with Safari?
| Option | Suitable use | Main limitation |
|---|---|---|
| HTTP/HTTPS proxy | General browsing and authorized regional testing | Must match the provider’s protocol and authentication instructions |
| SOCKS proxy on Mac | Workflows specifically supporting SOCKS | Not equivalent to the iPhone HTTP Proxy screen |
| PAC file | Conditional routing and bypass rules | Depends on a correct and reachable PAC file |
| Static residential proxy | Sessions that need a consistent exit | The fixed address and account access must be protected |
| Rotating endpoint | Repeated authorized requests or regional pool testing | The visible IP may change unless session controls are used |
ROLA IP provides generated connection details for several proxy networks. Choose according to session stability, region, and rotation needs. No proxy guarantees third-party access or complete anonymity.
Security and Privacy Limits
A proxy changes the route, but it does not automatically:
- Clear Safari cookies or local storage
- Remove browser and device characteristics
- Separate activity performed in the same account
- Encrypt every connection beyond what the underlying protocol provides
- Make an untrusted proxy safe
Avoid unknown free proxies for sensitive traffic, and never install an untrusted root certificate to suppress HTTPS errors. Private Browsing, Private Relay, VPNs, and proxies are not interchangeable. Use proxies only for authorized activity.
Configure, Verify, and Keep a Restore Path
The reliable order is simple:
Record the original settings > map the provider fields > configure the active network > verify the exit IP > test HTTPS > document how to disable the proxy.
Do not assume that a page loading means the expected proxy is active. Keep a restore point and verify the public IP.
Technical sources: Apple Safari User Guide: Change Safari settings; Apple Mac User Guide: Change proxy settings; Apple Support: Configure proxy settings on iPhone and iPad.