iPhone Proxy Settings: Manual, PAC, SOCKS5 & How to Turn Off

Sep 17, 2026 · Guides · 14 min read
To configure iPhone proxy settings, connect to the target Wi-Fi network, go to Settings → Wi-Fi → ⓘ next to the current network → Configure Proxy, then choose Manual to enter the server, port, and authentication details, or choose Automatic to enter a PAC URL. After saving, verify the exit through an IP lookup page and an HTTPS page.
This guide is for Safari regional-page checks, ad verification, and authorized mobile QA. It covers Manual and PAC settings, Rola IP connection parameters, a SOCKS5 client workflow, and troubleshooting. The screenshots illustrate interface controls; they are not a record of a verified connection on your device. Menu labels may vary by iOS or client version.
TL;DR
The built-in iPhone proxy applies to the selected Wi-Fi network and apps that honor its proxy settings; it does not configure cellular traffic. Choose Manual for an HTTP proxy hostname and port, or Automatic for a PAC URL. For SOCKS5 or cellular use, choose a compatible proxy client and verify its actual routing. Test a request that should use the proxy, check its exit IP, and open the target HTTPS page. To disable the Wi-Fi proxy, choose Off and save; disconnect any proxy client separately.
What Are iPhone Proxy Settings?
iPhone proxy settings are the HTTP proxy configuration for the current Wi-Fi network. They forward requests from apps that follow the system proxy settings to a specified proxy server.
A proxy sits between the iPhone and the destination website. The destination normally sees the proxy’s exit IP rather than the public IP of the current Wi-Fi connection. This can be useful for authorized regional-content checks, ad and search-result verification, network-quality testing, and business access that requires a fixed exit IP.
However, a proxy does not automatically make all traffic “anonymous.” HTTPS content still depends on end-to-end TLS. A proxy may be able to observe connection destinations and traffic metadata, but it should not decrypt content without authorization. Choosing a trusted provider, protecting credentials, and following website terms and local laws are more important than simply changing an IP address.
| Connection Type | Covered by the Built-in iPhone Setting? | Key Point |
|---|---|---|
| Current Wi-Fi | Yes | The setting is saved per network; switching to another Wi-Fi network requires a separate configuration. |
| Cellular data | No | The built-in Configure Proxy setting does not apply to 4G/5G; use a compatible VPN/proxy client or an administrator-deployed routing policy. |
| Safari | Usually | Safari uses the system networking stack and is suitable for validating a manual HTTP proxy. |
| Third-party apps | Not guaranteed | An app may use a networking path that does not honor the system proxy. |
| SOCKS5 | Cannot be entered directly | The standard Wi-Fi page is for HTTP Proxy; SOCKS5 requires a trusted third-party client. |
Apple’s iPhone User Guide provides guidance on connecting to the internet. Organizations deploying proxy settings through device management should consult Apple’s Platform Deployment proxy payload documentation for deployment requirements. The personal Wi-Fi configuration below is separate from managed proxy policies.
Manual, Automatic, or a Proxy Client: Which Should You Choose?
Choose Manual when you have a Host, Port, and account credentials; choose Automatic when you have a PAC URL; consider a trusted proxy client only when you need SOCKS5, cellular coverage, or broader traffic routing.
| Method | Information Needed | Best For | Main Limitation |
|---|---|---|---|
| Manual | Server, Port, optional Username/Password | One Wi-Fi network, short-term testing, fixed gateway | Must be configured separately for each Wi-Fi network; does not directly support SOCKS5. |
| Automatic/PAC | PAC file URL | Enterprises, schools, or multi-rule routing | The PAC URL must be reachable and the script must be valid. |
| Proxy client/VPN configuration | App, node parameters, system permission | SOCKS5, cellular data, rule-based or global routing | Depends on a third-party app; broader scope also means higher permissions. |
The HTTP Proxy section in iPhone Wi-Fi settings configures an HTTP proxy for that network. It can forward HTTP requests and, when the proxy supports CONNECT tunneling, carry HTTPS connections without decrypting their content. HTTPS traffic through an HTTP proxy does not by itself mean the connection to the proxy is TLS-encrypted.
What Do You Need Before You Set Up a Proxy on iPhone?
Before you start, prepare at least the Server, Port, and authentication method. If you use Automatic mode, you also need the complete PAC URL.
- Server/Host: Enter only the proxy hostname or IP address in the iPhone Server field. Enter the port separately; do not paste a URL, credentials, or a path into Server.
- Port: A number from 1 to 65535 that must match the product endpoint.
- Authentication: For username/password authentication, prepare the Username and Password. IP allowlist mode usually does not require this switch.
- Protocol: For the built-in Wi-Fi page, use an HTTP proxy endpoint that supports CONNECT when you need HTTPS websites. Do not assume an endpoint requiring TLS to the proxy is interchangeable with a plain HTTP endpoint. SOCKS5 needs a compatible client.
- Region and session: Rotating proxy services often encode country, city, session, and similar parameters in the username. Copy the full username exactly.
- PAC URL: Use the full administrator-provided URL that serves the PAC script. HTTPS is preferable when available, but a
.pacfilename extension is not a requirement. A normal webpage or bare proxy hostname is not a substitute.
Do not confuse your proxy provider’s website login password with the proxy password. With Rola IP, copy Host, Port, Username, and Password from the proxy configuration page for your account. Use the assigned endpoint rather than copying values from an example screenshot.
How to Set Up a Proxy on iPhone Manually
Manual is the most direct iPhone proxy settings method when you already have an HTTP proxy endpoint and authentication details.
Step 1: Open Wi-Fi Settings
Open the Settings app on your iPhone.
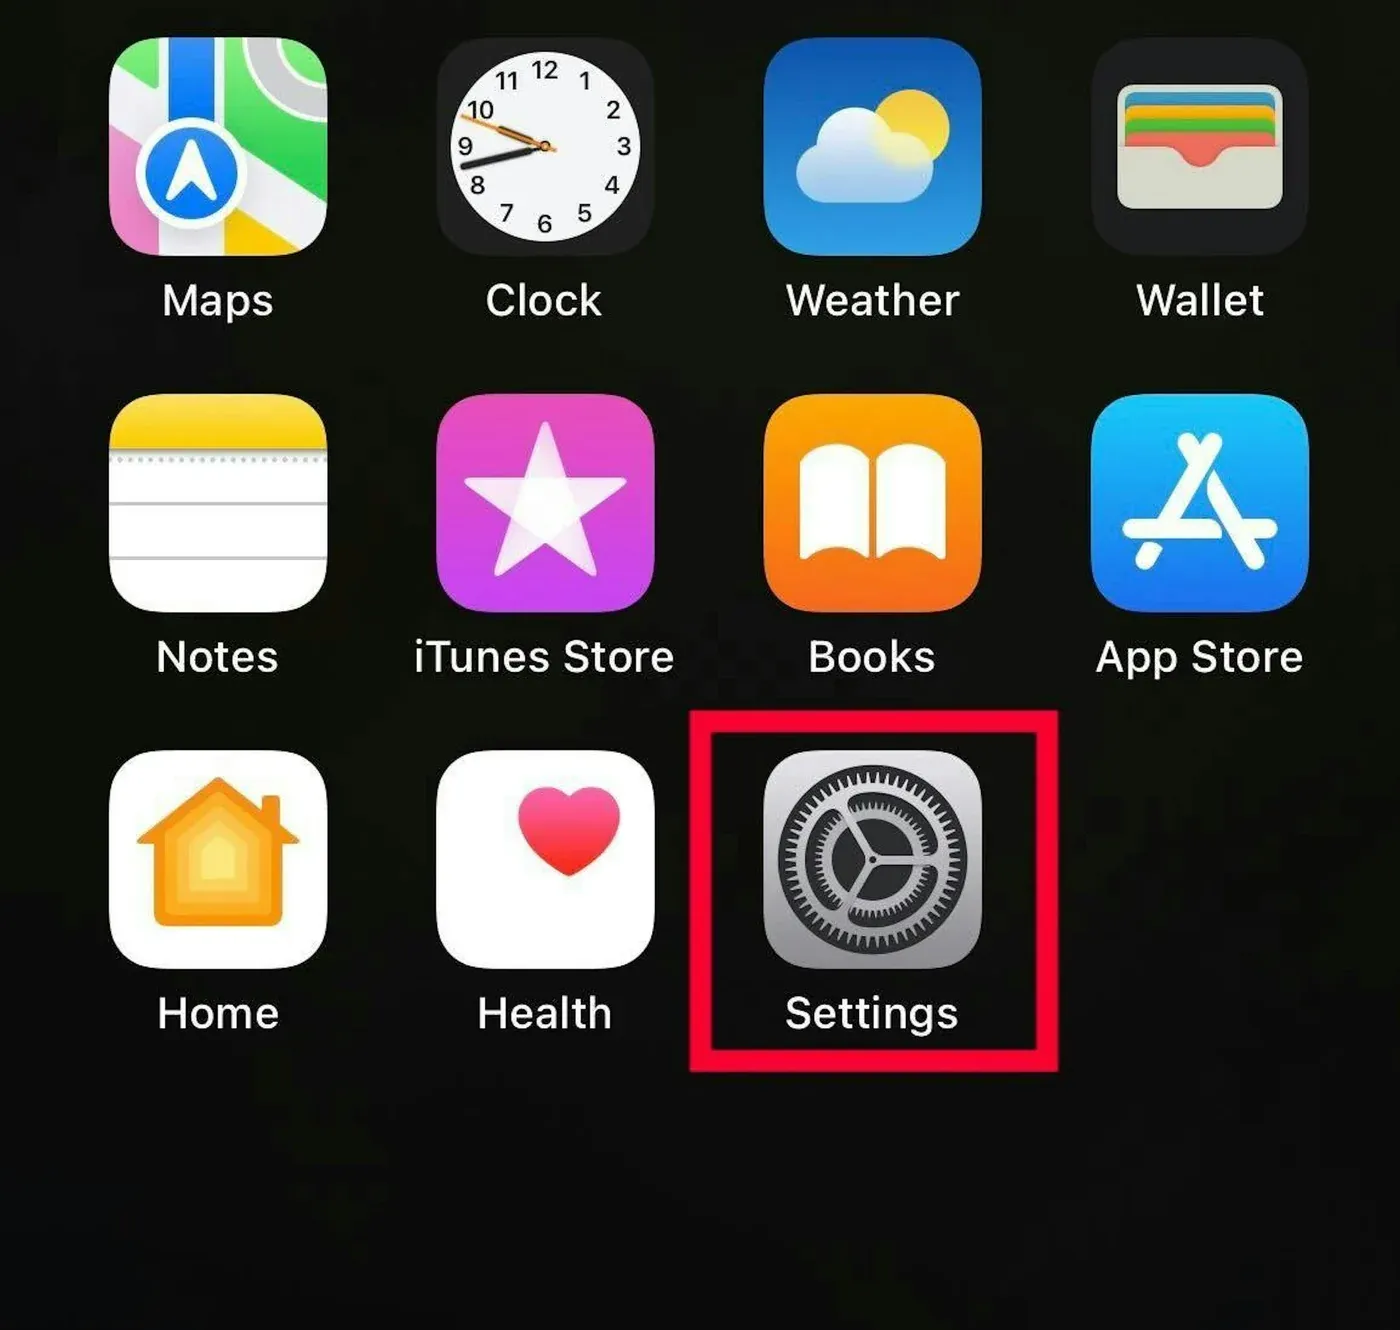
Figure 1: Open Settings from the Home Screen.
Tap Wi-Fi to view available networks and the current connection.
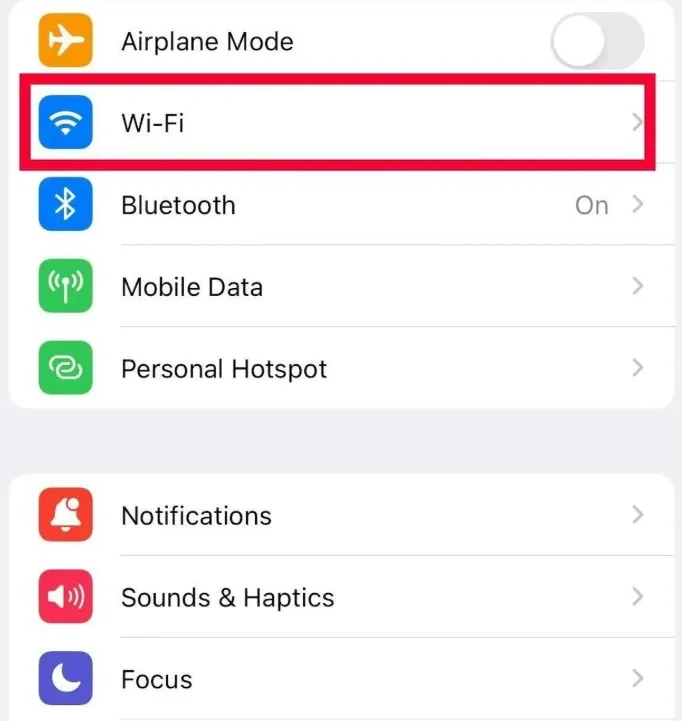
Figure 2: Open Wi-Fi. The network name shown is an example; choose your own network.
Step 2: Open the Current Network Details
Tap the blue ⓘ next to the current Wi-Fi network name. Do not open a different saved network because proxy settings are stored per network.
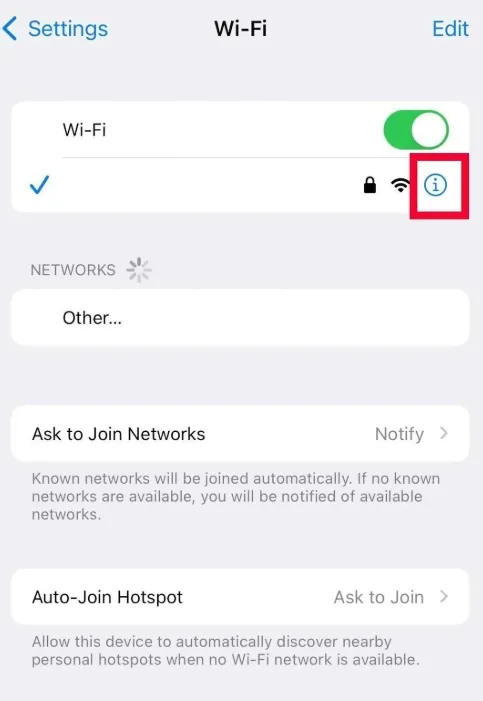
Figure 3: The blue checkmark identifies the connected network. Tap its information button to open network details.
Step 3: Find Configure Proxy
Scroll down to the HTTP Proxy section and tap Configure Proxy. If it shows Off, no proxy is currently enabled for that Wi-Fi network.
Step 4: Select Manual and Enter the Parameters
Choose Manual.
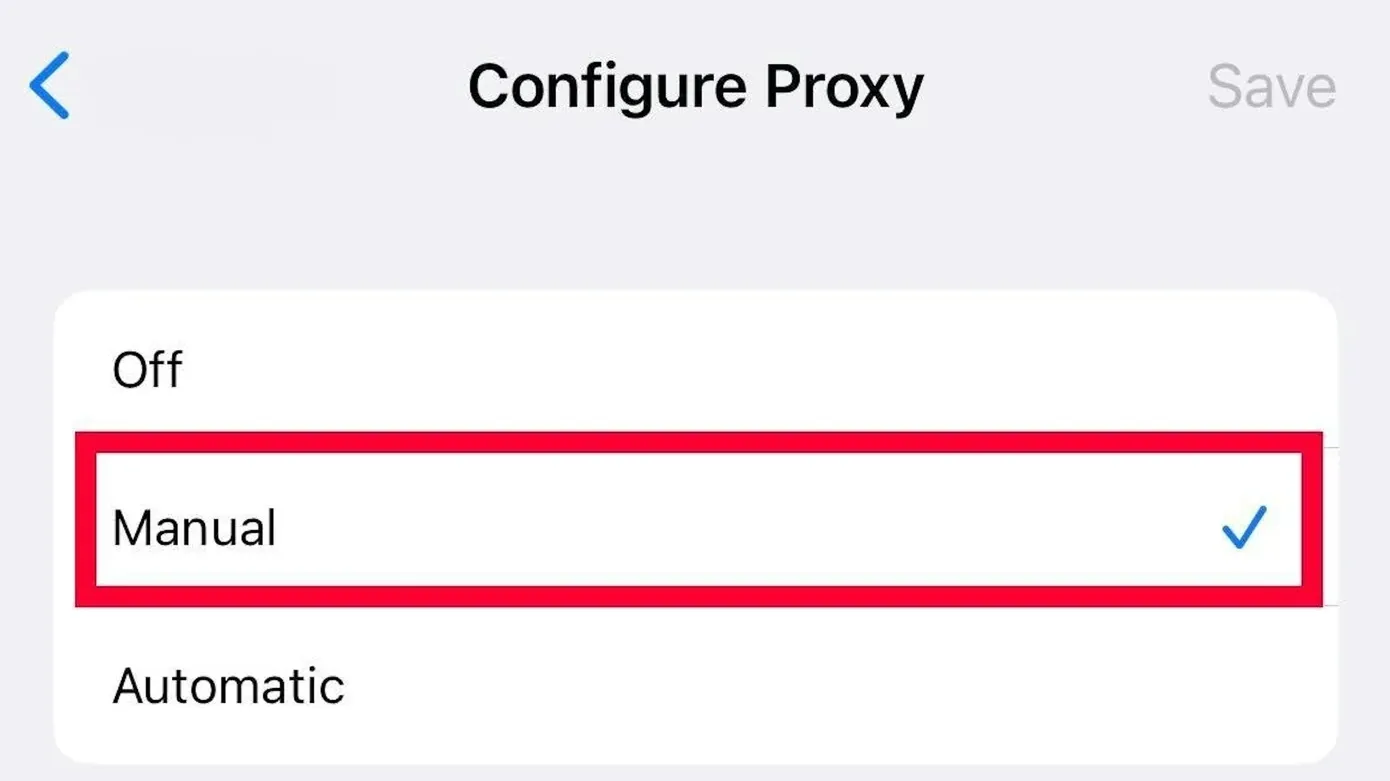
Figure 4: Select Manual to configure an HTTP proxy.
In the fields below the mode selector, enter the following:
- Server: The proxy Host or IP address, without a protocol prefix or port.
- Port: The port number supplied by the provider.
- Authentication: Turn it on when username/password authentication is required.
- Username/Password: Enter the full proxy username and proxy password, preserving capitalization and connection parameters.
- Tap Save in the upper-right corner.
If you use IP allowlist authentication, first confirm that the public IP of the current Wi-Fi network has been added to the provider’s allowlist, then leave Authentication off. Home broadband public IPs can change, while public Wi-Fi and CGNAT environments are also poor fits for allowlist-based authentication. Username/password authentication is therefore often more practical for mobile use cases.
How to Use Rola IP on iPhone
When using Rola IP, first choose the proxy network that matches the task and copy the connection parameters. Then use either iPhone Manual HTTP Proxy or a trusted proxy client depending on the protocol.
Rola IP provides rotating residential, rotating datacenter, and mobile proxy networks. For regional-page validation, mobile QA, or authorized account testing on iPhone, choosing the right product matters more than simply entering a random endpoint and trying it:
- Residential proxies: Suitable for regional content, pricing, search results, and ad landing-page validation through residential-network exits.
- Rotating Datacenter: Suitable for lower-risk network checks where speed and cost matter more.
- Mobile proxies: Suitable for app or mobile-web tests that require mobile-network exit characteristics.
- Sticky session: For login, checkout, and consecutive-page validation, request a sticky session when available. It reduces intentional rotation but does not guarantee that an exit remains available throughout the task.
Path A: Rola HTTP Endpoint + iPhone Manual
- In the Rola IP dashboard, choose a proxy network and open its configuration page.
- Copy Host, Port, Username, and Password. If you need a region or sticky session, use the proxy parameter documentation to generate the complete username.
- On the iPhone, go to Settings → Wi-Fi → ⓘ → Configure Proxy → Manual.
- Enter the Host in Server, the port in Port, enable Authentication, and enter the full credentials.
- Save the configuration, verify the IP first, and then verify the target HTTPS page.
Do not guess username parameters. Rola IP’s parameter documentation limits state and city targeting to Rotating Residential; Rotating Datacenter and Mobile IP support country-level targeting. Copy the generated username for the chosen network and session options exactly. Missing or misspelled parameters can change routing or cause authentication failures.
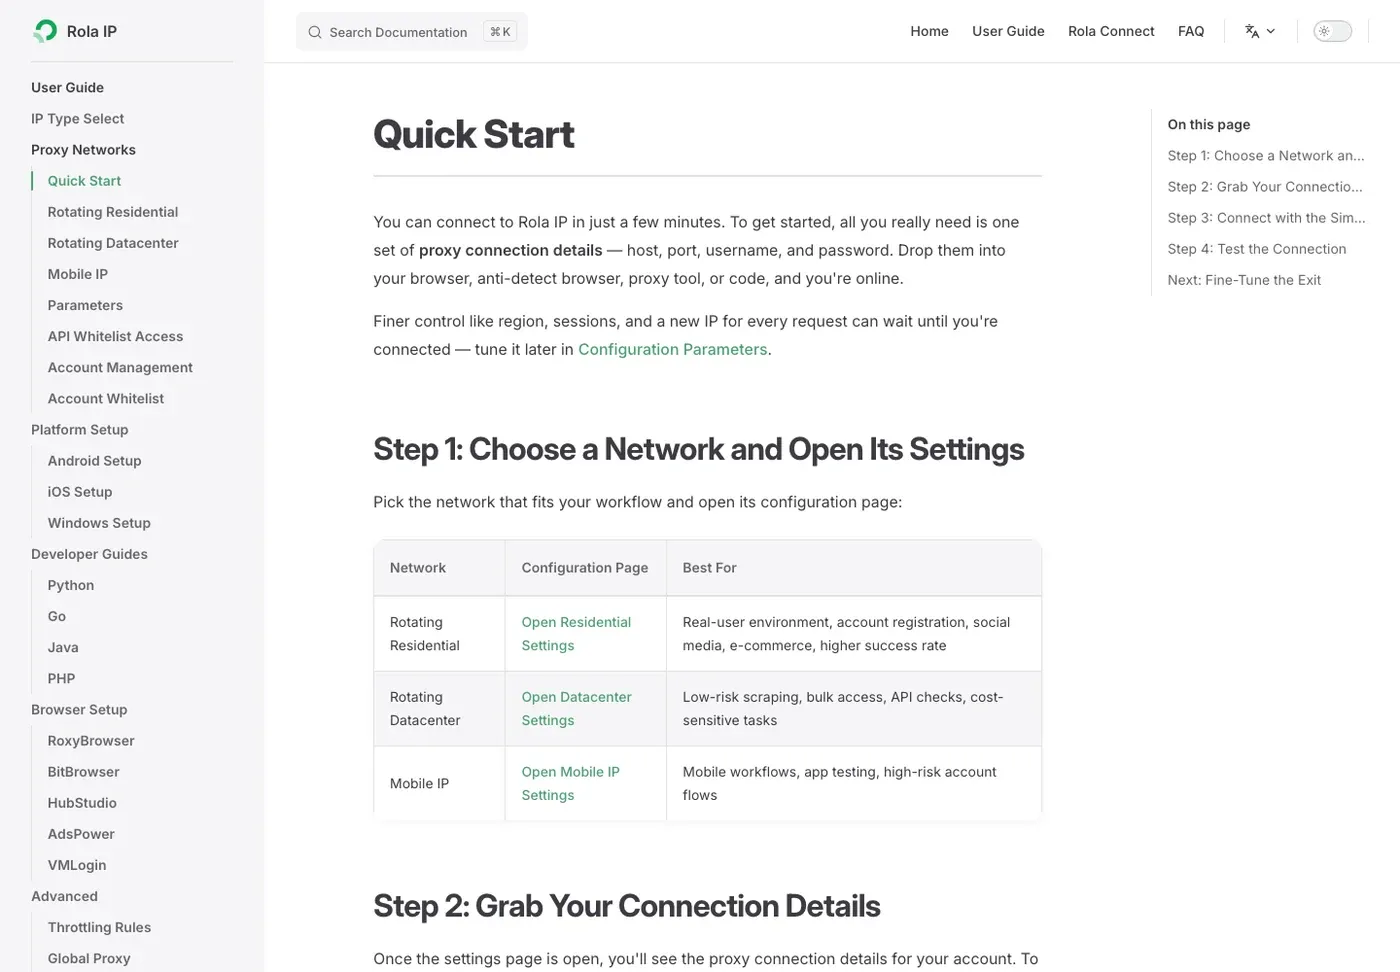
Figure 5: Rola IP Quick Start introduces host, port, username, and password and lists proxy network types.
Path B: Rola SOCKS5 + Shadowrocket
If the Rola endpoint is SOCKS5, or you need coverage across Wi-Fi and cellular data within an authorized use case, you can follow the Rola IP iOS setup guide and use a trusted client such as Shadowrocket. This path requests permission to add a VPN configuration, so its coverage and permissions are broader than Wi-Fi Manual. Obtain the app from the official App Store and verify the developer information.
Step 1: Add a Server
In Shadowrocket, tap + to add a server.
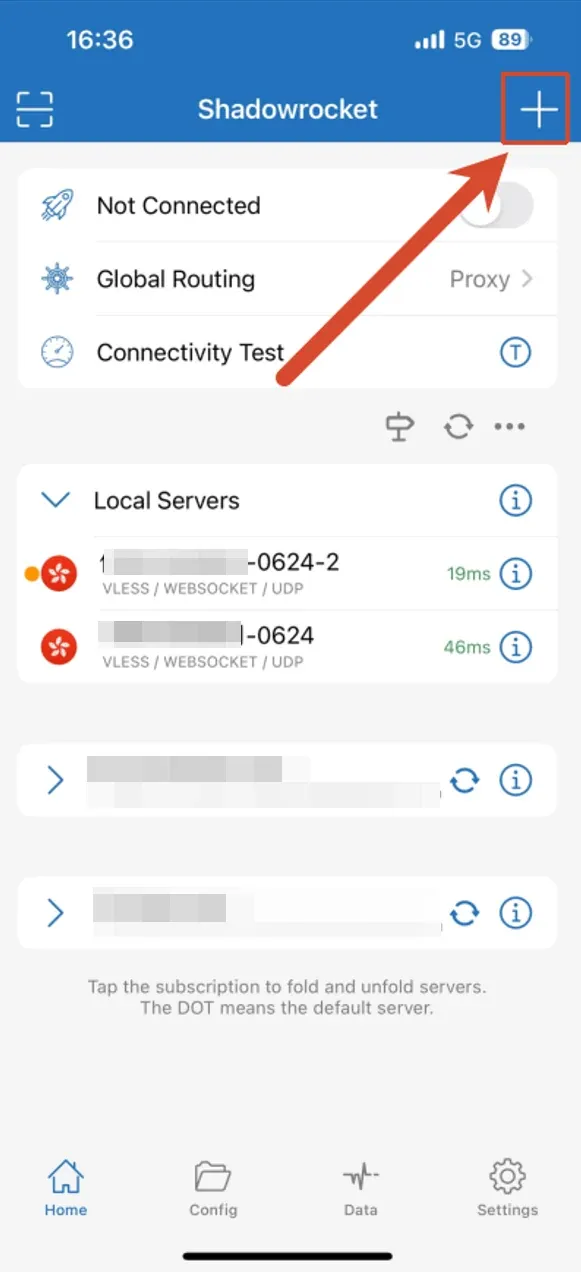
Figure 6: Tap the plus button to add a server.
Step 2: Choose the Proxy Type
Set Type to Socks5 for a SOCKS5 endpoint. Match the type to the connection details supplied for your account.
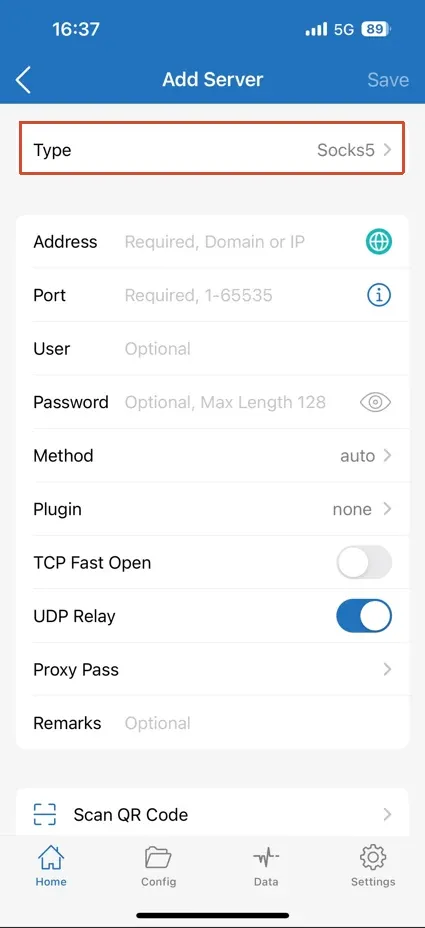
Figure 7: Select Socks5 in the Type field.
Step 3: Enter Your Rola IP Connection Details
Enter Address, Port, User, and Password from your Rola IP configuration, then tap Save. Use your own assigned values rather than copying the example account or endpoint shown below.
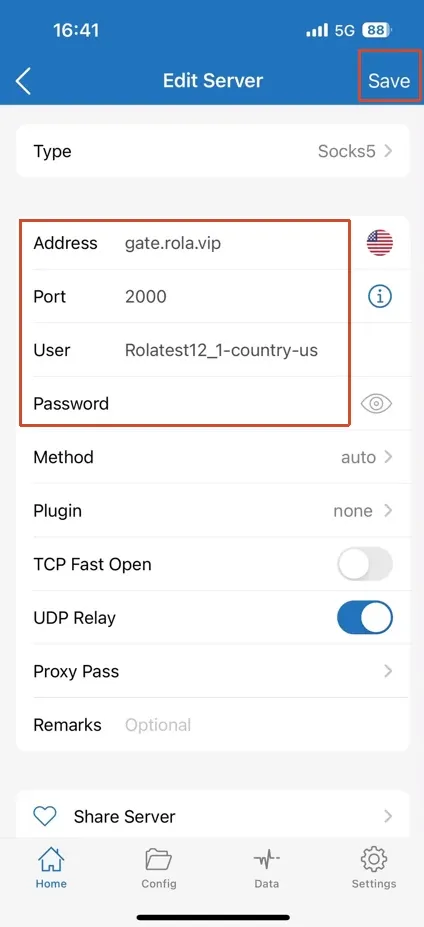
Figure 8: Fill in the connection fields and tap Save in the upper-right corner.
Step 4: Open Global Routing
On the Home screen, tap Global Routing.
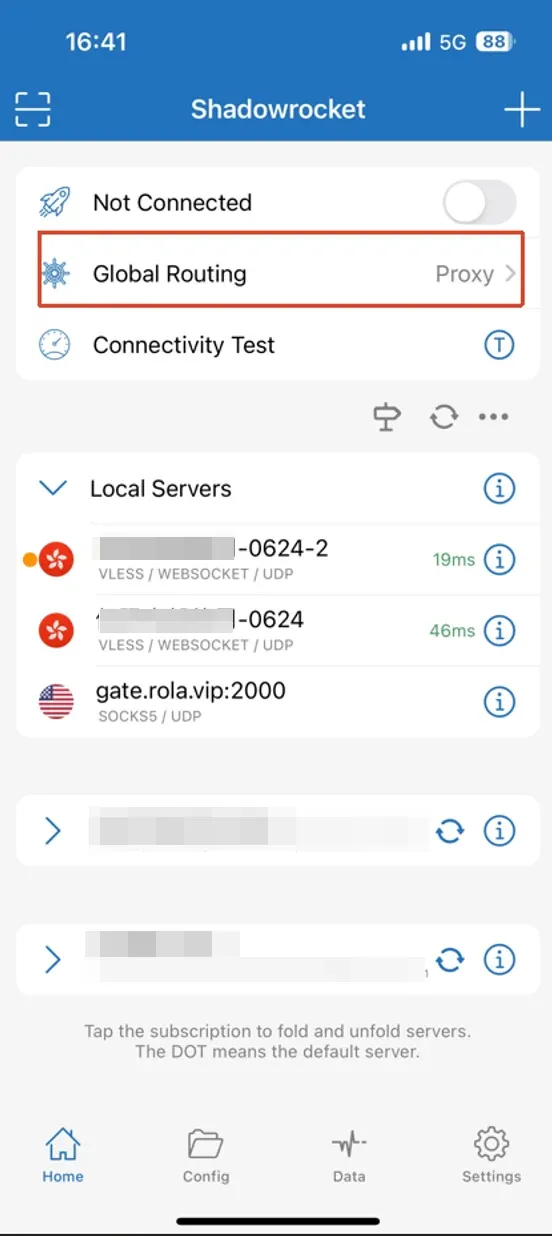
Figure 9: Open Global Routing. Select the Rola IP server separately before enabling the connection.
Step 5: Select the Routing Mode
Choose Proxy for proxy routing, or use the configuration rules required by your task.
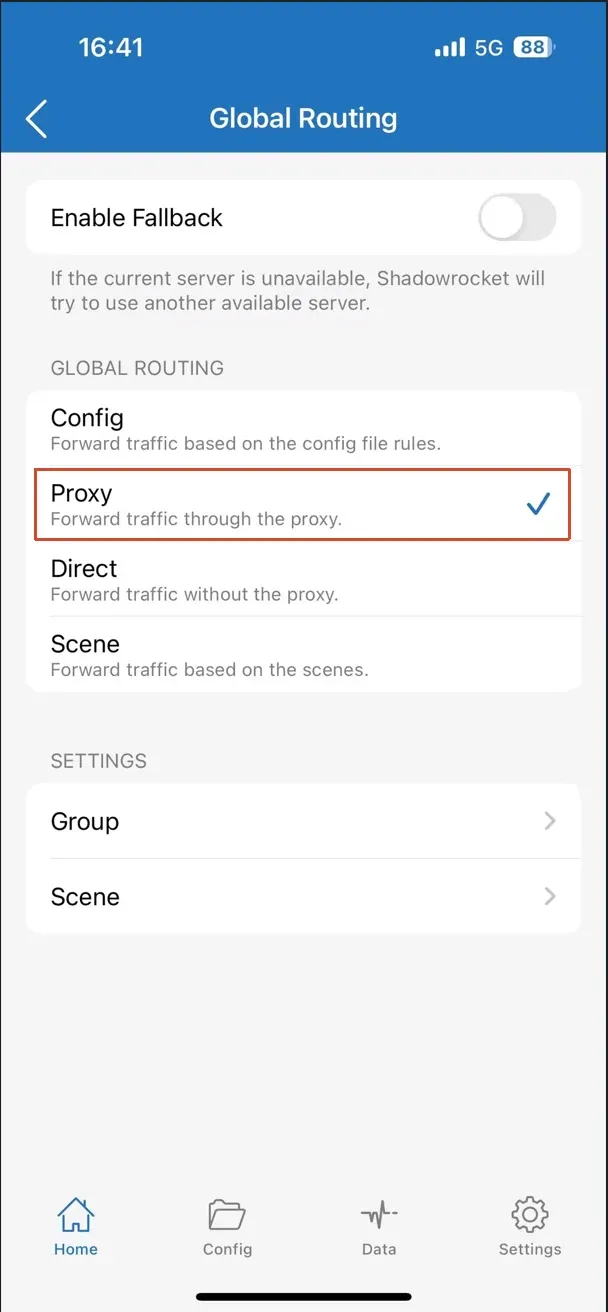
Figure 10: Select Proxy to route traffic through the selected proxy server. Verify the target app’s route separately.
Step 6: Select the Rola IP Server and Connect
Return to Home and select the Rola IP entry in Local Servers. Confirm that the selection indicator is beside that entry, then enable the connection. Approve the iOS VPN configuration request if prompted.
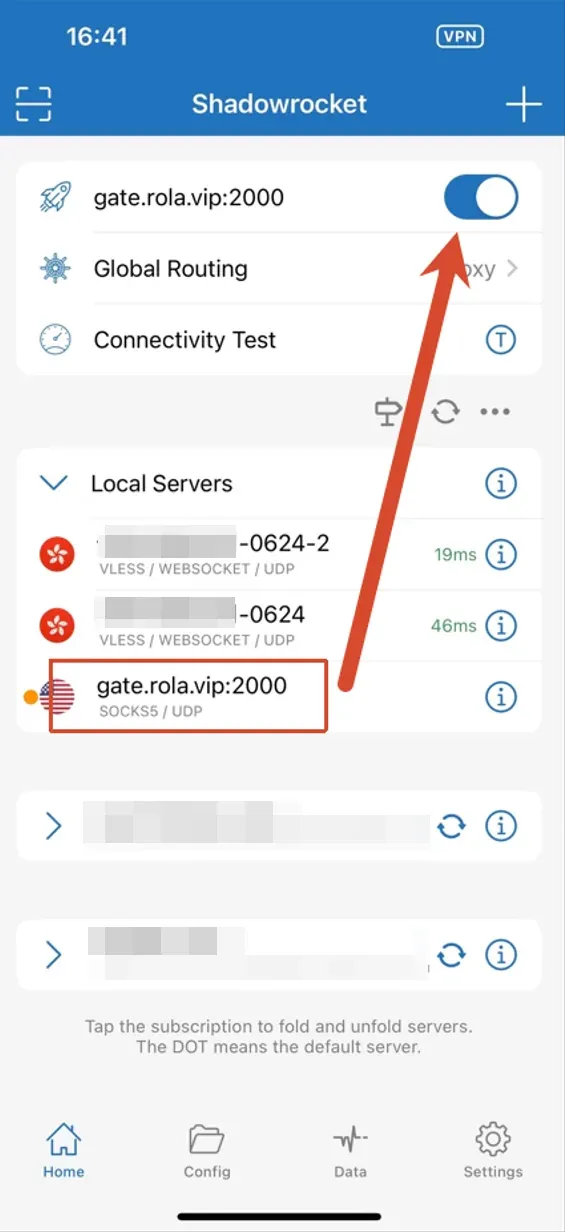
Figure 11: The selection indicator is beside the Rola IP entry and the connection switch is enabled. Use the endpoint assigned to your own account.
Step 7: Verify the Connection
Check the exit IP, region, and target HTTPS page using the verification steps below. The VPN indicator alone does not prove successful proxy access. Disconnect the test connection when finished.
Enable UDP Relay only when the selected endpoint and client configuration support it. A SOCKS5 type label or enabled switch alone does not establish UDP support.
Automatic/PAC: How to Automatically Configure HTTP Proxy on iPhone
Automatic mode uses a PAC file to decide which destinations connect directly and which use a proxy. It is suitable for rules distributed centrally by an enterprise, school, or network administrator.
Go to Settings → Wi-Fi → ⓘ → Configure Proxy → Automatic, paste the complete PAC address into the URL field, and save. PAC files commonly contain FindProxyForURL(url, host) rules that return either a proxy route or DIRECT according to the domain, protocol, or network location.
Keep three points in mind:
- The PAC URL must be reachable on the current network. Redirects, captive login pages, or certificate errors can prevent it from loading.
- Do not use a normal webpage URL or proxy Host as the PAC URL.
- If your organization requires certificates, MDM, or a specific VPN, follow the administrator-provided process rather than replacing it with Manual configuration.
Automatic centralizes routing rules: administrators can update the PAC file without editing Server and Port on each device, although clients may cache the script. If the PAC service is unavailable, follow the administrator-approved recovery process. Use DIRECT, Manual, or Off as a fallback only when network policy permits it; some organizations require traffic to remain on the proxy path.
How to Check Proxy Settings on iPhone
To confirm that an iPhone proxy is working, verify the configuration state, exit IP, region, and HTTPS access together. A page merely loading is not enough.
1. Check the Configuration State
Return to Settings → Wi-Fi → ⓘ → Configure Proxy and confirm that Manual or Automatic is selected. If you switched Wi-Fi networks, check the new network because the setting does not migrate automatically.
2. Compare the Exit IP Before and After the Proxy
Record the public IP before enabling the proxy, then repeat the check with a request configured to use it. With PAC, an IP lookup website may match a DIRECT rule, so an unchanged IP alone does not prove that the proxy is broken. Confirm the route for the test domain before interpreting the result.
IP geolocation databases can disagree, especially at city level. If the reported location differs from your target, compare another database and check the endpoint and location parameters before drawing a conclusion.
3. Test HTTPS and the Actual Business Page
Open an HTTPS website and then the actual page you need to validate. An IP lookup that confirms the expected proxy exit establishes only the route for that request. It does not prove that the target site, login state, DNS, certificates, and app behavior are all correct; PAC rules may route each destination differently.
4. Check Leaks and Scope
If your workflow has DNS or WebRTC requirements, use an appropriate test page. For third-party apps, use server-side logs or test-environment records to confirm that requests actually come from the proxy exit rather than assuming all apps behave like Safari.
How to Change Proxy Settings on iPhone
Before changing proxy settings, record the working configuration and change only one variable at a time. Changing region, session, and authentication simultaneously makes failures harder to isolate.
Common changes include:
- Change Server or Port: Use when switching to another compatible endpoint. Changing a port does not make the built-in page support SOCKS5.
- Change Username: Copy the generated username when changing supported location, session, or rotation options; available controls depend on the product.
- Change Password: Update the iPhone whenever credentials are rotated.
- Change Manual to Automatic: Do this only when you already have a valid PAC URL.
- Change Wi-Fi networks: Configure the proxy again in the new network’s details instead of editing the old network.
For login, cart, checkout, or multi-step QA flows, reuse the same sticky-session parameters within the service’s supported duration and monitor for exit changes. Per-request rotation is more appropriate for independent public-page checks.
How to Turn Off Proxy on iPhone
To turn off the iPhone proxy, open Configure Proxy for the current Wi-Fi network, choose Off, and save. If you use a third-party proxy client, also disconnect its VPN/proxy connection in the app.
On a managed device, obtain administrator approval before disabling a required proxy or VPN policy.
Built-in proxy shutdown steps:
- Open Settings → Wi-Fi.
- Tap ⓘ next to the current network.
- Tap Configure Proxy.
- Choose Off.
- Tap Save, then reopen Safari to verify connectivity.
Off disables the system proxy only for the current Wi-Fi network. It does not remove settings from another Wi-Fi network, and it does not automatically disable Shadowrocket, an enterprise VPN, or another network extension. If the status bar still shows VPN, also check the relevant app or Settings → General → VPN & Device Management.
Do iPhone Proxy Settings Cover Cellular Data and Every App?
No. The built-in Wi-Fi proxy does not cover cellular data and cannot guarantee that every app follows the system proxy.
If an app connects directly, investigate whether its networking stack honors the system proxy and whether another VPN or routing policy is active. Confirm the app’s actual exit through server-side logs or an authorized test environment.
Certificate pinning is a separate TLS check. It does not itself bypass a proxy, but it can reject a connection when TLS interception replaces the destination server’s certificate. An ordinary CONNECT tunnel preserves the server’s certificate. For enterprise devices, administrators must choose and deploy the appropriate proxy or VPN policy; device management alone is not a traffic tunnel.
Common iPhone Proxy Settings Problems and Fixes
The most effective troubleshooting order is to confirm scope first, then check protocol, Host/Port, authentication, and network connectivity before changing proxy nodes.
| Symptom | More Likely Cause | What to Do |
|---|---|---|
| No internet access after saving | Wrong Host/Port, endpoint offline, or protocol mismatch | If policy permits, turn the proxy off to check the base connection; copy the endpoint again and confirm its protocol. |
| Persistent 407 Proxy Authentication Required | Missing or rejected credentials, unsupported authentication method, or account restrictions | Confirm Authentication is enabled; check the full credentials, authentication method, and account status. |
| IP does not change | PAC returns DIRECT, wrong Wi-Fi configured, proxy not saved, or app ignores the system proxy | Check the test domain’s route and current Wi-Fi; validate the target app with server-side logs. |
| Unexpected region | Geolocation database disagreement, incorrect location parameters, or unsupported targeting | Compare another database and check product targeting options and username parameters. |
| HTTPS certificate warning | Untrusted proxy, TLS interception, or missing enterprise certificate | Stop immediately; do not ignore the warning; install trusted certificates only through an approved organizational process. |
| Public Wi-Fi login page does not open | Captive portal conflicts with the proxy | If policy permits, set the proxy to Off, complete Wi-Fi login, then enable it; otherwise contact the administrator. |
| Automatic does not work | PAC URL unreachable, script error, certificate issue, or redirect problem | Check that the URL serves a PAC script; ask the administrator to validate it and approve any fallback. |
| Only some apps fail | App ignores the system proxy, unsupported UDP/QUIC traffic, policy restrictions, or TLS interception rejected by certificate pinning | Diagnose routing and TLS failures separately in an authorized test environment. |
Restore Connectivity Before Continuing Troubleshooting
On a network you manage, or when policy permits, switch back to Off and check whether the original Wi-Fi connection can reach the internet. If it still fails, investigate the base connection and any remaining VPN or managed settings as well. Once connectivity is restored, re-enable the proxy and verify each field. On a managed device, follow the administrator’s recovery process instead of disabling a required proxy.
407 and “Connection Timeout” Are Different Errors
A 407 Proxy Authentication Required response means the proxy requires authentication for the request. It may be an initial challenge rather than proof of an incorrect password. If it persists after credentials are supplied, check the username, password, supported authentication method, and account status. A timeout instead points to a possible endpoint, firewall, or network-path problem.
Do Not Ignore Certificate Warnings
If a public proxy or unknown configuration asks you to install a root certificate, stop. Only install a certificate through an administrator-approved process when the organization, purpose, and certificate source are clearly verified. Changing a proxy IP does not require an extra root certificate; such a request often means the connection is attempting to inspect or decrypt HTTPS.
Security and Usage Recommendations
The safest approach to iPhone proxy use is minimum necessary scope, trusted credentials, a verifiable exit, and prompt shutdown after the task is complete.
- Do not use unknown free proxies for accounts, payments, email, or internal systems.
- Do not expose proxy passwords or full session usernames in screenshots, tickets, or chats.
- Prefer HTTPS target sites and reject unexplained certificates or downgrade warnings.
- Complete captive-portal authentication before enabling a personal proxy on public Wi-Fi. Follow administrator instructions when a proxy is required by network policy.
- For business testing, record the time, target URL, exit IP, region, session ID, and result.
- A proxy only changes the network exit path; it does not replace website authorization, rate limiting, account security, or compliance review.
Conclusion
Choose the connection method that fits the task: Manual for an HTTP endpoint on Wi-Fi, Automatic for administrator-managed PAC rules, or a compatible client for SOCKS5 and cellular routing. Rola IP users can start by choosing a network and copying their assigned Host, Port, Username, and Password. Verify the route for the actual test destination, then disconnect personal test configurations when finished. Keep required organizational settings under administrator control.