Windows 11 Proxy Settings: Setup, IP Checks, and Fixes

Sep 28, 2026 · Guides · 10 min read
To configure Windows 11 proxy settings, open Settings → Network & internet → Proxy. Use Manual proxy setup for an HTTP proxy address and port, or Use setup script for a PAC URL supplied by your administrator. Then check the public IP in Chrome to confirm the route used by that request. These settings apply to apps that use the Windows proxy configuration; they do not automatically route every app through a proxy. For SOCKS5, use the separate instructions below.
This guide uses Rola IP to explain how to obtain HTTP proxy connection details, enter them in Windows 11, and authenticate and check the connection in Chrome. The Windows steps also apply to compatible HTTP proxies from other providers.
Before you start: check the proxy details you received
Match the information from your provider or network administrator to the right Windows setting. First, note the current switches, address, and port on the Proxy page, then check your current public IP in a browser. You can use those details to restore your connection if the new setting fails. On a managed work computer, follow your administrator’s instructions.
| What you have | Where to go | What to enter |
|---|---|---|
| Settings supplied automatically by your network | Automatically detect settings | Turn on the switch; no server address is needed |
| A PAC script URL | Use setup script | Enter the full script URL |
| An HTTP proxy address and port | Manual proxy setup | Enter the hostname or IP address and port separately |
| A SOCKS5 proxy address and port | SOCKS5 options below | Check whether the proxy requires a username and password |
An HTTP proxy can carry requests to an HTTPS website through a CONNECT tunnel if the proxy allows the destination and port. The website’s HTTPS connection and the connection to the proxy are separate. An HTTPS proxy encrypts the connection to the proxy itself; it is not simply another name for an HTTP proxy used to visit HTTPS websites. SOCKS5 is a separate proxy protocol.
The Windows manual setup steps below use an HTTP proxy. If your provider gave you SOCKS5, skip to the SOCKS5 section.
If you still need a proxy endpoint, check its protocol and authentication method before choosing one. Rola IP residential proxies offer country and city targeting in supported locations.
Get your proxy details from Rola IP
For the walkthrough below, use a Rola IP rotating residential HTTP proxy with username/password authentication. Have an active service with sufficient balance or traffic available before connecting. Rola IP’s rotating residential configuration guide links to the Residential Settings page and documents both HTTP and SOCKS5 connections.
- Sign in to your Rola IP console and open Residential Settings. You can reach this page through the configuration guide linked above.
- Select the proxy account you want to use, or enter its account name. For a first connection, use the basic account name; if you need a regional exit, configure the supported country or location parameters before copying the connection details.
- Copy the generated host, port, full proxy username, and proxy password. Use the connection details for HTTP in the Windows manual setup below. Do not assume a SOCKS5-only endpoint will work in the same form.
- Keep the full generated username intact, including any location or session parameters. Use the proxy account credentials supplied for the endpoint, rather than assuming your website sign-in email and password are the proxy credentials.
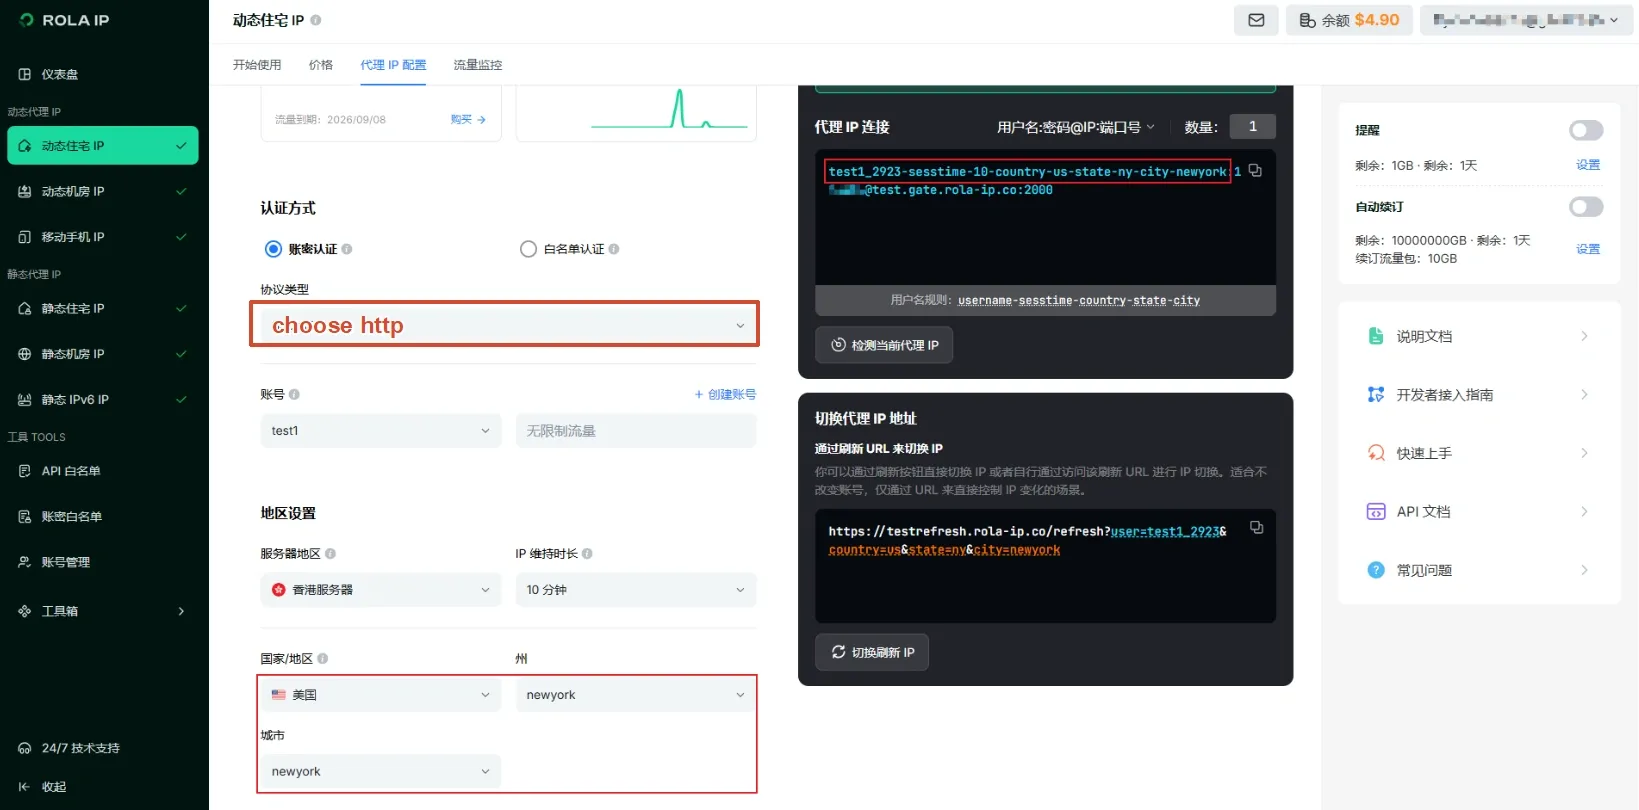
Select HTTP and copy the generated host, port, full proxy username, and proxy password for the Windows setup below.
Rola IP’s account whitelist is an additional restriction on username/password access; it does not remove the need for credentials. If you enabled IP Whitelist Limit for this account, make sure your current public source IP is allowed. A VPN may change that source IP. Credential-free API whitelist access is a separate connection method; use its own extracted endpoint details if you choose that method instead.
Once you have the four connection details, go directly to the Windows manual HTTP setup. The automatic settings below are alternatives for networks that provide discovery or a PAC script; they are not required for this manual setup.
Use automatic proxy settings when your network provides them
Automatically detect settings
If your network is set up for automatic discovery, open Settings → Network & internet → Proxy and turn on Automatically detect settings. Windows will look for a configuration on the network. If you were given an address and port instead, use manual setup below.
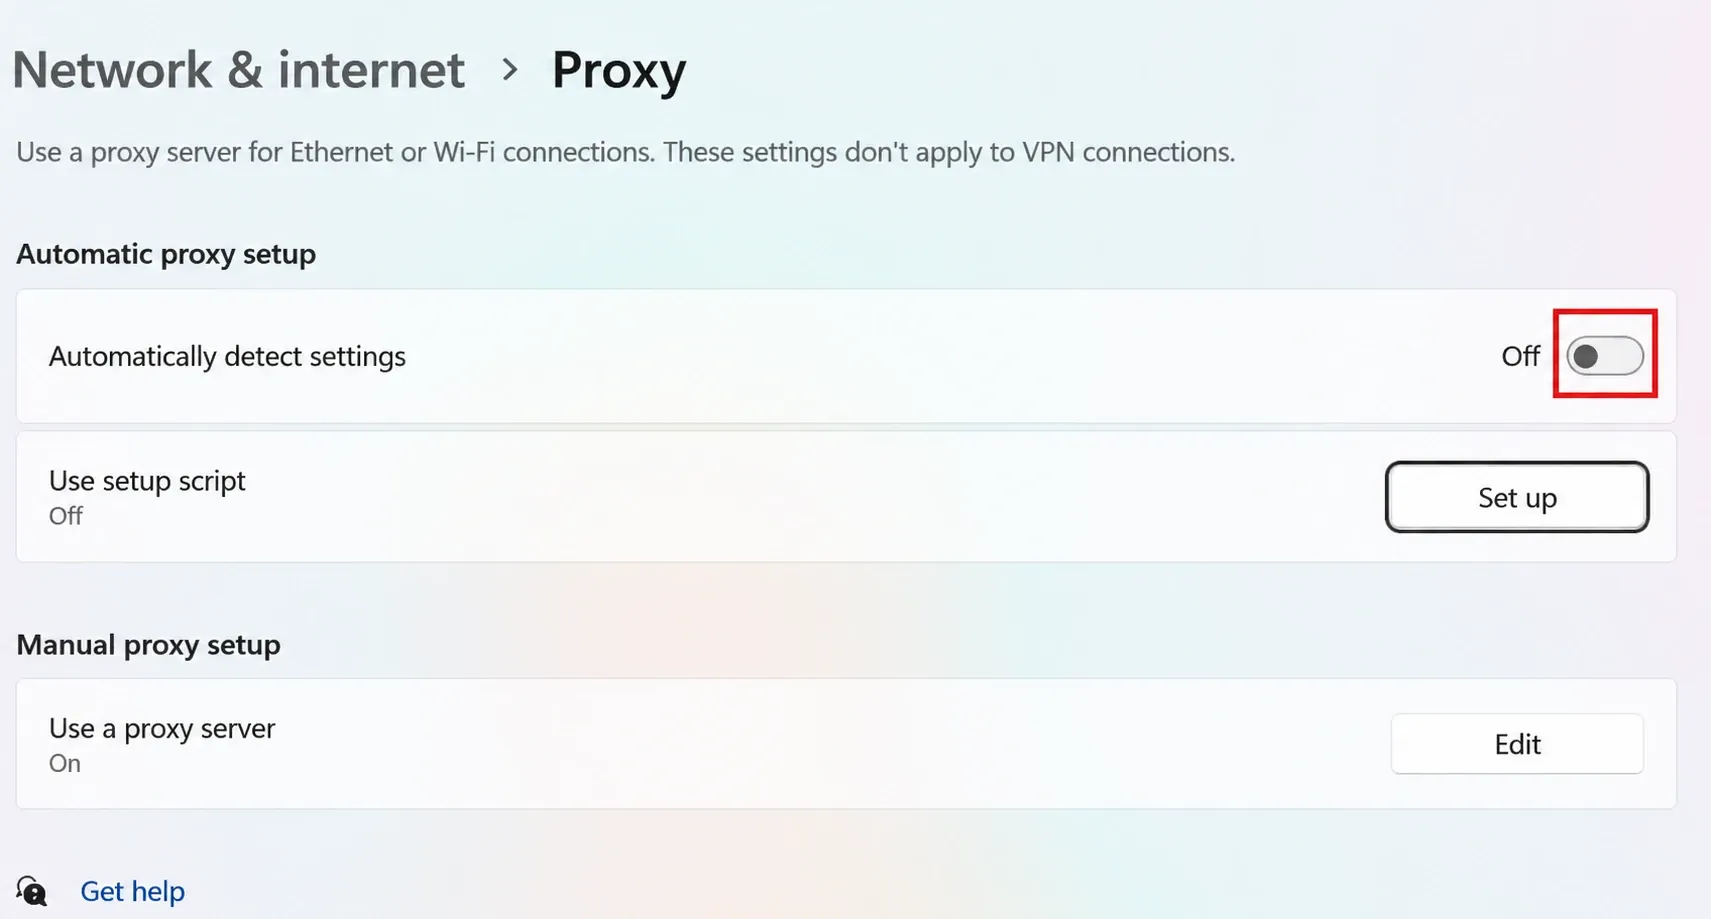
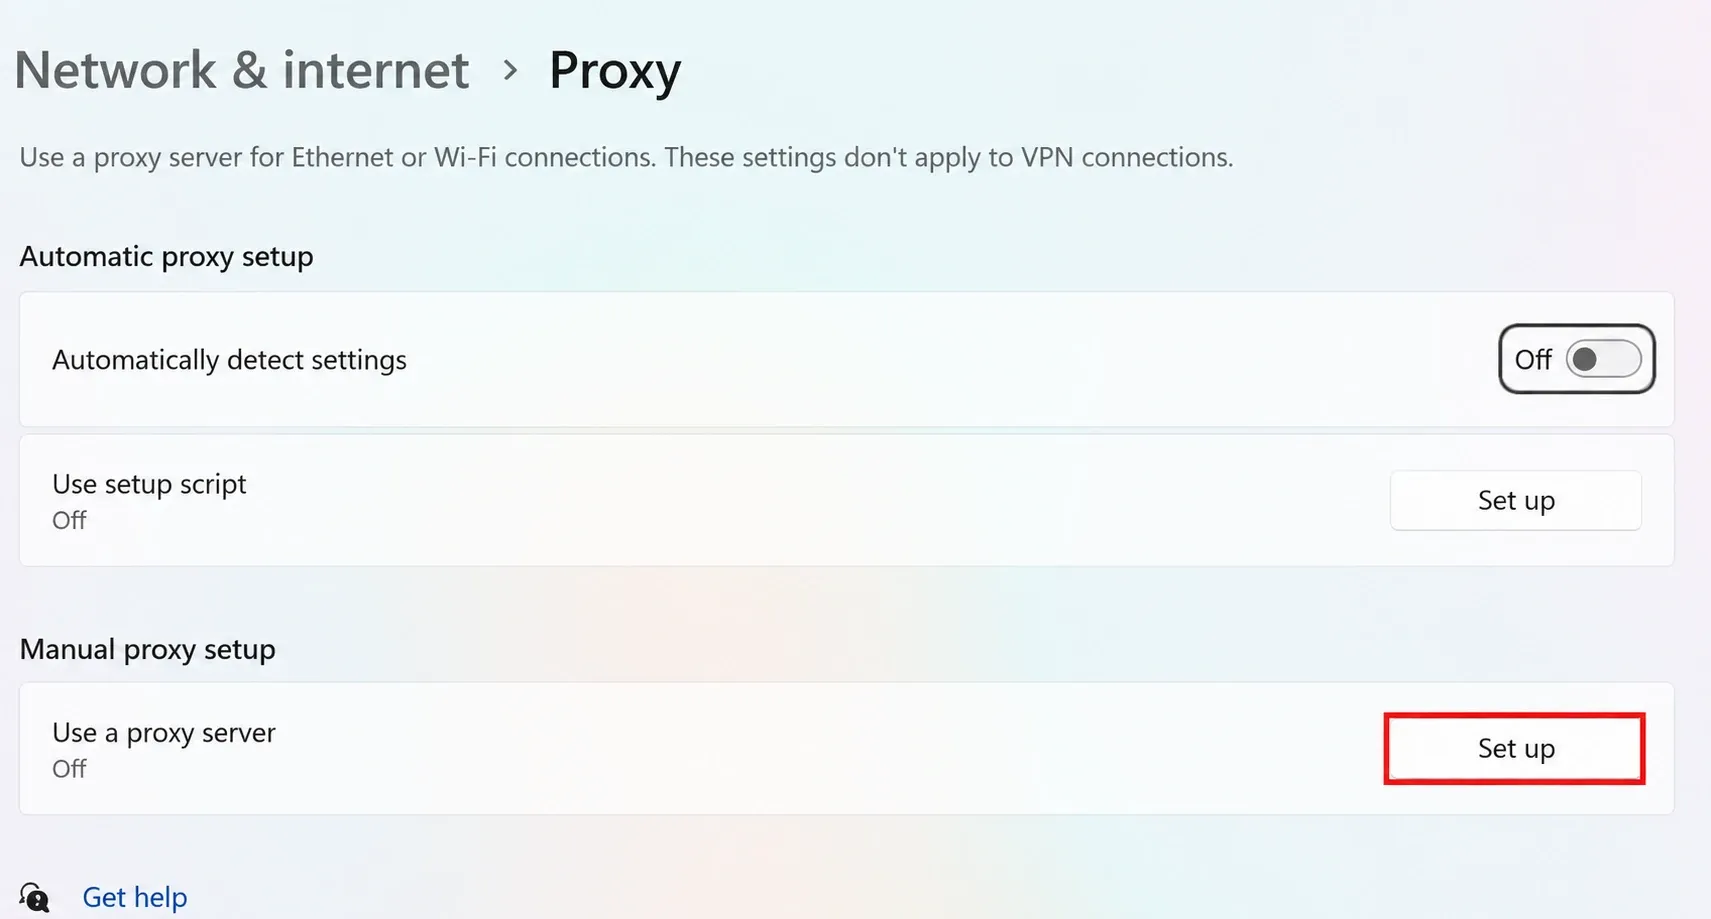
The screenshot shows the switch before activation. Turn it on only if your network provides automatic proxy discovery.
Use a PAC setup script
If your administrator gave you a PAC URL, click Set up next to Use setup script on the same page. Turn on the switch, enter the URL, and save. A PAC file uses FindProxyForURL to decide which sites use a proxy and which connect directly.
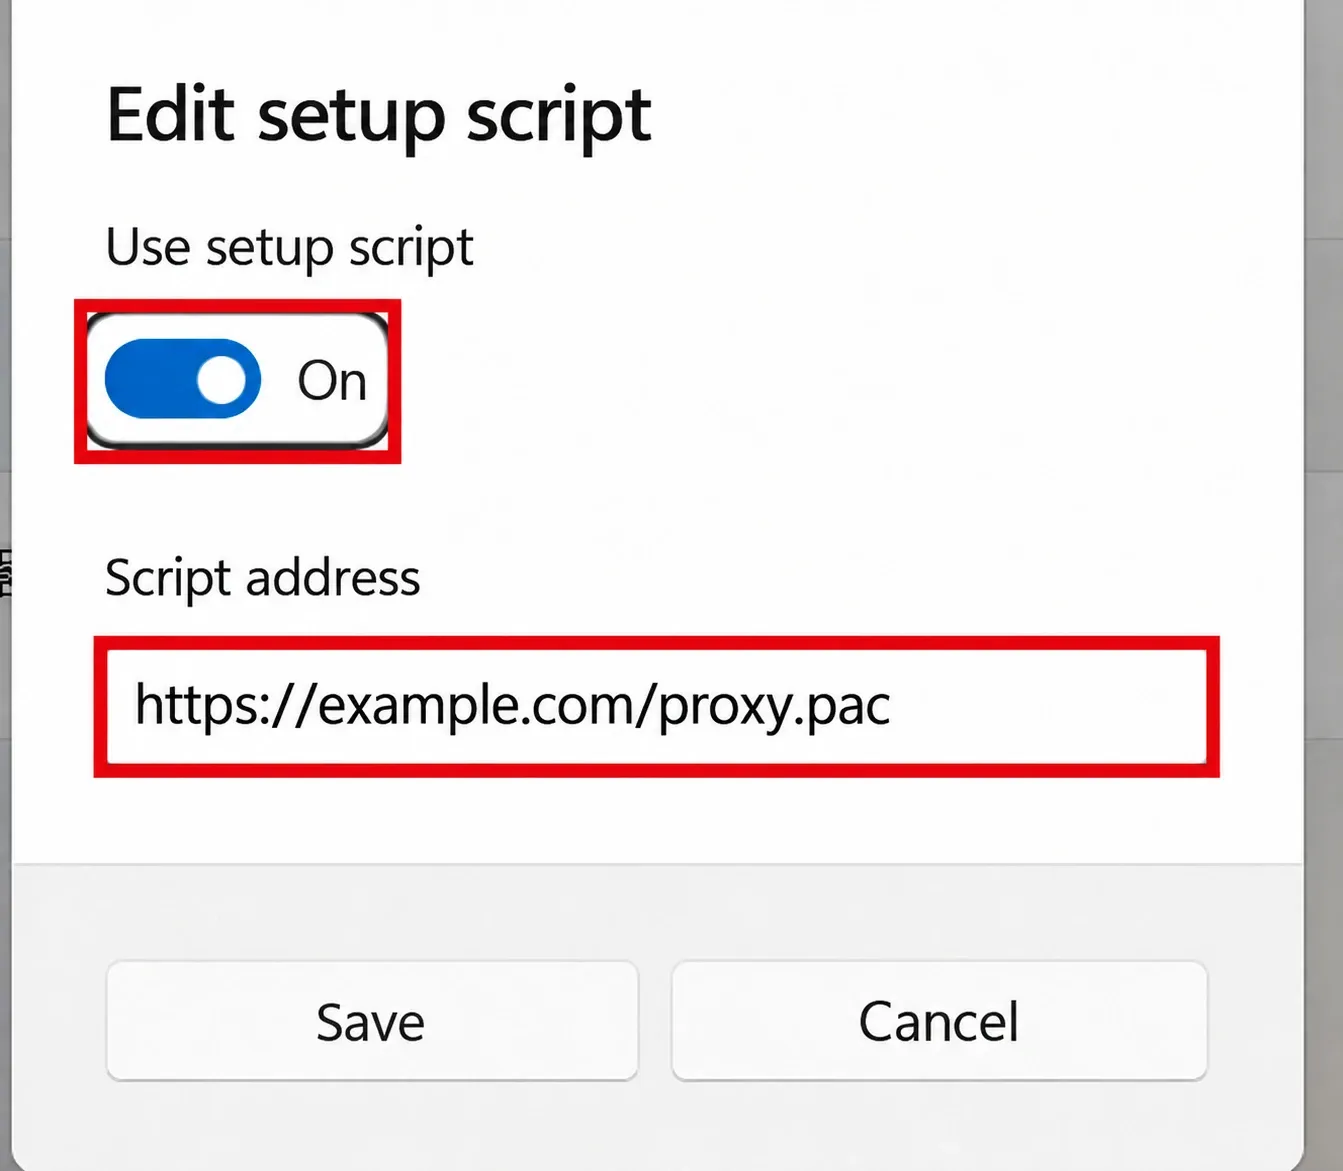
The script address in the screenshot is a placeholder, not a working PAC URL. Replace it with the address supplied by your administrator.
After saving, test a site that the PAC rules are expected to proxy. Other sites may connect directly, so a public-IP lookup only checks the route selected for that lookup site.
How to set up an HTTP proxy on Windows 11
Step 1: Open the Proxy page
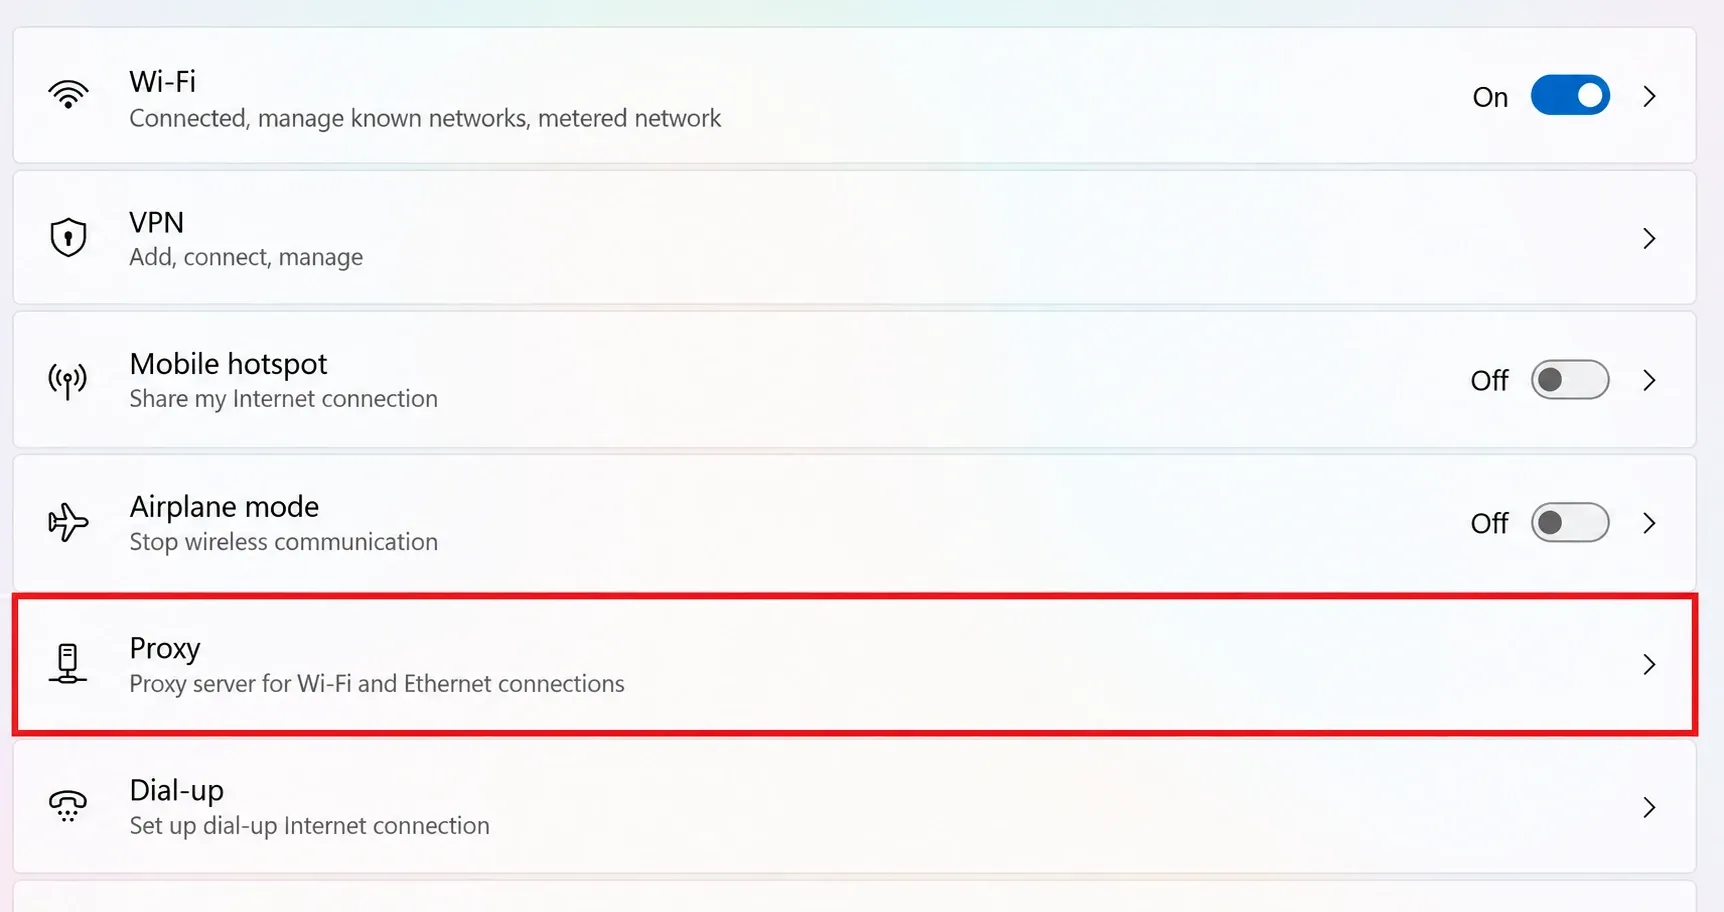
Press Win + I to open Settings, then choose Network & internet → Proxy. You can also search for “proxy settings” in the Start menu.
Step 2: Open manual proxy setup
Scroll to Manual proxy setup and click Set up next to Use a proxy server. If a manual proxy is already enabled, the button may say Edit.
Step 3: Enter the server address and port
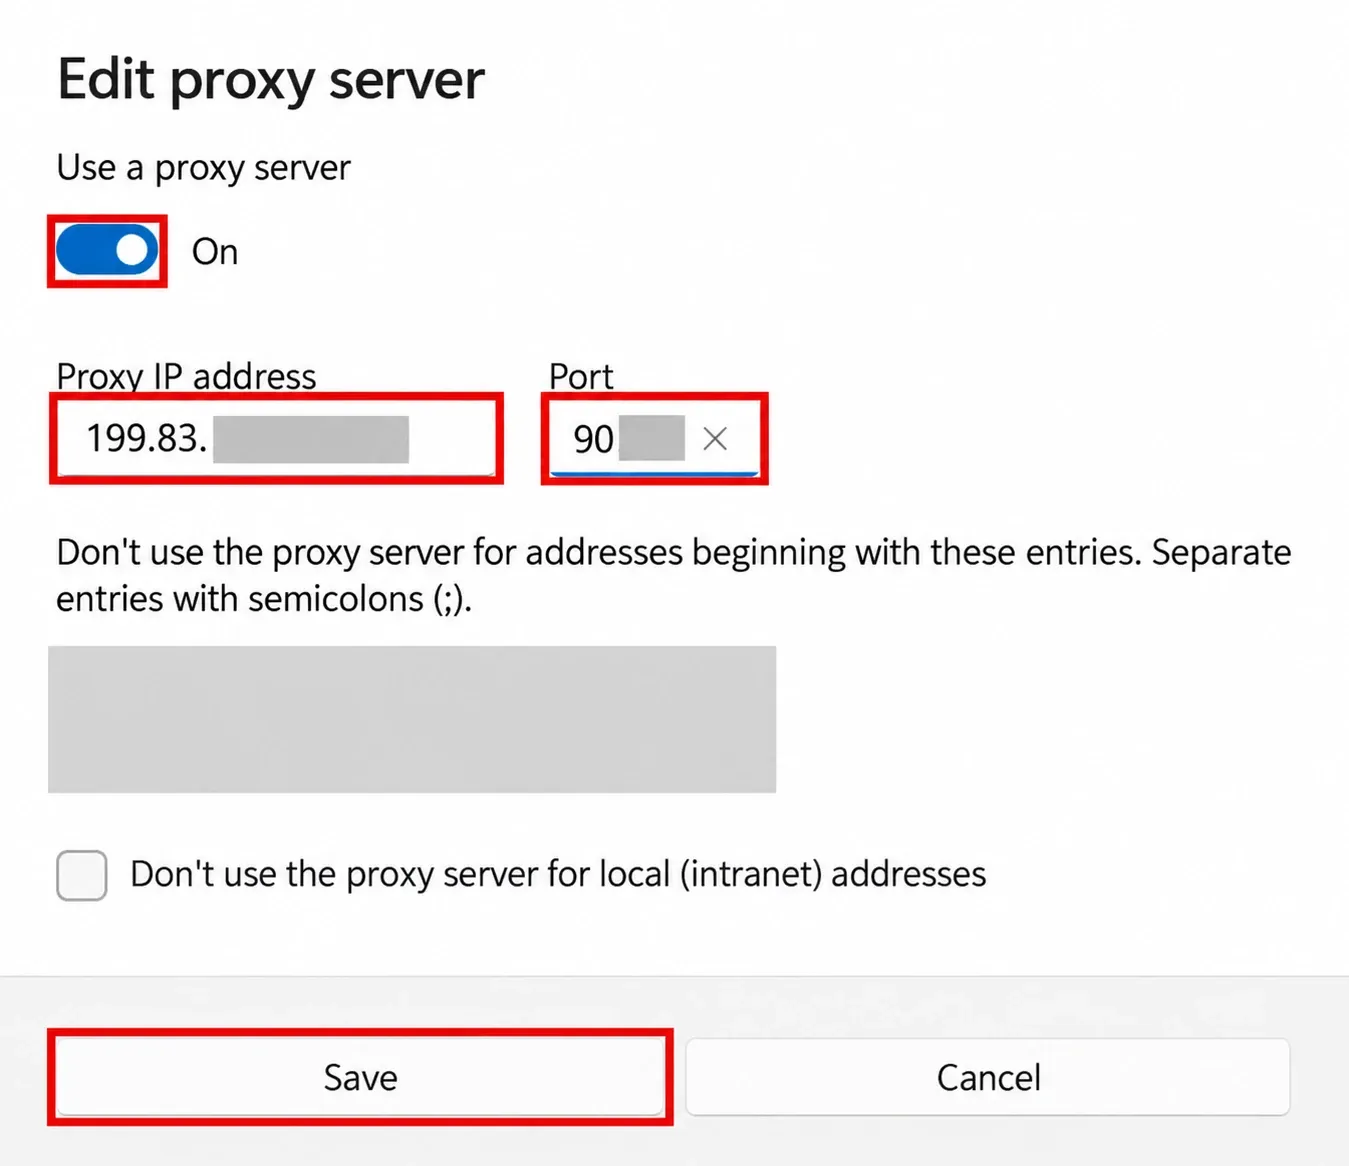
Turn on Use a proxy server. Put the hostname or IP address from your provider in Proxy IP address, put the port number in Port, and click Save. Enter only the hostname or IP address in the address field, without a URL scheme, path, or credentials. The form has no username or password field. With an authenticated HTTP proxy, Chrome may prompt for those details when you first open a site.
For the Rola IP connection details you copied, use this mapping:
| Rola IP connection detail | Where to use it |
|---|---|
| Host | Windows Proxy IP address; enter only the hostname or IP |
| Port | Windows Port; use the port supplied for the HTTP connection |
| Full proxy username | Chrome’s proxy authentication prompt, if shown; retain any location or session parameters |
| Proxy password | The password field in Chrome’s proxy authentication prompt |
Do not paste an entire connection URL or a combined host, port, username, and password string into Proxy IP address.
Sites in the exception list connect directly. For example, to bypass the proxy for intranet.example.test and all subdomains of example.com, enter intranet.example.test;*.example.com. Separate entries with semicolons. Add example.com as another entry if the main domain should also bypass the proxy. Review existing exceptions before saving. Keep entries required by your administrator, remove obsolete entries only if you are authorized to change them, and do not add new entries unless those destinations should connect directly.
Step 4: Check the exit IP in Chrome
Open Chrome and visit an HTTPS page. If Chrome shows a proxy authentication prompt for your Rola IP endpoint, enter the full proxy username and proxy password copied earlier. These credentials belong in the browser’s proxy prompt, not in the website’s login form. A prompt may not appear if Chrome already has usable proxy credentials or you are using a separate credential-free endpoint.
If the prompt repeats or Chrome reports error 407, recheck the full proxy username and password. If you enabled Rola IP’s account whitelist restriction, also check the allowed source IP; the restriction does not replace password authentication. See the troubleshooting table below before repeatedly retrying.
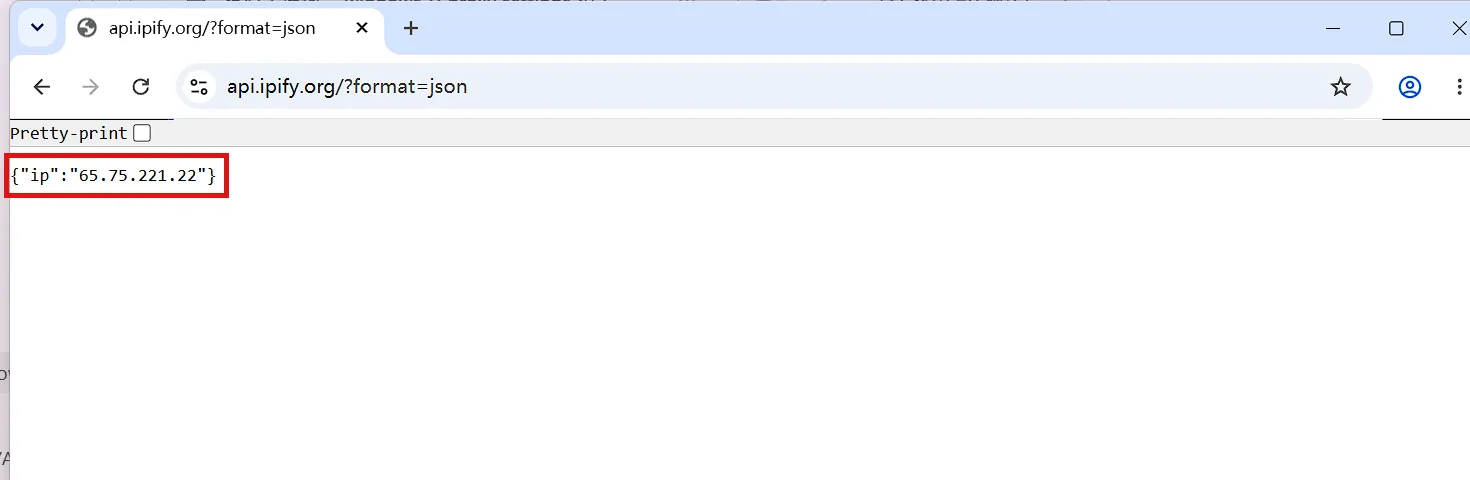
Open ipify’s public IP endpoint in Chrome and note the address returned after ip. Compare it with your pre-test result and, where available, the provider’s exit information or connection log for the same request or session. A gateway address may differ from its exit IP, and a rotating proxy may return different exits across requests.
The screenshot illustrates the response format; its IP address is not the value you should expect. Treat the check as successful when the returned exit agrees with the provider’s information or the intended route is corroborated by a connection log. An IP change alone does not identify which VPN or proxy carried the request. This check validates that browser request, not every app or website. Then open the page you actually need and confirm that it loads as expected.
For your Rola IP check, record the time, the proxy host and port, the selected location or session settings, and the public IP returned in Chrome. Do not include the password in the record. Compare the result with any exit information available for that connection; the Rola gateway hostname itself is not the expected exit IP. If you selected a country, check the returned IP’s location as well, allowing for differences between geolocation databases. Keep the IP check and the target-page check together as your verification record; the illustration above is not a recorded Rola IP connection test.
How to use a SOCKS5 proxy with Chrome
Use an explicit socks5:// proxy setting for Chrome when no username or password is required. Chrome does not natively support SOCKS5 username/password authentication, so an authenticated SOCKS5 endpoint requires a compatible client. Chromium documents these limits in its proxy support guide listed under Sources.
No username or password: specify SOCKS5 in Chrome
If your proxy does not require a username and password, for example because your IP is allowlisted, make a copy of your Chrome desktop shortcut. Right-click the copy and open Properties → Shortcut. Add a space after the existing Target, followed by --proxy-server="socks5://HOST:PORT". Replace HOST:PORT with your provider’s details; keep the existing executable path and its quotation marks intact.
Save your work and exit Chrome completely, including any background Chrome processes, then launch Chrome from the modified shortcut. Keep the socks5:// prefix so Chrome uses the right protocol. Repeat the exit-IP check. To undo this setting, close Chrome completely and launch it using the original shortcut.
Username and password required: use a client that supports them
The following menu paths follow the Proxifier for Windows v4 documentation. Record your existing settings before changing a profile.
For Rola-specific connection details, see Rola IP’s Windows proxy setup guide, which uses Proxifier. The rules below limit the example to Chrome.
- Open Profile → Proxy Servers → Add. Enter the host and port, select SOCKS Version 5, enable authentication, and enter the username and password. Use Check to test the endpoint before continuing.
- Open Profile → Proxification Rules → Add. Set Applications to
chrome.exeand Action to the proxy you added. For all Chrome destinations, leave the target-host and target-port filters unrestricted. - Keep the predefined Localhost rule enabled. Place the Chrome rule above broader rules that could otherwise match Chrome. Proxifier evaluates rules from top to bottom.
- If only Chrome should use this proxy, set the Default rule’s Action to Direct and review any other enabled rules that might proxy other applications. Default applies only when no earlier rule matches.
- Where your network policy permits, remove Chrome proxy launch flags, disable conflicting proxy extensions, and restore the underlying Windows proxy configuration to a direct connection. Proxifier’s documentation warns that retaining an application’s own proxy can cause the connection to pass through a proxy twice. If your organization requires an existing proxy, ask its administrator for the appropriate configuration.
- Restart Chrome and repeat the exit-IP check. Inspect Proxifier’s connection log to confirm that the Chrome request used the intended proxy. Then retry the page you need to access.
To undo the change, restore your saved Proxifier profile or disable the new Chrome rule and check the remaining rules, including Default. Restore any Windows or Chrome settings changed for this setup.
How to fix proxy settings that do not work
| What happens | What to check next |
|---|---|
| The saved address reverts, or the switch changes by itself | Check whether a VPN or another proxy client controls the system proxy setting. On a managed device, check the policy with your administrator. |
| Chrome shows 407 Proxy Authentication Required | The proxy requires authentication. Check the username/password and supported authentication method. If your account uses an IP allowlist, confirm it contains the source IP that the provider sees. |
| The address is saved, but Chrome’s IP does not change | Check whether the IP lookup site is on the exception list or uses a direct PAC route. Then inspect Chrome extensions, launch flags, company policies, and other proxy clients. Compare the provider’s connection log. |
| Chrome’s IP changes, but it is not the expected exit | Compare it with the provider’s exit details or connection log for that request. Check whether the product rotates exits and whether a VPN or another proxy client is also active. |
| Pages stop loading immediately after you save | Turn off the new manual proxy and restore your previous settings. Check whether your provider supplied HTTP or SOCKS5, then confirm the host, port, and server status. |
| A hostname cannot be resolved | Identify the failing name from the browser or client error. For a proxy hostname, check spelling and local DNS resolution. For a destination hostname, check the destination and the DNS behavior of the active proxy route. |
| The proxy connection is refused or times out | Refusal often means the port is closed or the connection was actively rejected. A timeout may indicate filtering, routing trouble, or an unavailable server. Confirm the endpoint and port with the provider and check applicable firewall rules; do not disable the firewall as a blanket fix. |
| A page returns 403 or 429 | These differ from proxy authentication error 407. Identify whether the response comes from the destination or the proxy. For 403, check access permissions and applicable rules. For 429, reduce the request rate and respect Retry-After when supplied. |
Change one setting at a time, then repeat the same browser IP check and retry the original failing page. Record whether the error persists; a successful IP lookup does not prove that the target page works.
How to turn off the manual proxy
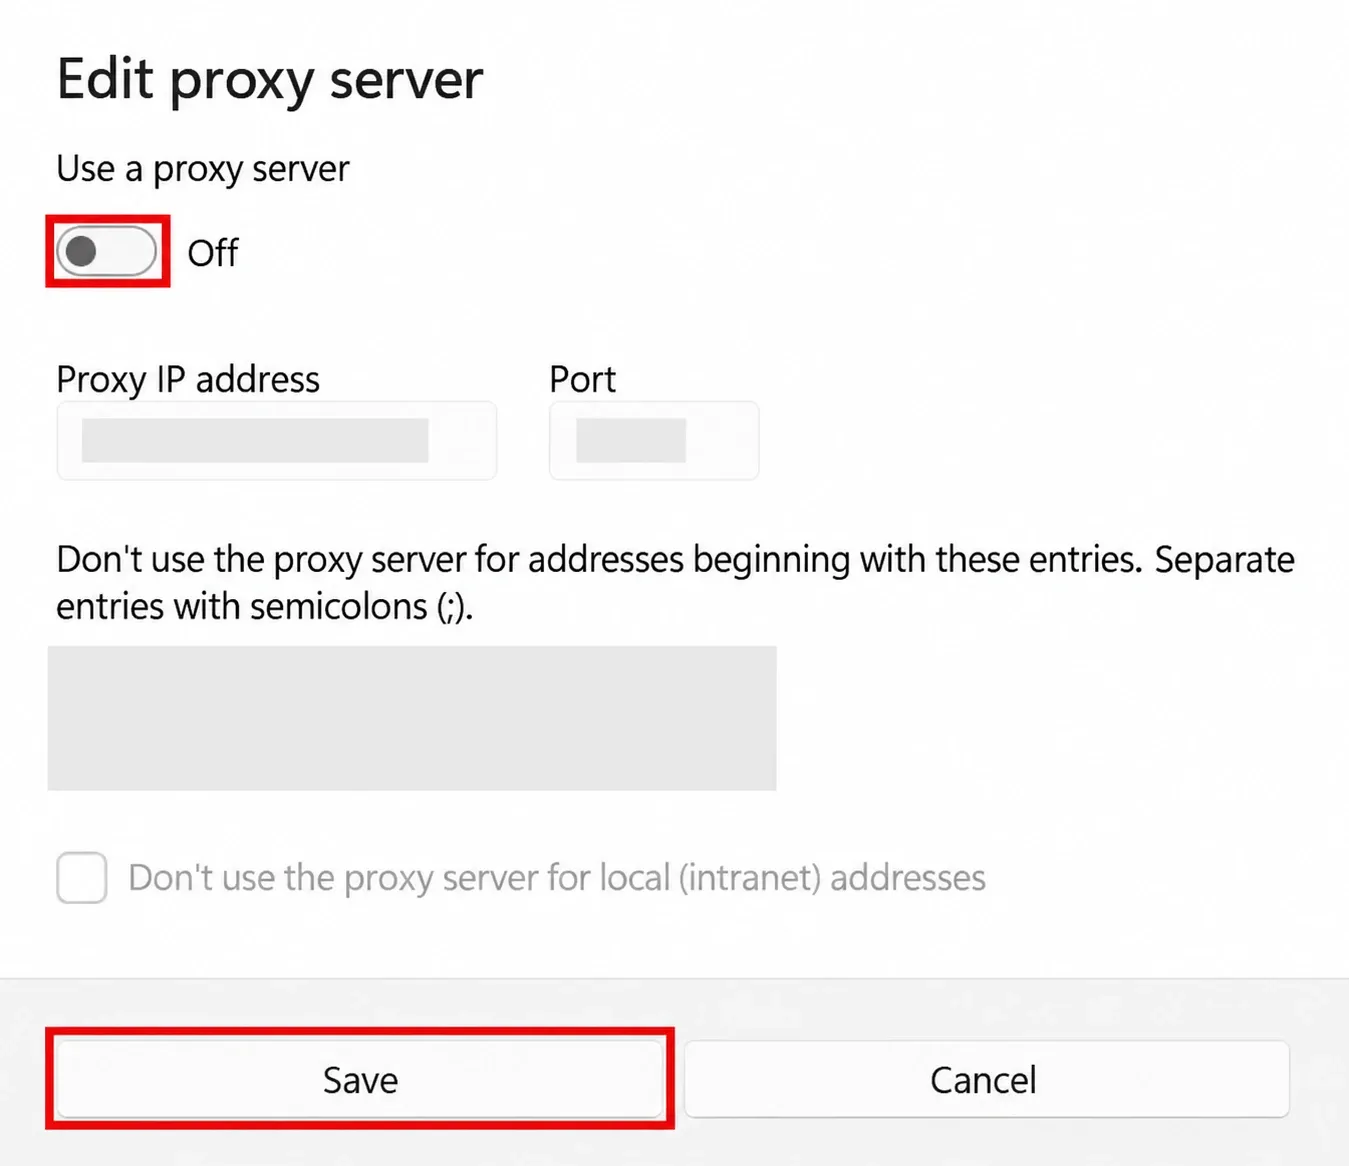
Go back to Settings → Network & internet → Proxy. Under Manual proxy setup, click Edit, turn off Use a proxy server, and save. Recheck the exit IP in Chrome. This disables only the manual entry; a PAC script, automatic discovery, Chrome launch flag, or proxy client may still control the route. Restore the settings you recorded before the test, including any client that previously managed the system proxy.
Where are proxy settings in Windows 10?
In Windows 10, open Settings → Network & Internet → Proxy for automatic detection, a setup script, or a manual proxy. The page layout may look different from Windows 11.