Ubuntu Proxy Settings: GUI, Terminal, APT & Chrome Configuration Guide

Sep 17, 2026 · Guides · 21 min read
Correctly configuring Ubuntu proxy settings depends on where the traffic comes from: compatible desktop applications read GNOME Network Proxy, command-line tools may read shell environment variables, APT supports dedicated configuration, and background services need settings their applications understand.
Ubuntu does not have one universal proxy switch that automatically covers every program. Entering a proxy only in Settings may still leave curl or apt connecting directly; running only export https_proxy=... does not guarantee that Chrome or background services will use it. Many cases where a proxy is configured but the IP address does not change are actually caused by choosing the wrong configuration scope.
This guide first clarifies proxy scope, then walks through configuration and verification for the Ubuntu desktop, Terminal, APT, Chrome, Git, and systemd. The Rola IP section explains how to obtain the correct host, port, username, password, location, and session parameters from the control panel. The examples cover desktop browsing, server-side scripts, and package downloads.
Before You Start
Use an Ubuntu Desktop session with GNOME for the GUI steps; Ubuntu Server users can start with Terminal or APT. Shell examples assume Bash. System files, APT configuration, Snap settings, and system services require administrator access. Install the relevant client before following its section.
Every proxy.example address, sample port, and username must be replaced with your authorized connection details. The GUI images illustrate different layouts, not a single version-specific test. Ubuntu and GNOME versions can change labels and button positions. Record existing settings before changing them so you can restore them afterward.
TL;DR
- Desktop browsers and applications that support GNOME settings: Settings → Network → Network Proxy.
- Current Terminal: set lowercase and uppercase
http_proxy,https_proxy, andno_proxyenvironment variables. - APT: create
/etc/apt/apt.conf.d/95proxies; do not assume shell variables will be preserved bysudo apt. - Chrome: where available, the proxy-settings button at
chrome://settings/systemopens the desktop proxy settings. For an isolated test, use--proxy-serverwith a separate browser profile. - systemd services: use a service drop-in only if the application supports proxy environment variables; do not rely on the login shell’s
.bashrc. - Check configuration by inspecting GNOME, environment variables, APT, and systemd separately; no single command represents every layer.
- Authentication: prefer secure credential management or IP allowlisting. Do not commit production passwords to Git or expose them in shell history.
Why Are Ubuntu Proxy Settings Easy to Misconfigure?
Ubuntu proxy settings are distributed across the desktop, shell, application, and service layers, so a “system proxy” does not necessarily cover the entire system.
The Ubuntu official proxy documentation divides desktop proxy configuration into None, Manual, and Automatic. It controls network proxy behavior for the desktop session, but it does not mean every command-line tool will inherit those settings.
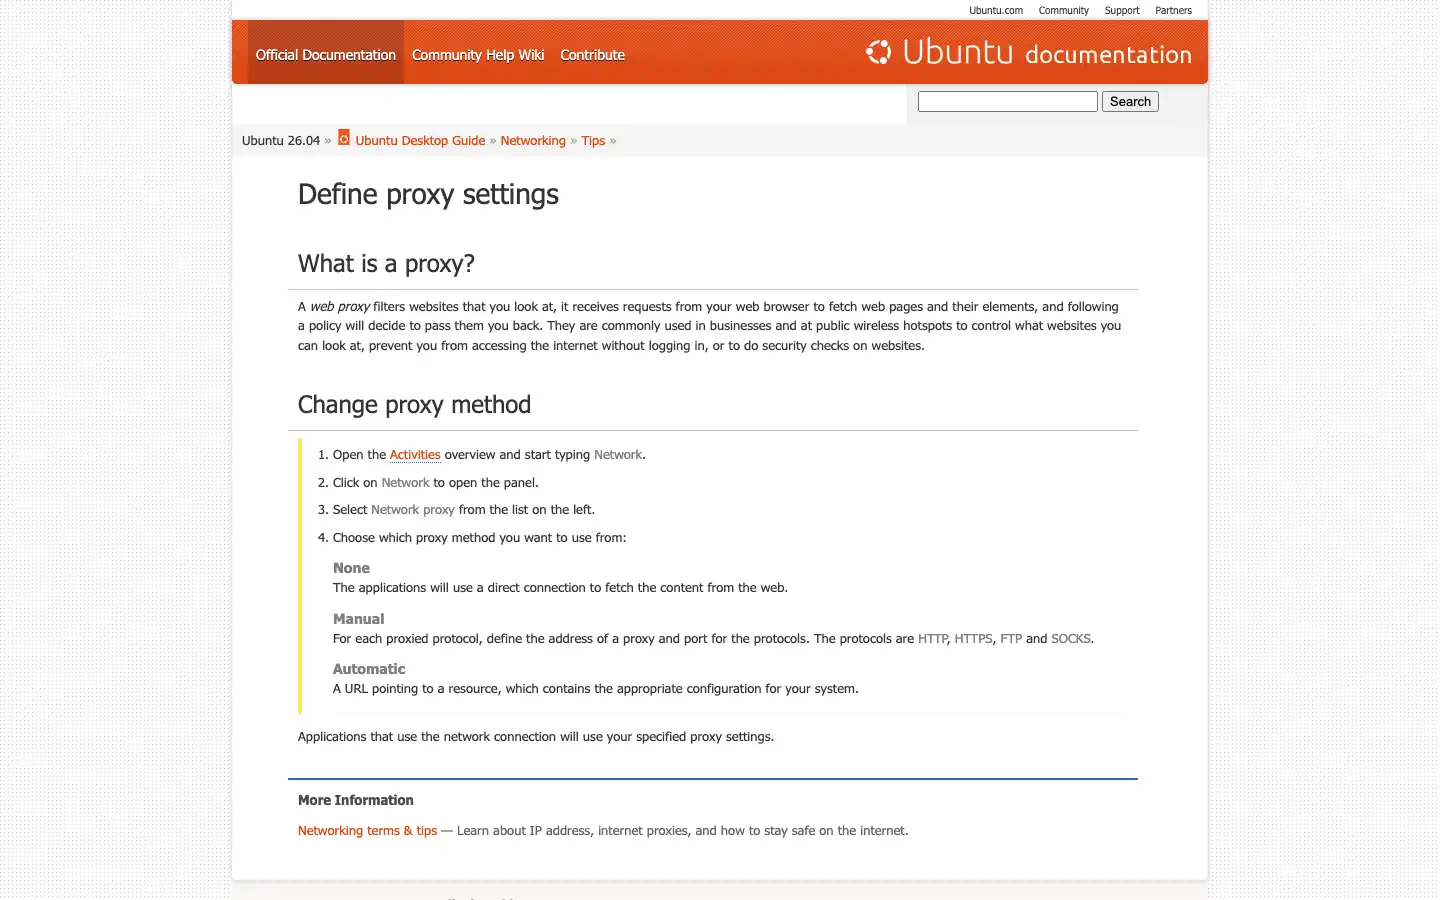
Figure 1: Ubuntu’s official English documentation explains the None, Manual, and Automatic desktop proxy methods.
What Proxy Information Do You Need Before Configuration?
At minimum, confirm the protocol, gateway address, port, authentication method, and whether you need location or session parameters.
- Protocol: HTTP/HTTPS forward proxy or SOCKS5.
- Host: the proxy gateway domain or IP address, not the destination website.
- Port: the entry port corresponding to the product and protocol.
- Authentication: username/password or exit-IP allowlisting.
- Location: country, state/province, city, or other available targeting parameters.
- Session: rotate on every request or keep the same exit for a period of time.
- Bypass: localhost, loopback addresses, internal networks, and domains that should not use the proxy.
An HTTPS destination website does not mean the proxy URL in the https_proxy variable must start with https://. If the provider supplies a standard HTTP forward proxy, HTTPS destinations are usually sent through a CONNECT tunnel, while the proxy URL still uses http://host:port. Follow the provider’s protocol documentation.
Ubuntu Proxy Settings: Eight Configuration Methods
This guide covers eight ways to configure a proxy on Ubuntu: GNOME desktop settings, temporary shell variables, user login files, the system environment file, APT, Chrome, application-specific settings, and systemd service settings.
These methods cover different traffic scopes. Desktop users normally start with Method 1; server-side scripts should generally start with Method 2; software updates use Method 5; and background services require Method 8. Do not enable every method at once just to make the proxy “global,” because doing so makes it much harder to determine where a proxy setting is being inherited from later.
| Method | Configuration Location | Main Coverage | Best For |
|---|---|---|---|
| Method 1 | GNOME Network Proxy | Chrome and some desktop applications | Ubuntu Desktop users |
| Method 2 | Current Terminal environment variables | Current shell and child processes | Temporary tests and script debugging |
| Method 3 | ~/.profile |
New login sessions for the current user | Long-term use for one user |
| Method 4 | /etc/environment |
New login sessions for multiple users | Controlled multi-user hosts |
| Method 5 | /etc/apt/apt.conf.d/ |
APT repository downloads | Software installation and updates |
| Method 6 | Chrome system entry or launch parameter | One Chrome test process | Browser verification |
| Method 7 | Git, Wget, Python, npm, Snap, Docker | A specified tool or container | Development and automation tasks |
| Method 8 | systemd drop-in | A specified background service | Daemons and collection services |
Method 1: Configure a Proxy with the Ubuntu Desktop GUI
For desktop users, the simplest method is to open Settings → Network → Network Proxy and set Method to Manual.
Step 1: Open Network Settings
Open Settings from the system menu, or search for Network in the application overview and open the matching settings panel.
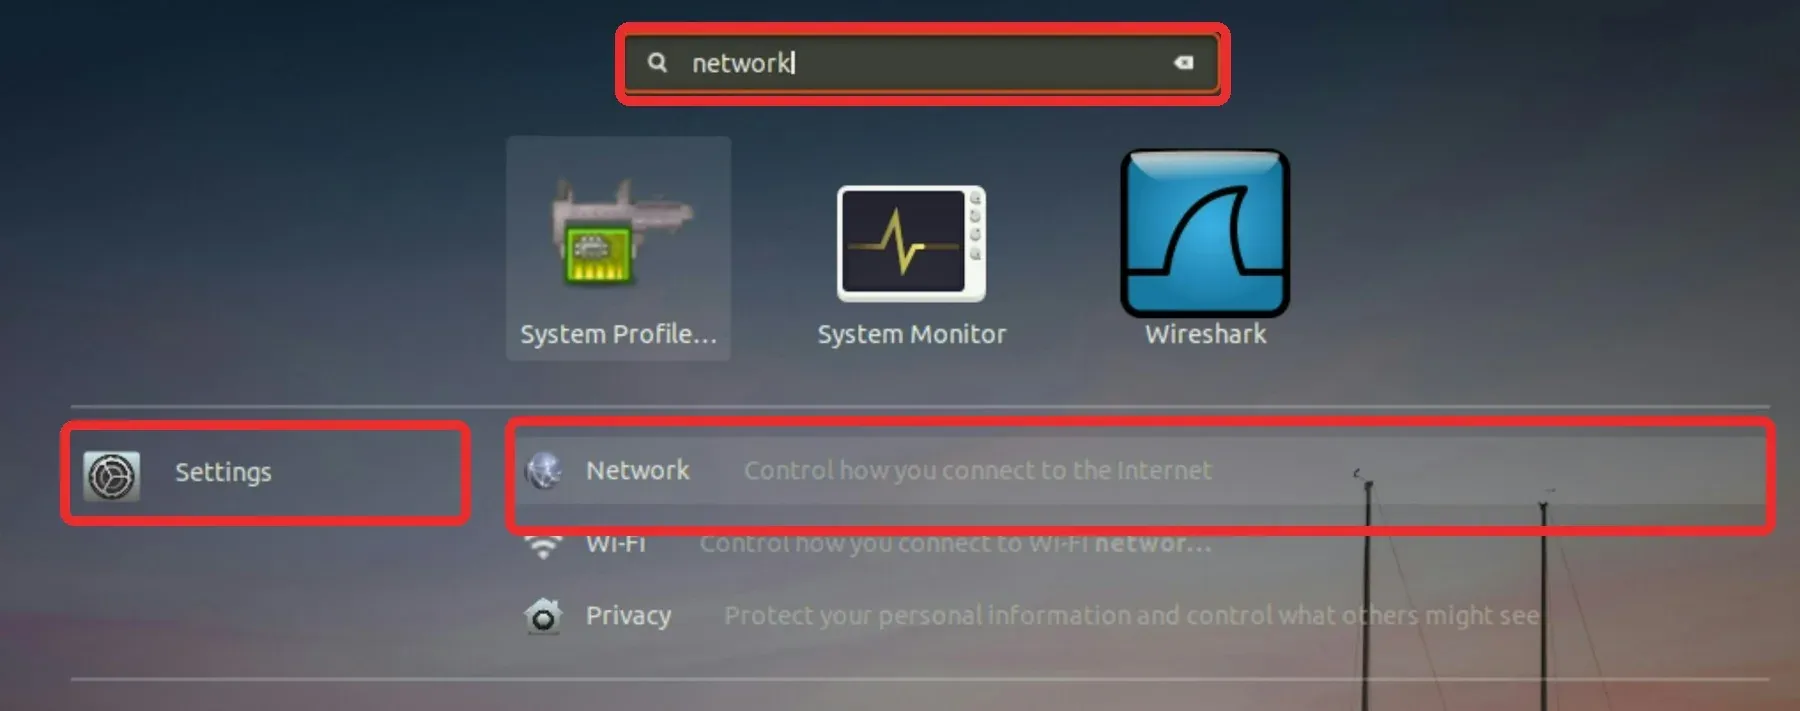
Figure 2: Search for Network to find the network settings panel. Search results and layout vary by desktop version.
Step 2: Open Network Proxy
Select Network, then open Network Proxy. In the interface shown below, use the gear button next to Network Proxy.
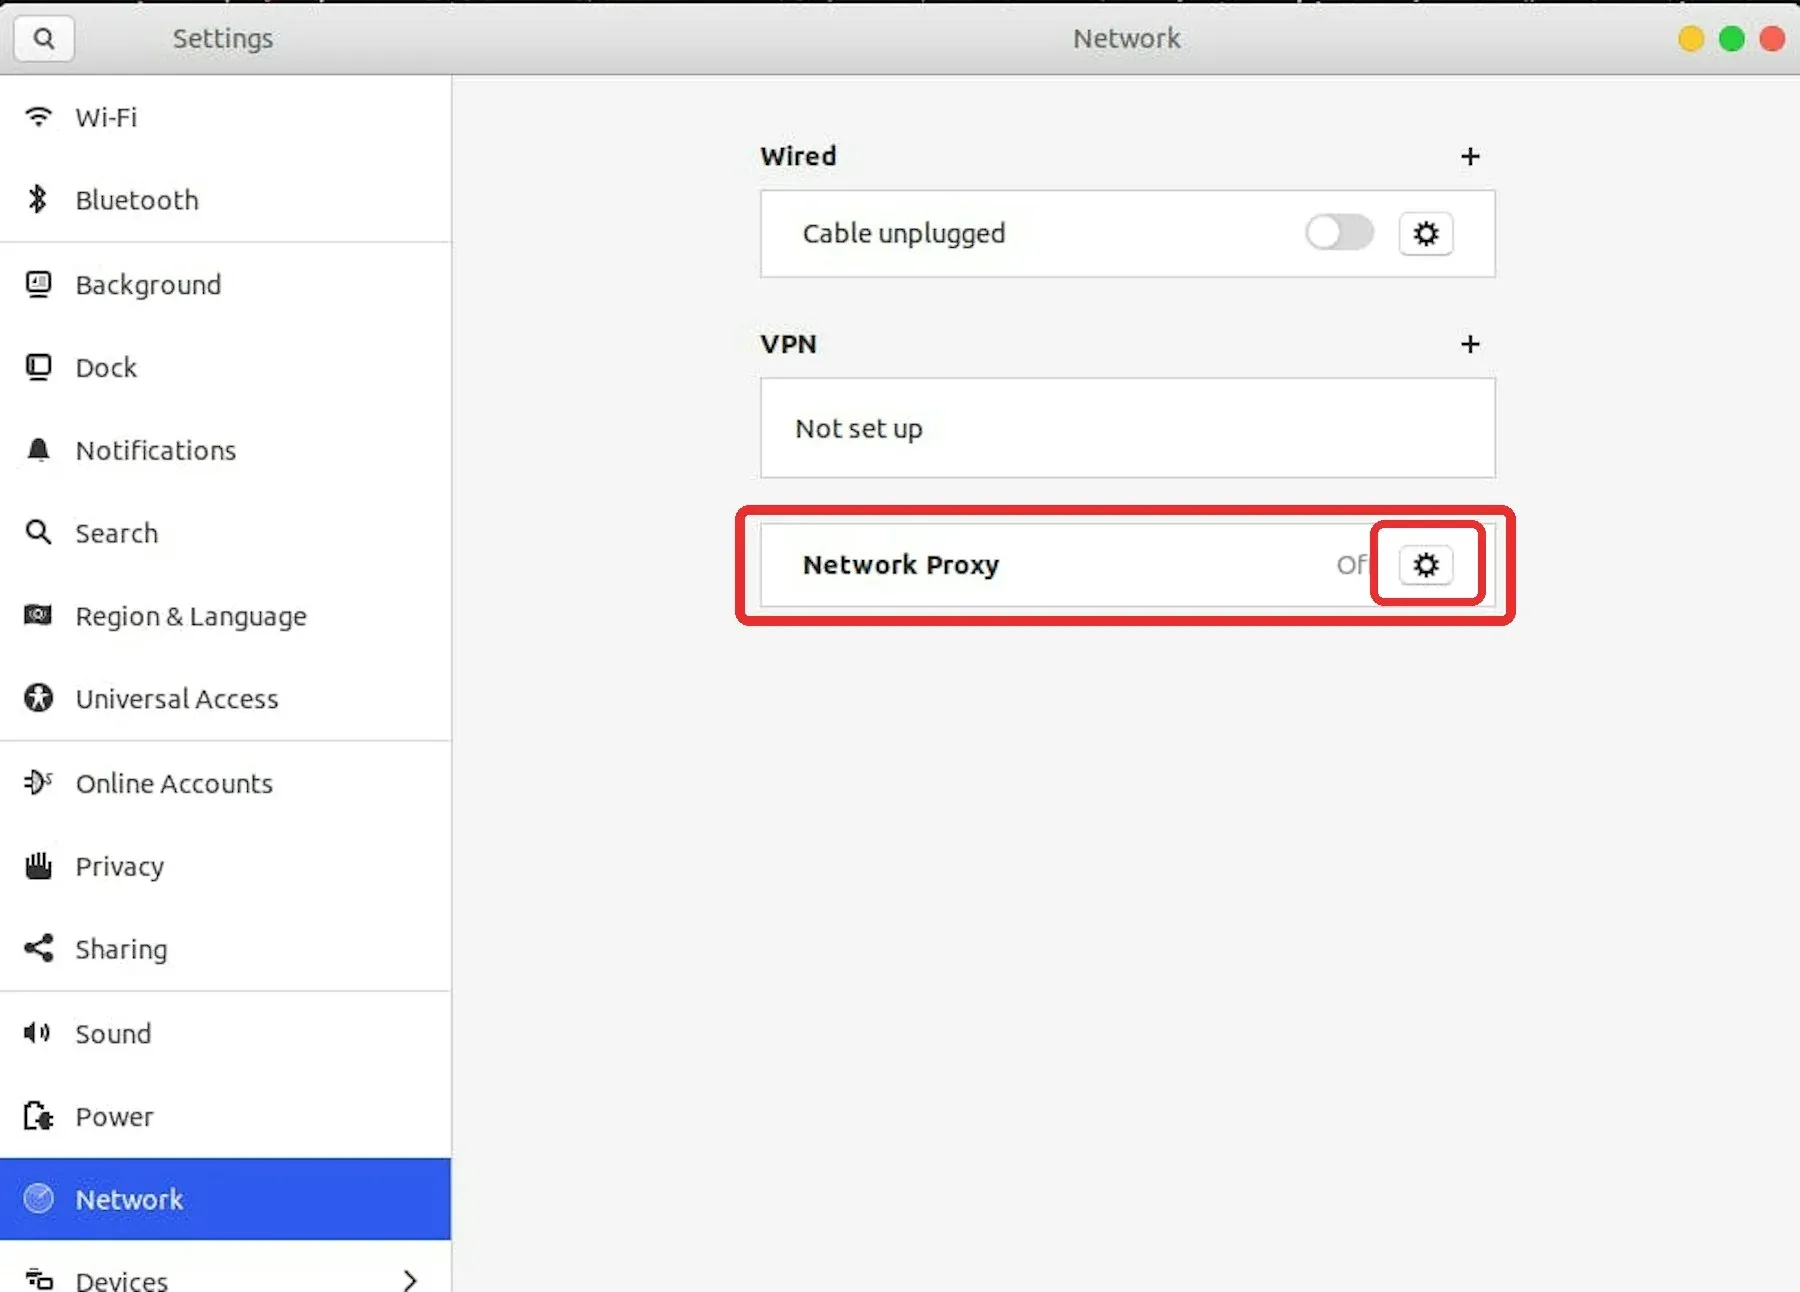
Figure 3: The Network Proxy entry in the Network settings panel.
Step 3: Select Manual and Enter the Host and Port
Select Manual instead of None or Disabled. Enter your proxy host and numeric port in the appropriate protocol fields. Keep localhost, 127.0.0.0/8, and ::1 in Ignore Hosts, and add internal domains as needed.
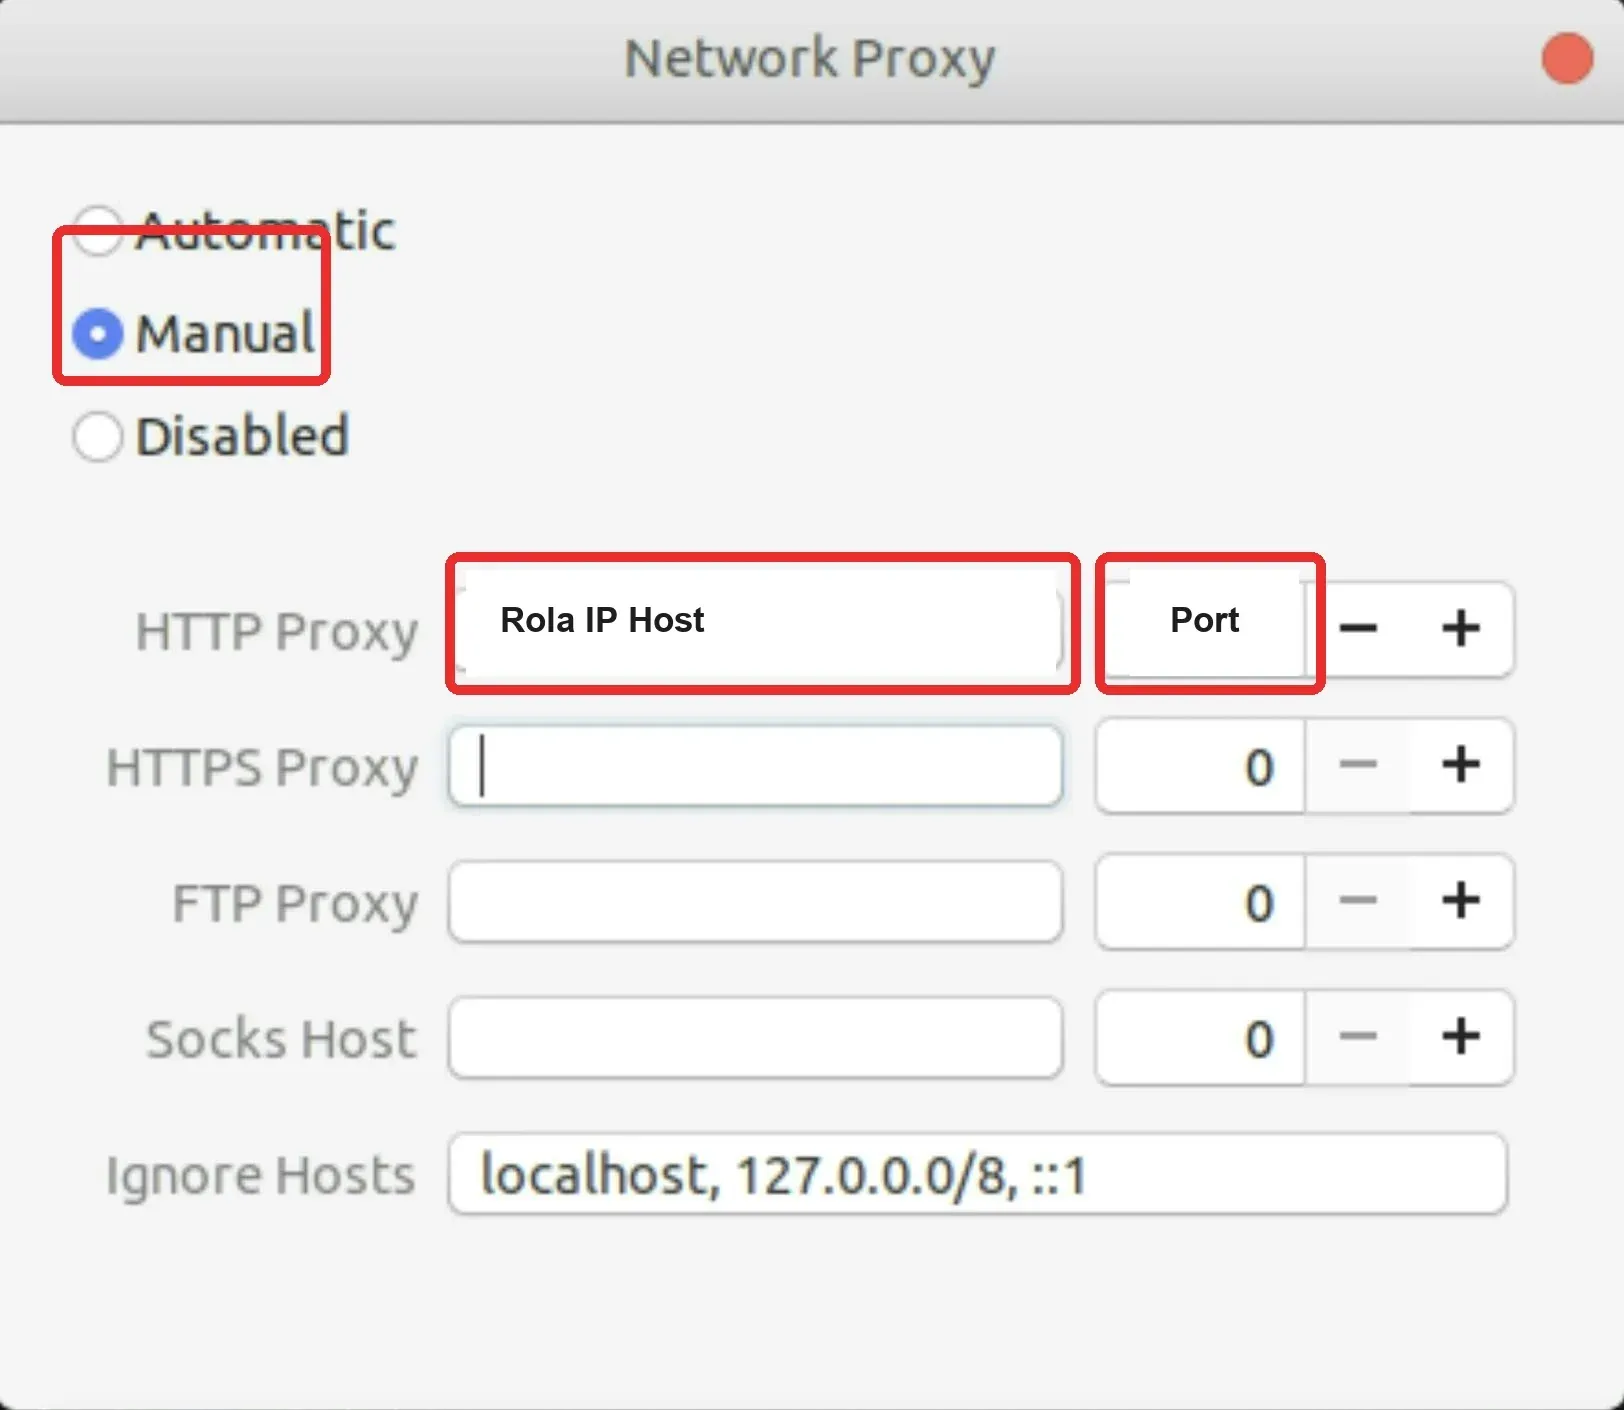
Figure 4: Annotated field guide. “Rola IP Host” and “Port” are explanatory labels, not connection values; replace them with your gateway host and numeric port.
Step 4: Save and Restart the Application
If your interface provides Apply or Save, use it after entering the required values. Then fully restart the application you want to test. The screenshots show different interface layouts, so button placement may differ on your desktop.
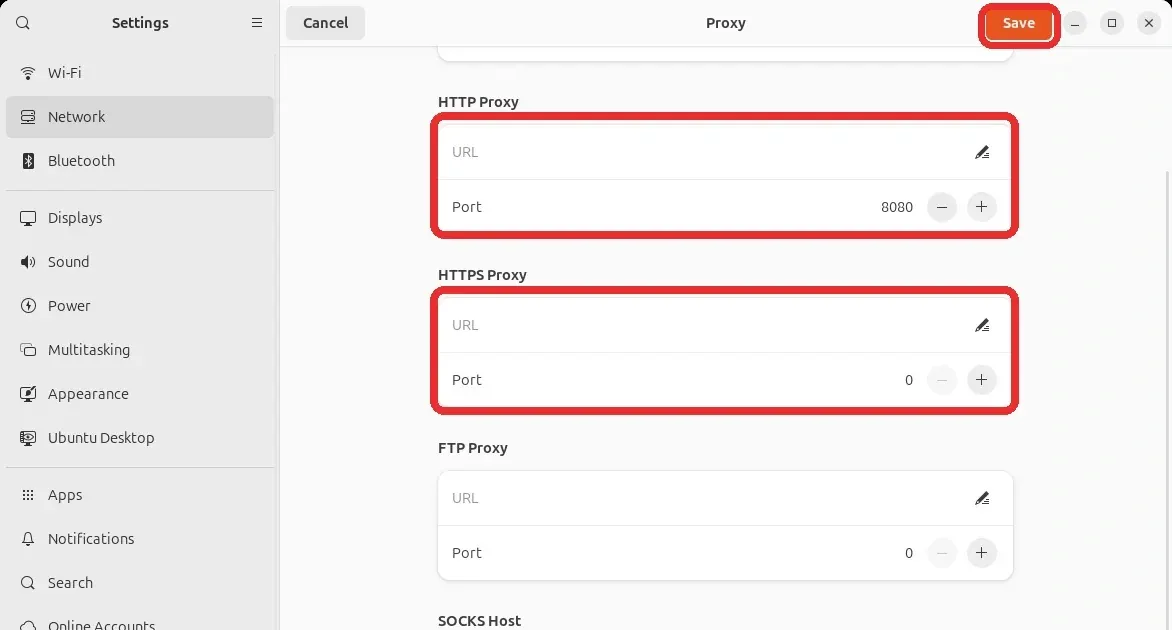
Figure 5: An alternative proxy settings layout with a Save button. The host fields are empty, so this is a field-location example, not a completed configuration. The displayed port is not a Rola IP connection parameter.
The GUI often stores only the address and port. When username/password authentication is required, an application may show an authentication dialog on the first request, and some applications have limited proxy-authentication support. If the provider supports IP allowlisting, it can reduce repeated credential prompts in desktop scenarios, but the current public exit must be stable and authorized.
Check the GNOME Proxy with gsettings
The following commands only read the configuration; they do not modify the system:
gsettings get org.gnome.system.proxy mode
gsettings get org.gnome.system.proxy.http host
gsettings get org.gnome.system.proxy.http port
gsettings get org.gnome.system.proxy.https host
gsettings get org.gnome.system.proxy.https port
gsettings get org.gnome.system.proxy.socks host
gsettings get org.gnome.system.proxy.socks port
gsettings get org.gnome.system.proxy ignore-hosts
For each protocol you intend to proxy, check that its host is populated and its port is valid. Unused protocol fields may remain empty or show 0. On Ubuntu Server without GNOME, gsettings may not be available; that does not prevent you from using environment variables, APT configuration, or service-specific proxy settings.
Method 2: Temporarily Set a Proxy in Ubuntu Terminal
If you only want the current terminal and its child processes to use a proxy, set environment variables in a fresh terminal and close it when finished. If reusing a terminal with existing proxy settings, record those values first and restore them afterward.
Set HTTP and HTTPS Proxies
export http_proxy="http://proxy.example:1000"
export https_proxy="http://proxy.example:1000"
export HTTP_PROXY="$http_proxy"
export HTTPS_PROXY="$https_proxy"

export no_proxy="localhost,127.0.0.1,::1,.internal.example"
export NO_PROXY="$no_proxy"
Setting both lowercase and uppercase forms improves compatibility across tools. no_proxy is usually comma-separated, but support for CIDR ranges, leading dots, and wildcards varies by application, so test the applications that matter to your workflow.
Test with Username and Password Authentication
For an interactive cURL test, pass only the username to --proxy-user. cURL prompts for the password, avoiding a literal password in your shell history or command arguments:
export ROLA_PROXY_HOST="proxy.example"
export ROLA_PROXY_PORT="1000"
export ROLA_PROXY_USER="your-username"
curl --proxy "http://${ROLA_PROXY_HOST}:${ROLA_PROXY_PORT}" \
  --proxy-user "$ROLA_PROXY_USER" \
  --noproxy "" \
  --connect-timeout 10 --max-time 30 --fail-with-body \
  "https://api.ipify.org?format=json"
--noproxy "" prevents a bypass list from skipping this explicit proxy test. If your cURL version does not support --fail-with-body, use --fail. Interactive password prompting is unsuitable for unattended jobs; use the client’s supported secret-management mechanism or authorized IP allowlisting. Redact credentials from diagnostic output.
Configure SOCKS5 and Remote DNS
cURL supports socks5h://, where the h means the proxy resolves the destination hostname. This delegates destination DNS resolution to the proxy; it does not guarantee a particular resolver location:
curl --proxy "socks5h://proxy.example:1080" \
  --proxy-user "your-username" \
  --noproxy "" --connect-timeout 10 --max-time 30 --fail \
  "https://api.ipify.org?format=json"
Enter the password at the prompt. Not every application understands socks5h:// in environment variables. When SOCKS5 is required, prefer the application’s own proxy options and verify its DNS behavior.
Remove the Current Terminal Proxy
unset http_proxy https_proxy HTTP_PROXY HTTPS_PROXY
unset all_proxy ALL_PROXY no_proxy NO_PROXY
Method 3: Permanently Set an Ubuntu Proxy for the Current User
For login shells, you can place non-sensitive proxy variables in ~/.profile; do not treat .bashrc as a system-wide proxy configuration for every application and service.
~/.bashrc is mainly read by interactive Bash shells, while desktop applications, cron jobs, and systemd services may not read it. ~/.profile is more appropriate for login sessions, and you should log out and back in after changing it.
Before editing an existing ~/.profile, make a uniquely named backup:
profile_backup=$(mktemp "$HOME/.profile.proxy-backup.XXXXXX") &&
  cp -p "$HOME/.profile" "$profile_backup"
If the file does not exist, create it in your editor. Add or update one proxy block rather than appending duplicate definitions on each run:
export http_proxy="http://proxy.example:1000"
export https_proxy="http://proxy.example:1000"
export HTTP_PROXY="$http_proxy"
export HTTPS_PROXY="$https_proxy"
export no_proxy="localhost,127.0.0.1,::1,.internal.example"
export NO_PROXY="$no_proxy"
Bash login shells read ~/.bash_profile or ~/.bash_login before ~/.profile when those files exist. Check your actual startup chain instead of assuming every session reads .profile. To undo the change, remove only the block you added or restore the saved values, then start a new login session. Keep production passwords out of shell startup files.
Method 4: Configure an Ubuntu Proxy with the System Environment File
/etc/environment can provide variables to future login sessions, but it is not a shell script. Do not put export, command substitutions, or complex logic in it.
http_proxy="http://proxy.example:1000"
https_proxy="http://proxy.example:1000"
HTTP_PROXY="http://proxy.example:1000"
HTTPS_PROXY="http://proxy.example:1000"
no_proxy="localhost,127.0.0.1,::1,.internal.example"
NO_PROXY="localhost,127.0.0.1,::1,.internal.example"
Back up /etc/environment before editing and preserve unrelated entries. After editing it with administrator privileges, log out and back in so a new PAM session can read the values. The file does not automatically update already-running terminals, desktop applications, or systemd services. Because local users may be able to read the file, it is not suitable for shared production passwords.
Method 5: Configure an Ubuntu Proxy Specifically for APT
The most predictable approach for APT is to create a dedicated configuration file such as /etc/apt/apt.conf.d/95proxies.
if sudo test -e /etc/apt/apt.conf.d/95proxies; then
  apt_proxy_backup=$(sudo mktemp /root/95proxies.backup.XXXXXX) &&
    sudo cp -p /etc/apt/apt.conf.d/95proxies "$apt_proxy_backup" &&
    sudoedit /etc/apt/apt.conf.d/95proxies
else
  sudo install -m 600 /dev/null /etc/apt/apt.conf.d/95proxies &&
    sudoedit /etc/apt/apt.conf.d/95proxies
fi
The commands preserve an existing file before editing; keep its backup outside the APT fragments directory. Add or update the following entries without deleting unrelated configuration. Here, https refers to the repository protocol. If the proxy itself is an HTTP forward proxy, both lines will commonly still use http://proxy.example:1000/:
Acquire::http::Proxy "http://proxy.example:1000/";
Acquire::https::Proxy "http://proxy.example:1000/";
The Ubuntu apt.conf manpage explains that the Acquire group controls proxy configuration for download methods. Configuration-fragment names may contain letters, digits, hyphens, underscores, and periods, and must have no extension or use .conf. The filename 95proxies meets these rules.
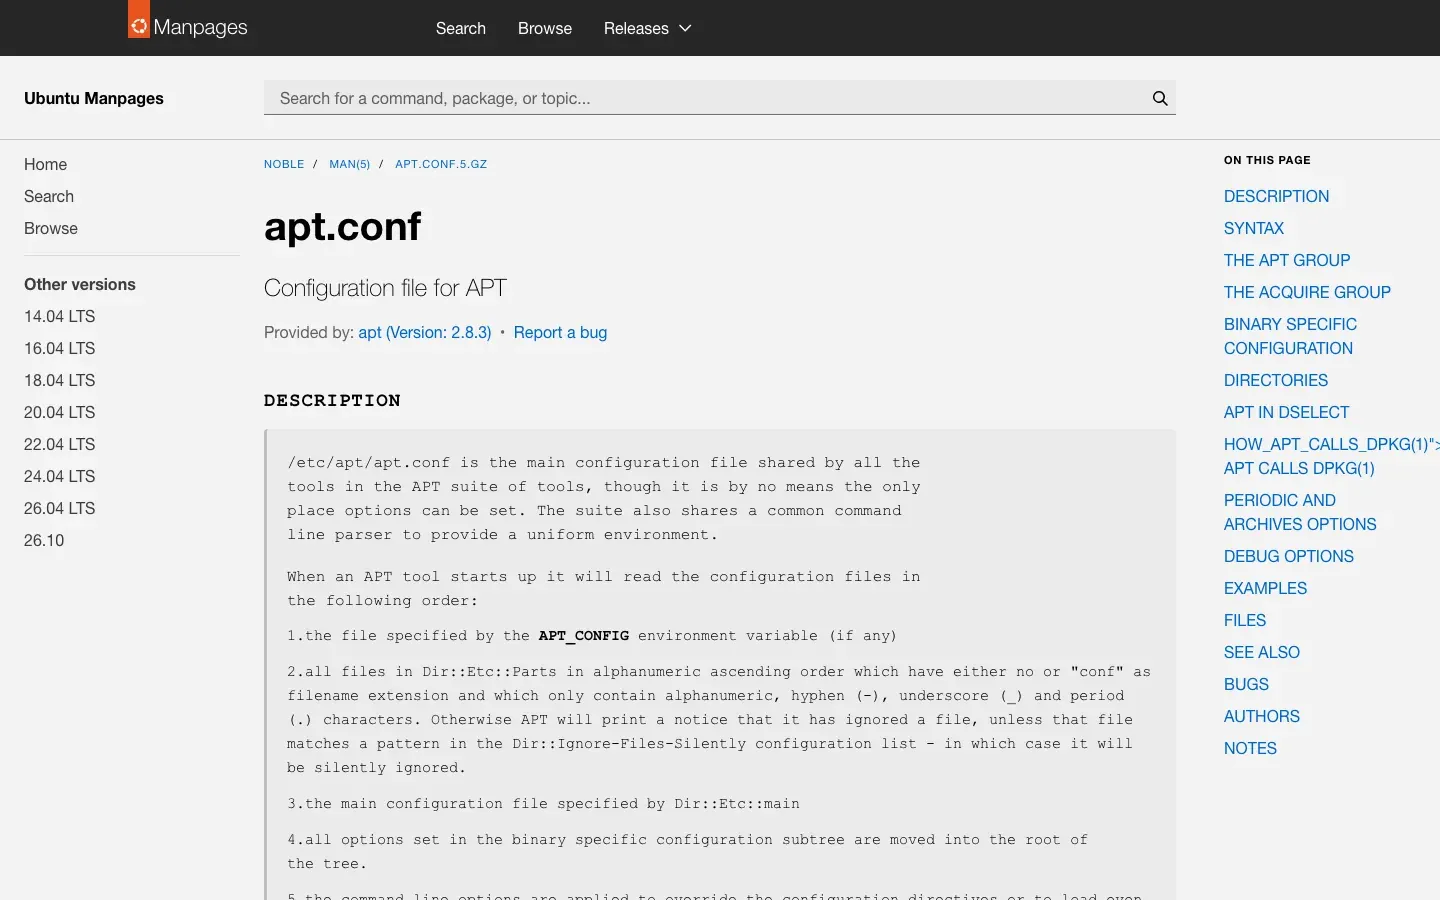
Figure 6: Ubuntu’s English apt.conf manpage. APT reads configuration fragments under /etc/apt/apt.conf.d/ in order.
Check Whether APT Loaded the Proxy
sudo apt-config dump | grep -i -E 'Acquire::(http|https)::Proxy'
sudo apt-get update
If authentication is required, prefer exit-IP allowlisting or restricted dedicated credentials. Do not upload APT configurations containing passwords to logs, support tickets, or Git.
Temporarily Bypass or Remove the APT Proxy
For a one-time direct-connection test where direct access is permitted, the following overrides the generic protocol settings. Also inspect any host-specific proxy entries or proxy auto-detection rules, which may affect the result:
sudo apt-get -o Acquire::http::Proxy="DIRECT" \
  -o Acquire::https::Proxy="DIRECT" update
Before permanently removing the proxy, confirm the exact configuration file you intend to change, then use sudoedit to remove only the proxy entries you added or restore their prior values. Preserve unrelated entries. Remove the file only if you created it solely for this proxy setup. On managed enterprise devices, consult the administrator first.
Method 6: Configure Chrome Proxy Settings on Ubuntu
Chrome in a GNOME desktop session normally uses desktop proxy settings. Where available, its system-proxy button opens the desktop settings. Menu wording and integration vary; if the button is absent, open GNOME Settings directly.
- Open
chrome://settings/system. - Click Open your computer’s proxy settings.
- In Ubuntu Network Proxy, select Manual and enter the correct protocol, host, and port.
- Fully quit Chrome, then reopen it.
- Visit an IP-check page and also test a normal HTTPS website.
For an isolated temporary test, launch a separate Chrome process from Terminal:
chrome_proxy_profile=$(mktemp -d /tmp/chrome-proxy-test.XXXXXX) &&
  google-chrome \
  --user-data-dir="$chrome_proxy_profile" \
  --proxy-server="http://proxy.example:1000"
After quitting the test browser, remove only the temporary profile directory created by this command if you no longer need it. Using a separate --user-data-dir helps avoid reusing an already-running Chrome process or its existing extension settings. This command does not securely save proxy credentials automatically; when authentication is required, the browser may prompt for credentials, or you should use allowlisting or a controlled proxy client.
Method 7: Configure Proxies Separately for Git, Wget, Python, npm, Snap, and Docker
When an application has its own proxy configuration, prefer the method it explicitly supports and keep a reversible command for removing the setting.
Git
Git uses http.proxy for both HTTP and HTTPS remotes; it does not configure SSH remotes. Record any existing value before changing it:
git config --global --get http.proxy
No output and exit status 1 means the key is absent. Set the proxy, then read it back:
git config --global http.proxy "http://proxy.example:1000"
git config --global --get http.proxy
Readback confirms storage, not network use. Local repository settings, URL-specific settings, and command-line options can override this value. Test access to a repository you are authorized to use and inspect the applicable configuration.
When finished, restore the old value. Only if no value existed before this change, remove the added key:
git config --global --unset http.proxy
Wget
Wget normally reads lowercase environment variables. A one-time command avoids changing other programs:
https_proxy="http://proxy.example:1000" \
  wget -S --spider "https://example.com/"
Python Requests
Requests normally reads proxy environment variables. The example below uses an explicit proxy and disables inherited environment settings to make this test easier to interpret.
Create a virtual environment with Python’s venv support installed, then install Requests:
python3 -m venv .venv
source .venv/bin/activate
python -m pip install requests
If venv creation reports missing support, install Ubuntu’s python3-venv package through your configured APT connection. Export the connection details before running the Python script:
export ROLA_PROXY_HOST="proxy.example"
export ROLA_PROXY_PORT="1000"
export ROLA_PROXY_USER="your-username"
Save the following code as ubuntu_proxy_check.py. For username/password authentication, it prompts for the password and URL-encodes the credential fields. For authorized IP allowlisting without username/password authentication, set ROLA_PROXY_AUTH=allowlist; otherwise, the default is password.
import os
import sys
from getpass import getpass
from ipaddress import ip_address
from urllib.parse import quote

import requests

def main():
    try:
        host = os.environ["ROLA_PROXY_HOST"].strip()
        port = int(os.environ["ROLA_PROXY_PORT"])
        auth = os.environ.get("ROLA_PROXY_AUTH", "password")
        if (not host or any(c.isspace() for c in host)
                or any(c in host for c in "/@?#")
                or not 1 <= port <= 65535
                or auth not in {"password", "allowlist"}):
            raise ValueError
        # A colon is allowed only in a bracketed IPv6 literal.
        if ":" in host or "[" in host or "]" in host:
            if not (host.startswith("[") and host.endswith("]")
                    and ip_address(host[1:-1]).version == 6):
                raise ValueError
        credentials = ""
        if auth == "password":
            username = os.environ["ROLA_PROXY_USER"]
            if not username:
                raise ValueError
            password = getpass("Proxy password: ")
            credentials = f"{quote(username, safe='')}:{quote(password, safe='')}@"
        proxy = f"http://{credentials}{host}:{port}"
    except (KeyError, ValueError):
        print("Configuration error: check ROLA_PROXY_HOST, PORT, USER and AUTH.",
              file=sys.stderr)
        return 2

    try:
        with requests.Session() as session:
            session.trust_env = False
            response = session.get(
                "https://api.ipify.org?format=json",
                proxies={"http": proxy, "https": proxy},
                timeout=(10, 30),
                allow_redirects=False,
            )
            response.raise_for_status()
            if response.status_code != 200:
                print("Unexpected HTTP status; no IP result accepted.", file=sys.stderr)
                return 1
            data = response.json()
            if not isinstance(data, dict) or not isinstance(data.get("ip"), str):
                raise ValueError
            exit_ip = ip_address(data["ip"])
    except requests.exceptions.ProxyError:
        print("Proxy connection failed: check endpoint and authentication.", file=sys.stderr)
        return 1
    except requests.exceptions.SSLError:
        print("TLS verification failed: check the approved CA configuration.", file=sys.stderr)
        return 1
    except requests.exceptions.Timeout:
        print("Request timed out: check the connection and response path.", file=sys.stderr)
        return 1
    except requests.exceptions.HTTPError as error:
        status = error.response.status_code if error.response is not None else "unknown"
        print(f"HTTP {status}: see the matching troubleshooting section.", file=sys.stderr)
        return 1
    except ValueError:
        print("Invalid response: expected JSON with a valid IP in the ip field.", file=sys.stderr)
        return 1
    except requests.exceptions.RequestException:
        print("Request failed: check network and client configuration.", file=sys.stderr)
        return 1

    print(f"HTTPS IP check succeeded: {exit_ip}")
    return 0


if __name__ == "__main__":
    raise SystemExit(main())
With the virtual environment active and the variables exported, record the installed versions and run the script:
python --version
python -m pip show requests
python ubuntu_proxy_check.py
The script exits with code 0 only after HTTP 200 and a valid IP address in the JSON ip field; request or response failures return 1, and configuration errors return 2. It makes one request with no automatic retries. After diagnosing a failure, correct the cause and repeat once; for 429, follow the rate-limit guidance below before retrying. Fixed error messages avoid printing credential-bearing exception details.
Use only the gateway hostname or IP in ROLA_PROXY_HOST, with brackets around an IPv6 literal; omit a URL scheme and path. trust_env=False also disables environment-based CA bundle selection and netrc handling; add verify="/path/to/approved-ca-bundle.pem" to session.get() when your environment requires an approved custom CA. Do not disable TLS verification or log the proxy URL.
A successful IP response verifies this request only. Corroborate routing with a permitted direct comparison or proxy-side logs; it does not prove long-term reliability or other applications’ configuration. Ubuntu/Rola live validation, actual tested dependency versions, and redacted run output have not been supplied for this example. Record them from your own authorized run rather than treating sample or simulated output as evidence.
npm
npm uses its own configuration keys. First record the current npm config get proxy and npm config get https-proxy values. Set the user-level values and inspect them:
npm config set proxy "http://proxy.example:1000" --location=user
npm config set https-proxy "http://proxy.example:1000" --location=user

npm config get proxy
npm config get https-proxy
Project-level settings or environment variables may override user settings. Restore the previous values after testing. If neither key previously existed at user level, remove only the keys you added:
npm config delete proxy --location=user
npm config delete https-proxy --location=user
If the proxy requires username/password authentication, do not save production credentials directly in a project-level .npmrc or commit them to Git. Prefer current-user-only configuration with restricted permissions, or use exit-IP allowlisting.
Snap
Snap uses system options rather than APT configuration. Run sudo snap get system proxy and record any existing values before changing them. Set and read back the options:
sudo snap set system proxy.http="http://proxy.example:1000"
sudo snap set system proxy.https="http://proxy.example:1000"
sudo snap get system proxy
Record existing Snap proxy options before changing them. When finished, restore their old values; if they were absent, remove the two options:
sudo snap unset system proxy.http
sudo snap unset system proxy.https
Snap and APT use separate package-management paths. APT updating successfully does not mean Snap has read the same proxy settings.
Docker CLI and Containers
Back up ~/.docker/config.json before editing and merge the proxies object into its existing JSON; preserve other keys such as authentication and credential-store settings. The Docker client can use ~/.docker/config.json to inject proxy environment variables into newly created containers. This configuration does not replace the proxy used by the Docker daemon when pulling images; the two must be handled separately.
{
  "proxies": {
    "default": {
      "httpProxy": "http://proxy.example:1000",
      "httpsProxy": "http://proxy.example:1000",
      "noProxy": "localhost,127.0.0.1,::1,.internal.example"
    }
  }
}
The configuration affects only containers created afterward. Use the following command to check whether a new container received the variables:
docker run --rm alpine:latest env | grep -i proxy
Choose an image tag approved for your environment; the example may pull an image and create a container. Readback only shows environment injection. If docker pull itself needs a proxy, configure the daemon separately. For a systemd-managed Docker Engine, a drop-in for docker.service is one option; explicit daemon proxy settings can take precedence. Rootless Docker and Docker Desktop require their own service or application configuration. Do not assume container environment variables are automatically passed to the Docker daemon.
Method 8: Configure a Proxy for a systemd Background Service
systemd system services normally do not read a user’s .bashrc or desktop proxy configuration. Create a drop-in for the specific service if its application supports proxy environment variables. systemd passes the variables but does not force network traffic through a proxy.
The following example uses your-service.service as a placeholder:
sudo systemctl edit your-service.service
Add the following in the editor:
[Service]
Environment="http_proxy=http://proxy.example:1000"
Environment="https_proxy=http://proxy.example:1000"
Environment="no_proxy=localhost,127.0.0.1,::1,.internal.example"
Environment="HTTP_PROXY=http://proxy.example:1000"
Environment="HTTPS_PROXY=http://proxy.example:1000"
Environment="NO_PROXY=localhost,127.0.0.1,::1,.internal.example"
Then run:
sudo systemctl daemon-reload
sudo systemctl restart your-service.service
systemctl show your-service.service --property=Environment
Restarting affects the service, so perform it in an appropriate maintenance window. The environment readback confirms configuration only; test the service’s own requests. systemd credentials require the application or a wrapper to read the credential files. A permission-restricted EnvironmentFile still exposes secrets to the service environment, so do not treat it as a general-purpose secret store. To undo the change, remove only the proxy directives you added to the drop-in, then reload systemd and restart the service; preserve unrelated overrides.
How Do You Check Proxy Settings on Ubuntu?
When checking Ubuntu proxy settings, inspect each layer separately. Run Git checks inside the relevant repository; they do not cover every repository or future command-line override. Redact passwords before sharing configuration output. Do not assume the whole system has no proxy just because the current shell has no proxy variables.
# Current shell
env | grep -i -E '^(http|https|all|no)_proxy='

# GNOME desktop
gsettings get org.gnome.system.proxy mode
gsettings list-recursively org.gnome.system.proxy

# APT
sudo apt-config dump | grep -i proxy

# Git
git config --show-origin --get-regexp '^http\..*proxy$' || true
| Symptom | Possible Cause | Check First |
|---|---|---|
Chrome uses the proxy, but curl does not |
GNOME is configured; shell is not | Environment variables |
curl uses the proxy, but Chrome does not |
Shell is configured; GNOME is not | Network Proxy |
| Browser works, but APT fails | APT-specific proxy configuration is missing or authentication failed | sudo apt-config dump and 95proxies |
| Login terminal works, but a systemd service connects directly | Service did not inherit the user environment | Service drop-in |
| Exit IP is correct, but DNS location does not match | Local DNS, application DNS settings, or resolver/geolocation differences | socks5h or application DNS settings |
Variables disappear after sudo |
sudo clears environment variables by default |
Configure the target tool directly; do not blindly use sudo -E |
How Do You Verify That an Ubuntu Application Uses the Proxy?
Configuration readback shows what was saved; an actual request checks what the client uses. If direct access is permitted, compare a direct request with an explicit proxy request:
# Direct request: bypass proxies for this request only.
curl --noproxy "*" --connect-timeout 10 --max-time 30 --fail \
  "https://api.ipify.org?format=json"
Then run the authenticated cURL command in Method 2 with your authorized endpoint. It explicitly sets the proxy and disables bypass rules for that request. A changed IP can support the result, but identical IPs do not alone prove failure: the network paths may share an exit. Use available proxy-side request logs to corroborate routing. Never publish credentials from verbose traces.
Repeat verification in the actual application: a browser IP-check page for Chrome, a repository operation for Git, an APT update for package downloads, or the service’s own requests. A successful cURL request does not verify those other clients. Keep the test date, client versions, and redacted results if documenting a deployment.
How Do You Connect and Verify Rola IP on Ubuntu?
First obtain the complete Rola IP connection information, verify it with a single cURL request, and then apply the verified proxy at the appropriate Ubuntu scope.
Step 1: Choose a Proxy Network
Start with the network available in your Rola IP account and copy its connection details. The Quick Start page shown below lists rotating residential, rotating datacenter, and mobile networks. Match the choice to your required location, session behavior, and authorized workload.
For a residential-network workflow, review the residential proxies product page before choosing your connection. Network type does not change Ubuntu’s configuration layers; each application still needs the correct protocol, endpoint, and authentication.
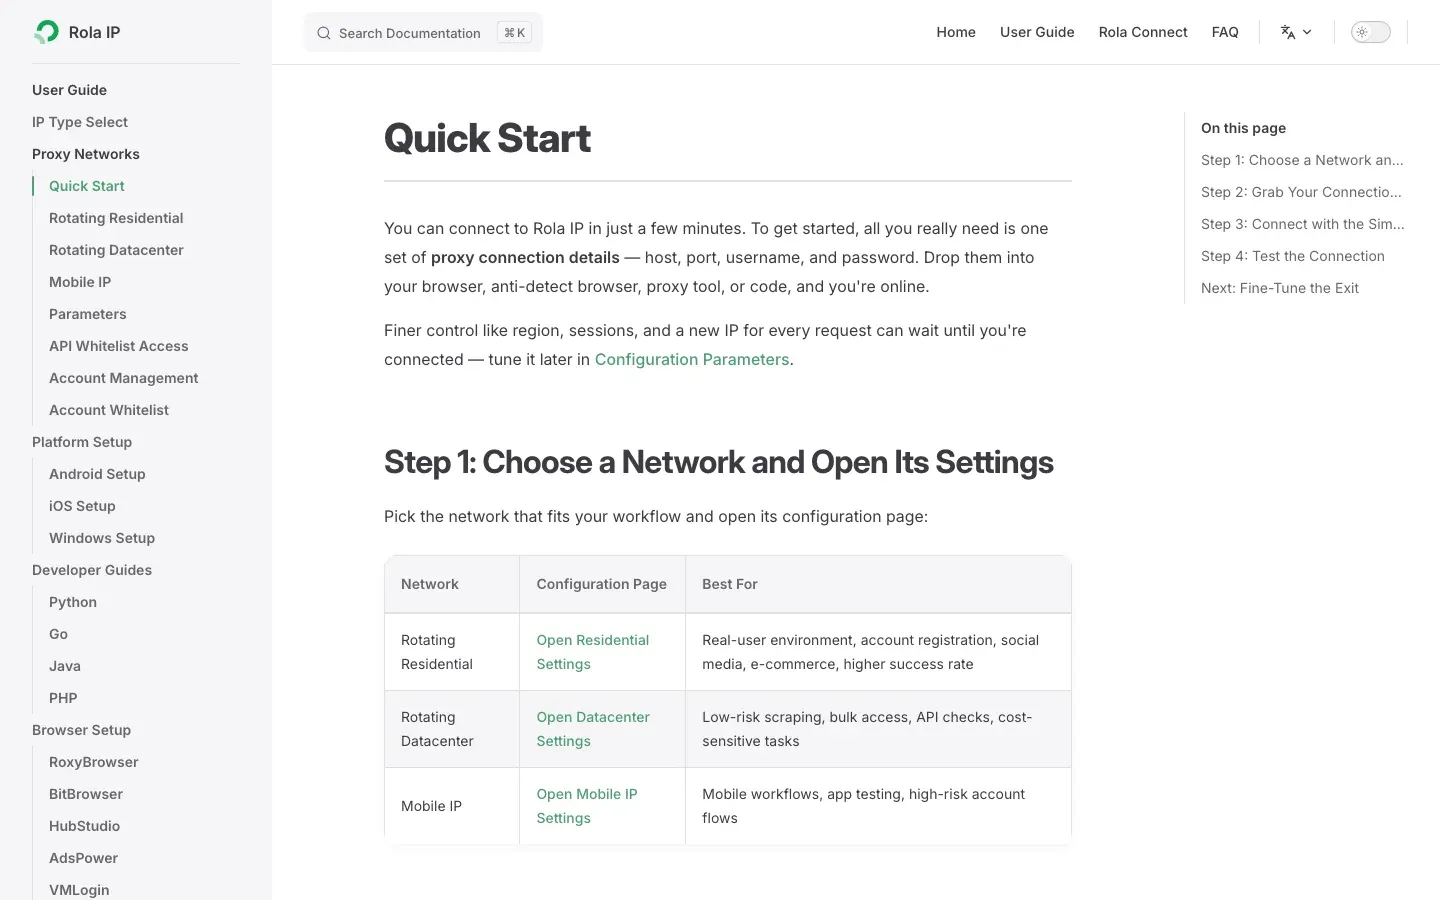
Figure 7: Rola IP’s English Quick Start page, where you choose a network type and open the corresponding settings page to obtain connection details.
Step 2: Copy the Host, Port, and Authentication Details
Open the selected network’s settings in your account to obtain the connection parameters. Do not confuse the exit IP with the gateway host, and do not mix ports from different products. If you use IP allowlisting, first confirm that the public exit of the Ubuntu server is authorized.
Location, session, and rotation fields should follow the proxy parameters documentation. The shown documentation limits state and city targeting to Rotating Residential; do not apply every parameter to every network. Incorrect parameter formatting can appear as authentication failure, a location mismatch, or a connection failure.
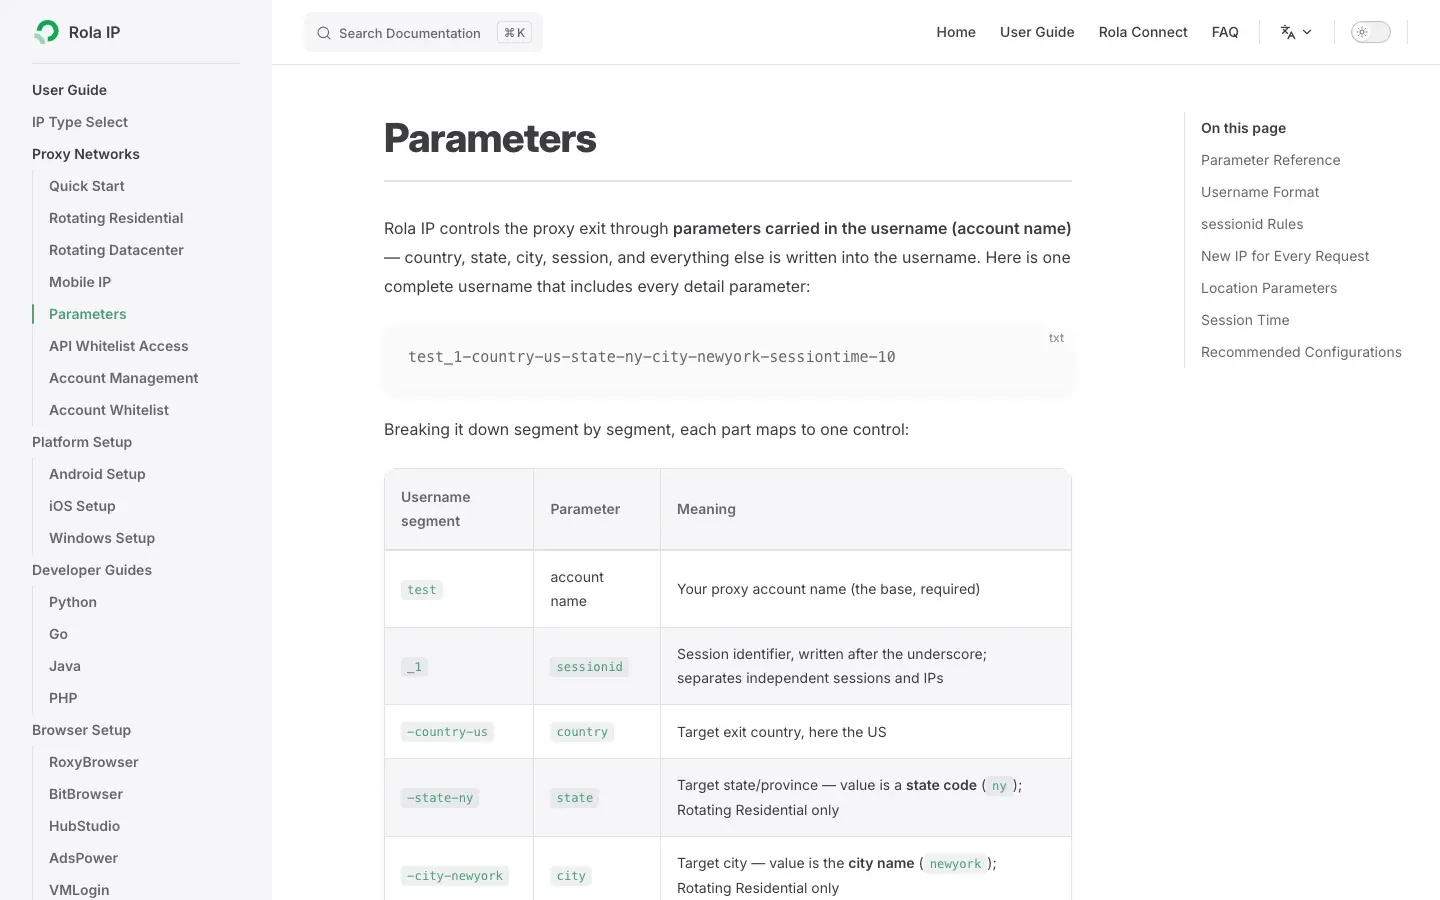
Figure 8: Rola IP’s English Parameters page, used to confirm how location, session, and rotation parameters are assembled. The visible state and city entries are marked Rotating Residential only.
Step 3: Verify Once Before Expanding the Scope
Start with the curl --proxy --proxy-user command shown earlier. After it succeeds, expand the configuration one layer at a time to the current shell, APT, Chrome, or systemd. If the proxy returns 407, fix authentication. If the connection times out or is refused, check the host, port, firewall, and proxy status, and refer to proxy API connection failed when troubleshooting allowlisting in multi-exit environments.
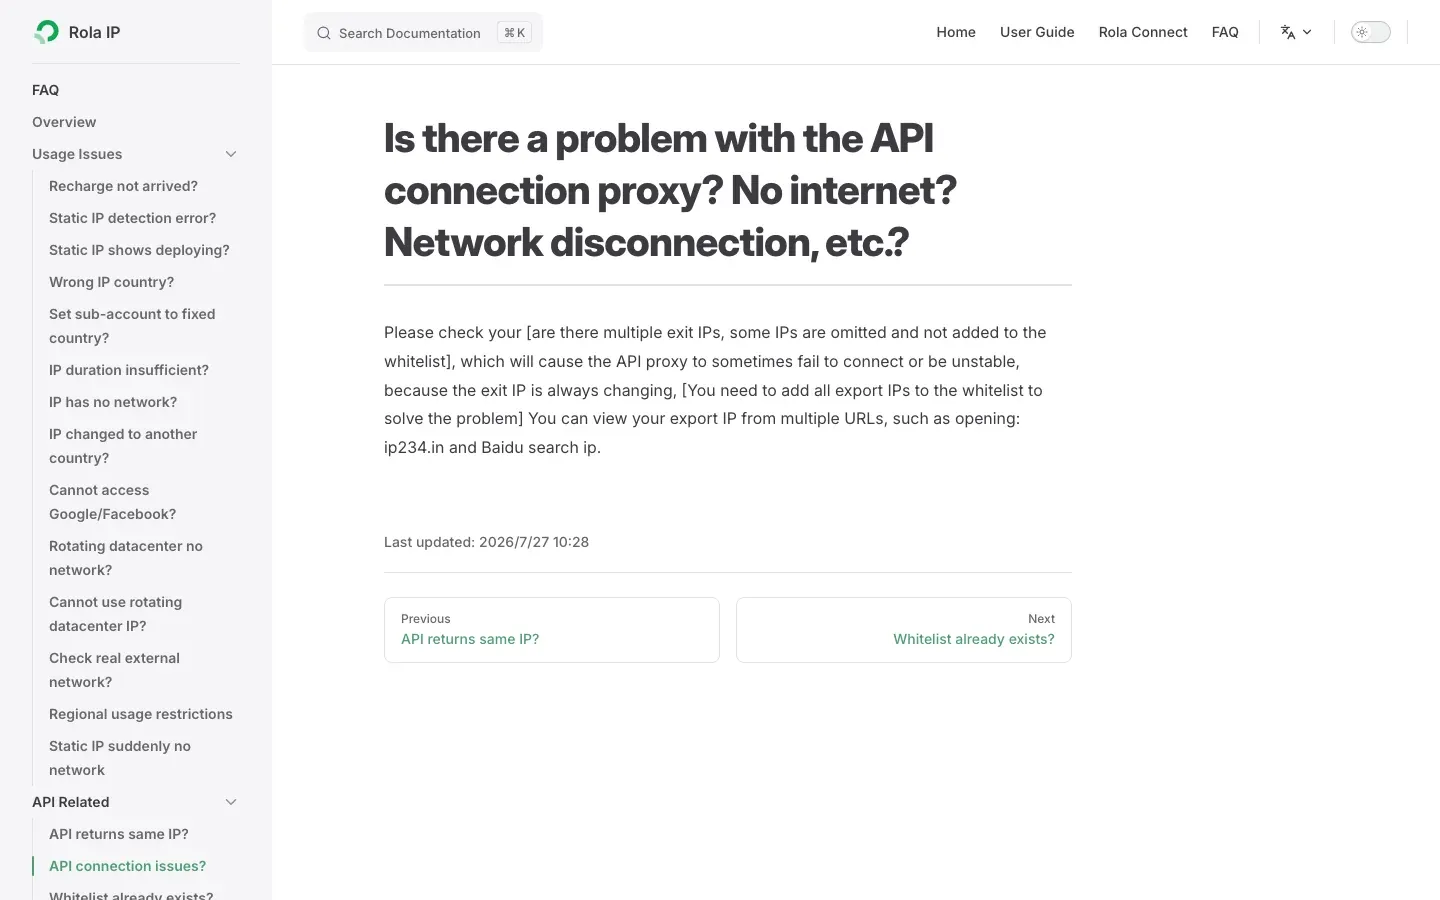
Figure 9: Rola IP’s English connection-troubleshooting page explains that multi-exit environments should verify whether the actual exit matches the allowlist.
Common Ubuntu Proxy Errors and Fixes
Common causes include configuration scope, protocol mismatches, authentication, network conditions, and leftover settings.
curl: (5) Could Not Resolve Proxy
The proxy host cannot be resolved. Check spelling, DNS, quoting, and whether the variable contains invisible characters. Do not try to solve a hostname-resolution error by rotating IP addresses.
curl: (7) Failed to Connect
The TCP connection was not established. Check the port, proxy-service status, local firewall, and corporate network policy.
HTTP 407 Proxy Authentication Required
HTTP 407 means the proxy requires authentication. Check whether credentials were sent, whether the authentication method is supported, and whether account or source-IP authorization applies. The status alone does not identify which check failed. Check special-character encoding where credentials are embedded in a proxy URL before resetting a password.
HTTP 403 Forbidden
A 403 response indicates that a responding server or intermediary refused the request. Check response details and available logs to determine whether the refusal came from the proxy or the destination, then review account permissions and access rules. Changing proxy credentials will not fix every 403. After correcting an authorized access issue, repeat one request and record the outcome.
HTTP 429 Too Many Requests
A 429 response indicates rate limiting. Inspect Retry-After when present: it can specify a delay in seconds or an HTTP date. Pause accordingly and reduce request frequency or concurrency. If the header is absent, stop the test and check the service’s rate-limit guidance before retrying. Retry once after the permitted wait and record the result; if limiting persists, stop and investigate. Do not use unlimited retries or IP rotation to disregard the limit.
curl: (28) Operation Timed Out
A timeout means the configured time limit expired. Determine whether the delay occurred during connection establishment or response transfer, then check the endpoint, firewall, network path, and proxy status. A timeout alone does not identify the failing component. After correcting the suspected cause, retry once with explicit connection and total timeouts and record whether the request succeeds. A timeout differs from a connection refusal, where the connection attempt is actively rejected.
APT Still Connects Directly or Times Out
Check whether /etc/apt/apt.conf.d/95proxies is being read, whether each line ends with a semicolon, and whether an HTTPS repository was incorrectly configured with an unsupported proxy protocol.
Proxy Still Applies After You Disable It
Check GNOME, shell startup files, /etc/environment, APT, Git, npm, Snap, Docker, systemd, Wget, and Chrome launch parameters. Restore prior values or remove only the entries you added, then restart affected applications and services. Existing containers may need to be recreated with corrected configuration. A proxy can be configured at multiple layers at the same time.
Conclusion
Reliable Ubuntu proxy configuration starts by choosing the correct scope. Use GNOME for desktop applications, environment variables for temporary scripts, dedicated configuration for APT, a systemd drop-in for background services, and the desktop settings that Chrome normally follows. Verify each layer separately instead of relying on a single IP-check result.
When connecting Rola IP, first copy the exact connection parameters and complete a one-time cURL test. Then apply the verified proxy gradually to Ubuntu Terminal, APT, or Chrome. This makes it easier to distinguish proxy-endpoint, authentication, application-configuration, and system-network problems while reducing plaintext credentials, configuration conflicts, and changes that are difficult to roll back.