
Charles Proxy Setup Guide for HTTPS, Android and Upstream Proxies

Nov 12, 2026 · Proxy Basics · 14 min read
Charles Proxy is a local HTTP debugging proxy for inspecting requests, responses, headers and timing. It can also decrypt HTTPS traffic in an authorized test environment after the client trusts the Charles root certificate. Charles does not supply a residential or mobile exit IP by itself. If your test also needs a controlled public exit, you can route Charles through an external proxy such as Rola IP.
The official Charles download page displayed version 5.2.2 when it was checked on November 10, 2026. Menu labels and platform behavior can change after that date, so confirm the installed version before following a path. This guide covers the local listening address and port, Windows, Chrome, Firefox, Android, HTTPS certificates, IP verification, reverse proxy mode, common failures and an optional Rola IP upstream.
TL;DR
- Install the current Charles release from the official download page and record the version used for the test.
- Confirm the Charles Proxy port under Proxy > Proxy Settings. The usual HTTP port is
8888, but use the value shown in your installation. - For local desktop testing, let Charles configure the operating system proxy. For Android, use an address and port that the device can route to, then confirm firewall and access-control rules.
- Install and trust the Charles root CA only on authorized test devices. Enable SSL Proxying for specific test hosts rather than every domain.
- Verify that requests appear in Charles. If an upstream proxy is configured, compare a direct request with an explicit request through the Charles listener.
- To use Rola IP as the exit, enter the live Rola host, port and credentials under Proxy > External Proxy Settings. Never publish those credentials.
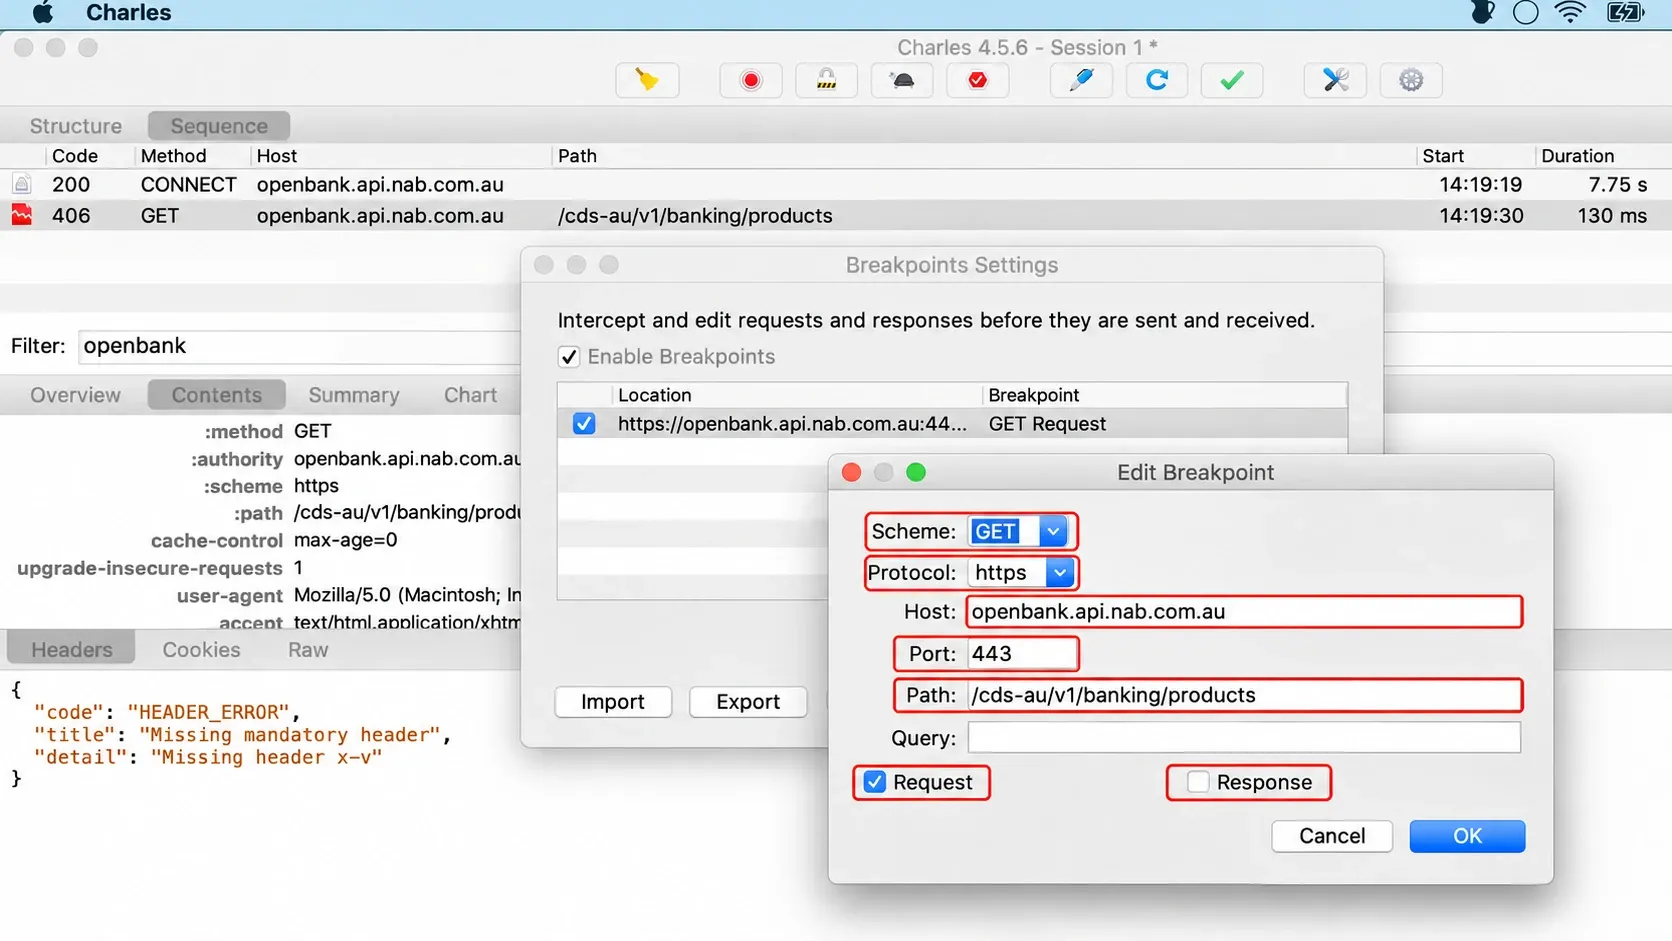
What Charles Proxy does, and what it does not do
Charles sits between a client and the destination server. A browser, mobile device or application sends traffic to Charles. Charles records the exchange and forwards it to the destination. With SSL Proxying enabled, Charles creates a certificate for the selected host, signs it with the local Charles CA and establishes a separate encrypted connection to the real server. This is a development and QA technique, not an anonymity feature.
The distinction matters when discussing a Charles Proxy IP. There are three different addresses in the workflow:
| Address | What it means | Typical value |
|---|---|---|
| Charles listener | Where the client connects to Charles | 127.0.0.1:8888 on the same computer, or LAN_IP:8888 from another device |
| Computer-reachable IP | A private or routed address that the test device can reach, subject to VLAN, firewall, NAT and access-control rules | Often 192.168.x.x or 10.x.x.x on a simple LAN |
| Public exit IP | The address seen by the destination | Direct network exit, or the selected upstream proxy exit |
The Charles Proxy IP address entered on an Android phone is normally the computer’s private LAN address, not the Rola IP exit and not the computer’s public address. The official Charles access-control documentation also notes that remote clients must be allowed and that local firewalls can block incoming connections.
What you need before setup
Download the installer only from the official Charles download page. On November 10, 2026, that page listed version 5.2.2 for Windows, macOS and Linux. Windows users could choose the recommended Appx package or MSI; macOS used a DMG, while Linux provided archives plus APT and YUM repositories. Recheck this page on publication day instead of treating 5.2.2 as a permanent requirement.
Prepare these values before changing any client settings:
- The Charles computer’s LAN IPv4 address if another device will connect.
- The HTTP listening port shown under Proxy > Proxy Settings.
- The test hostnames that need HTTPS inspection.
- A reversible way to remove the proxy and root certificate after testing.
- For an optional Rola IP upstream: the protocol, host, port, proxy username and proxy password generated for the selected network.
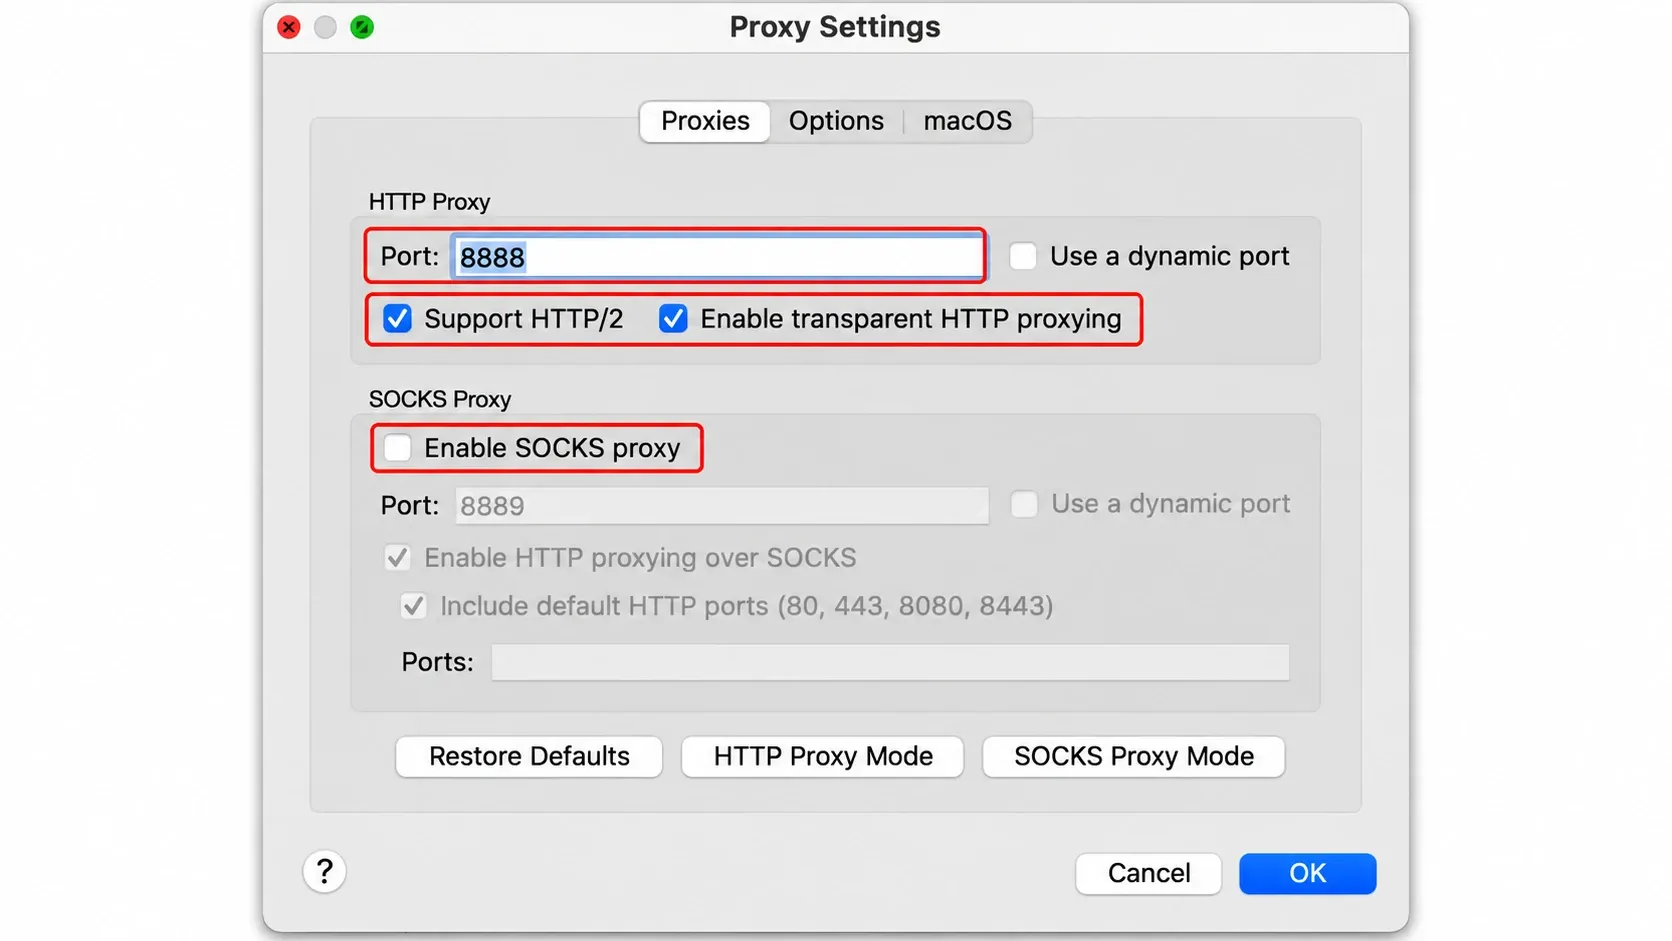
Install and configure Charles Proxy for Windows
For Charles Proxy for Windows, run the Appx or MSI installer, open Charles and allow the application through Windows Firewall on the private network you use for testing. Do not expose the listener to an untrusted network.
Then configure the local proxy:
- Open Proxy > Proxy Settings.
- Confirm the HTTP Proxy port.
8888is the common default. - Leave dynamic ports off when a phone or test script needs a predictable address.
- Keep the access-control list limited to localhost and the specific test device or subnet you manage.
- Start recording, then open an authorized test page.
If the browser stops working after Charles closes unexpectedly, Windows may still point to the local proxy. Quit Charles normally first. If that does not restore the connection, open Settings > Network & Internet > Proxy and turn off the stale manual proxy.
Configure Charles Proxy Chrome and Charles Proxy Firefox
Chrome
A Charles Proxy Chrome setup normally follows the operating system proxy. Start Charles, confirm that Windows or macOS proxying is enabled in the Charles Proxy menu, and open a test page in Chrome. If HTTP requests appear but HTTPS bodies remain encrypted, complete the certificate steps in the next section.
On Windows, the official Charles certificate guide instructs users to save the Charles root certificate as a .cer file and import it into Trusted Root Certification Authorities. On macOS, Charles opens Keychain Access so the local root can be explicitly trusted. Restrict this trust to a development machine and remove it when the test is finished.
Firefox
The official download page stated on November 10, 2026 that Firefox no longer required the old Charles add-on. For Charles Proxy Firefox, set Firefox to Use system proxy settings, or enter 127.0.0.1 and the active Charles port under Settings > Network Settings. Firefox maintains its own certificate store in some configurations, so opening https://chls.pro/ssl through Charles may trigger a separate CA import prompt.
If you need browser-only proxy control without changing every system-aware application, see Rola IP’s Firefox proxy configuration guide. For a system-wide macOS path, the Mac proxy settings guide explains the active network service, protocol fields and verification sequence.
Configure Charles Proxy HTTPS and SSL inspection
Plain HTTP can be recorded without installing a CA. Charles Proxy HTTPS inspection is different because the client must trust certificates generated by Charles. Use this only on devices, applications and endpoints you are authorized to test.
- Route the client through Charles first.
- On the desktop, choose Help > SSL Proxying > Install Charles Root Certificate. The exact label varies slightly by platform.
- Trust the certificate in the platform’s certificate store.
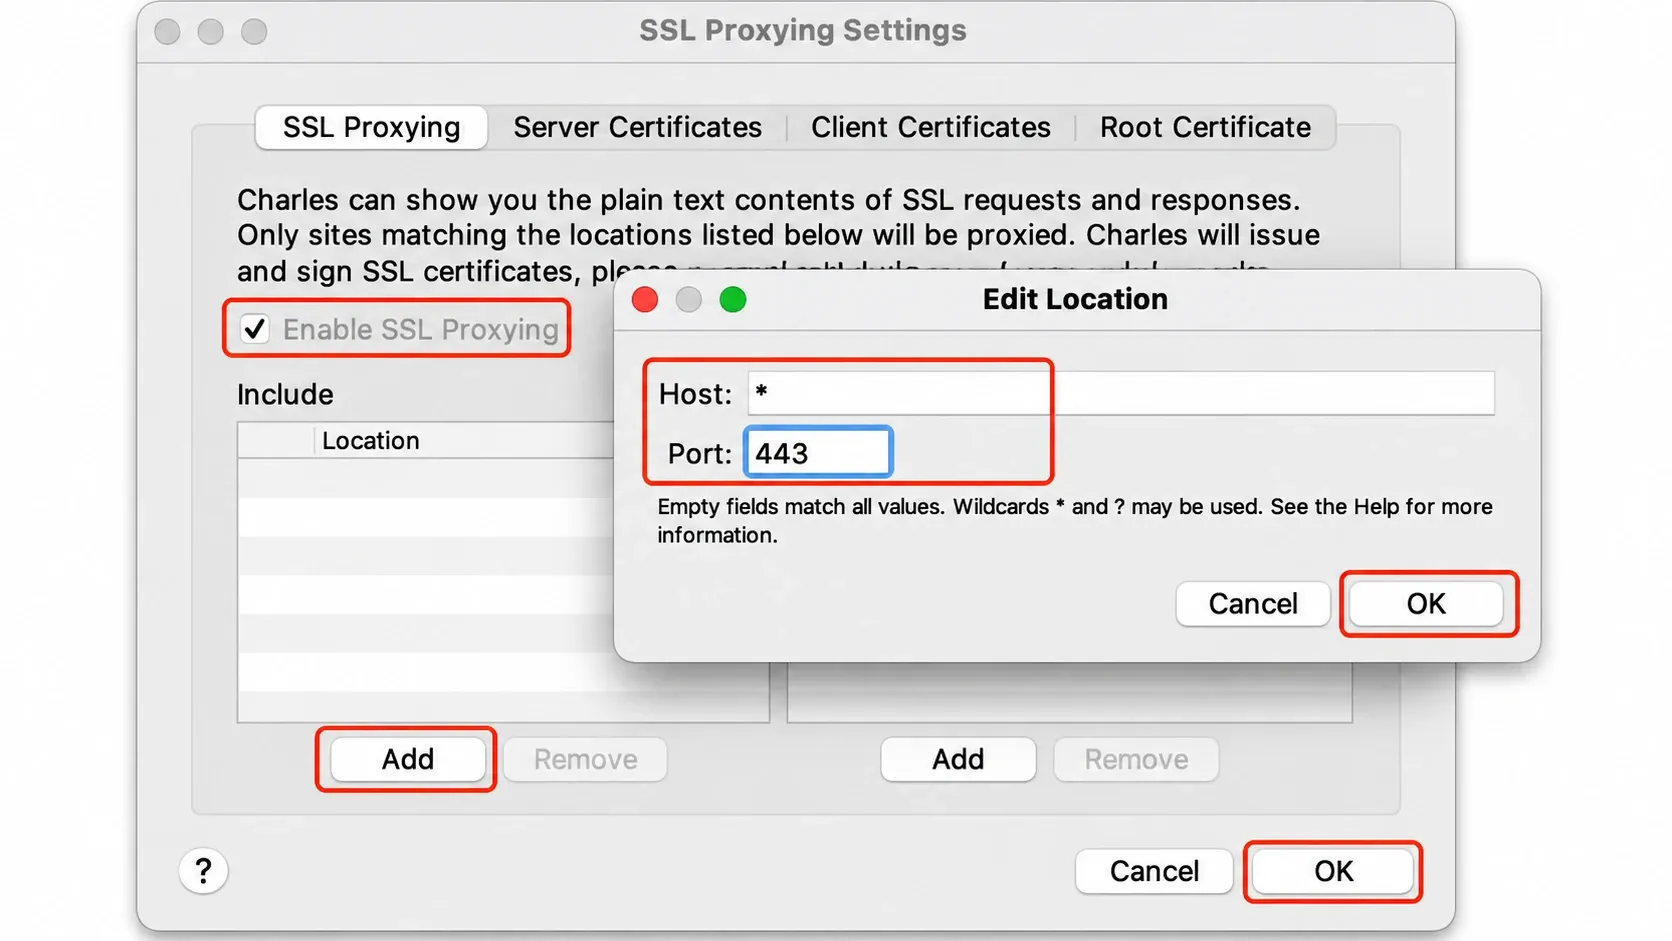
- Open Proxy > SSL Proxying Settings and add the specific hostname and port that require inspection.
- Retry the request and confirm that the request and response are readable in Charles.
The official Charles SSL Proxying documentation explains that SSL Proxying is opt-in by host. Avoid a global * rule for normal browsing. Charles can reveal credentials, session cookies and personal data in decrypted traffic, so clear the session, protect saved .chls files and remove the CA after the test.
The client must already be using Charles before opening https://chls.pro/ssl; otherwise the certificate download route may not work as expected. A Charles Proxy SSL failure is usually caused by missing CA trust, a host that was not added to SSL Proxying, certificate pinning or an application that ignores the configured proxy.
Set up Charles Proxy Android for mobile testing
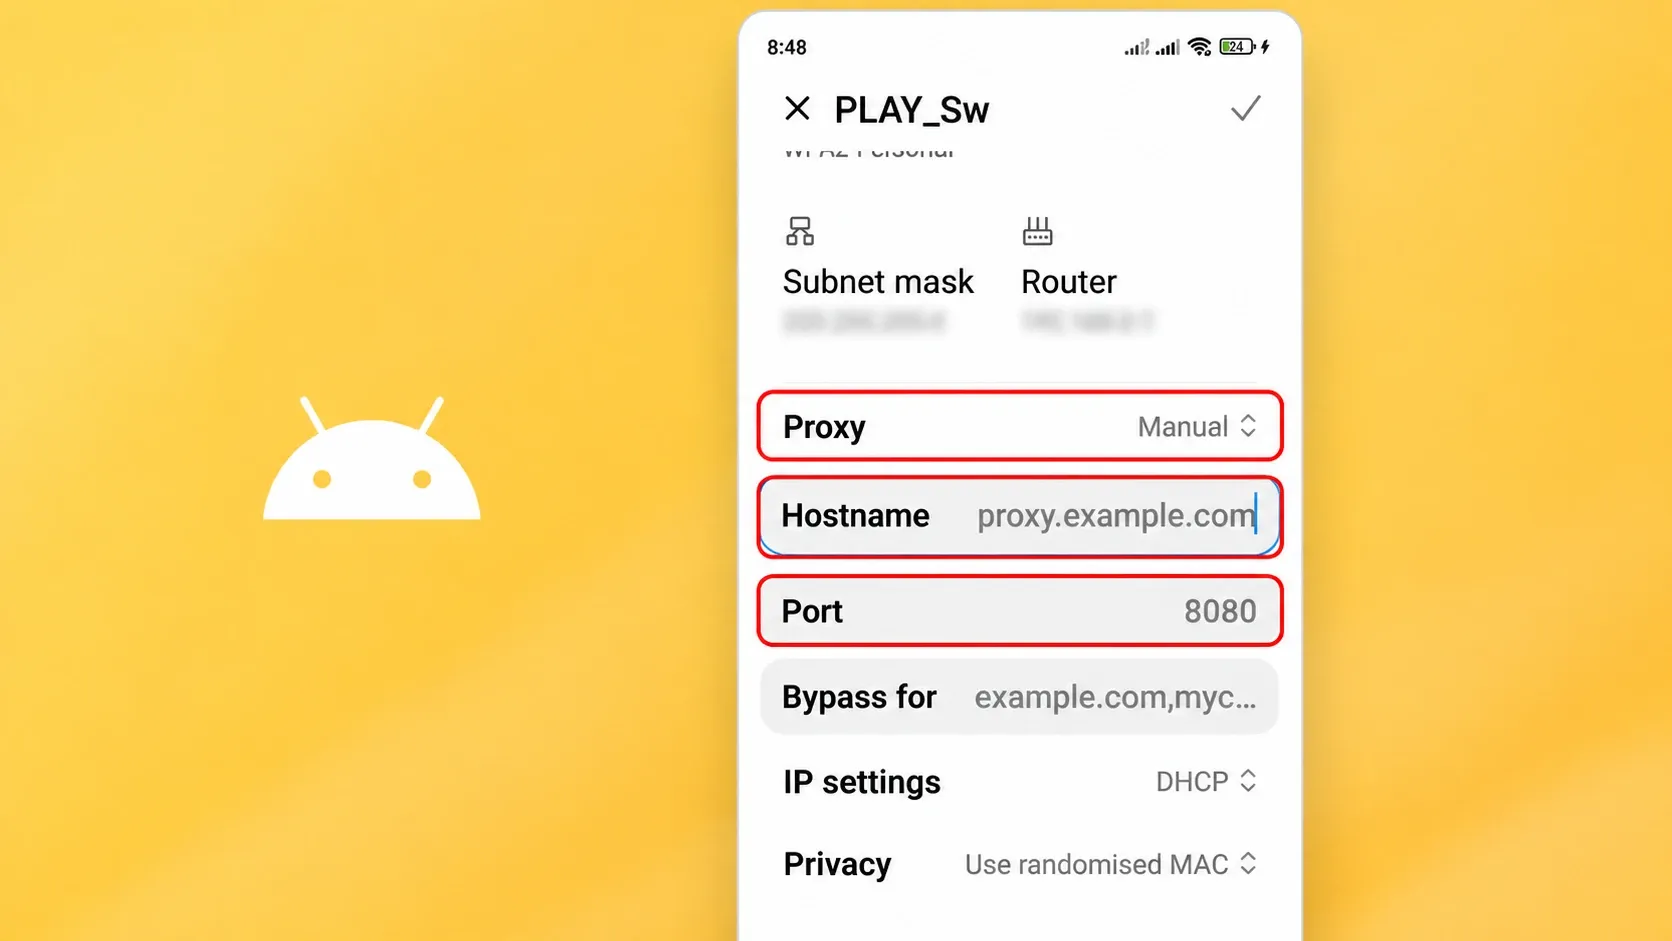
A physical phone needs network reachability to the Charles listener. The simplest setup puts the phone and computer on the same Wi-Fi or LAN, but a routed test network can also work when VLAN, firewall, NAT and access-control rules allow the device to reach the listener. A Charles Proxy Android connection uses that reachable computer address as the proxy hostname and the active Charles port as the proxy port.
- In Charles, open Help > Local IP Address and note the private address.
- On Android, open the active Wi-Fi network, edit it and set Proxy to Manual.
- Enter the computer’s LAN IP as the hostname and the Charles HTTP port, usually
8888. - Save the network. When Charles shows a remote-access prompt, allow only the phone you recognize.
- Open a plain HTTP test page first. Confirm that its requests appear in Charles.
- For HTTPS, open
https://chls.pro/ssl, install the CA on the test device and enable SSL Proxying for the test hostname.
For an Android emulator, the host loopback is commonly reachable as 10.0.2.2, so an emulator proxy can use http://10.0.2.2:8888. Google’s Charles setup guide for Android documents the emulator and physical-device paths.
Android 7 and later do not make user-added CAs trusted by every app. For an app you control, keep this trust rule in the debug source set so it cannot silently broaden the release build. Create app/src/debug/res/xml/network_security_config.xml:
<?xml version="1.0" encoding="utf-8"?>
<network-security-config>
  <debug-overrides>
    <trust-anchors>
      <certificates src="user" />
    </trust-anchors>
  </debug-overrides>
</network-security-config>
Create or update app/src/debug/AndroidManifest.xml. Android’s manifest merger applies this attribute to the debug build only:
<?xml version="1.0" encoding="utf-8"?>
<manifest xmlns:android="http://schemas.android.com/apk/res/android">
  <application
      android:networkSecurityConfig="@xml/network_security_config" />
</manifest>
Build and install the debug variant, route the device or emulator through Charles, and request an authorized HTTPS test host that is enabled under SSL Proxying. Success means the request and response are readable in Charles without a certificate error. Then build the release variant and inspect the merged release manifest to confirm that android:networkSecurityConfig is absent unless the production app intentionally defines a different policy. Certificate-pinned apps may still reject interception, and this guide does not provide instructions for bypassing pinning or inspecting applications you do not control.
Physical Android device versus emulator
| Client | Proxy address | Certificate and debug configuration | Reproducibility note |
|---|---|---|---|
| Physical Android device | A computer address reachable from the device, commonly a private LAN IP, plus the active Charles port | Install the Charles CA on the test device; an app you control needs the debug-only configuration above | Record phone OS, network/VLAN, computer OS, Charles version, listener address and port |
| Android emulator | Commonly 10.0.2.2 plus the active Charles port for the Android Studio emulator |
Install the CA in the emulator and use the same debug-only app configuration | Record emulator image/API level, host OS, Charles version and the exact test URL |
Route Charles through Rola IP as an external proxy
Charles records traffic; Rola IP can supply the upstream exit. This is useful when an authorized test needs both request-level debugging and a defined proxy exit, such as regional page QA, ad verification, public-page localization checks or testing how an application handles a changed network route.
First generate the current connection details in your Rola IP account. The values may differ by proxy network and account, so copy the protocol, host, port, username and password from the live dashboard or Rola IP documentation. The rotating residential proxy page explains the product category; it does not replace the account-specific connection details.
Before choosing a Rola network, define what the test must hold constant. A regional page check may need a stated country and a fresh session; a multi-step checkout QA flow may need one continuous session. Use only capabilities shown for the selected account and record them instead of inferring them from a general product page.
| Test field | Record before the run |
|---|---|
| Test region | Country or region required by the authorized scenario |
| Rola network type | The network selected in the account dashboard |
| Session requirement | Fresh request, bounded sticky session or fixed endpoint, as supported by the account |
| Upstream protocol | HTTP, HTTPS or SOCKS, matching the generated endpoint and Charles field |
| Charles listener | Computer OS, Charles version, listener address and port |
| Upstream source | Dashboard or documentation page that supplied host, port and authentication format |
| Test URL | One authorized IP-check URL and one authorized business URL |
| Comparison | Direct exit, Charles without upstream, then Charles with upstream |
| Page result | Status code, visible region-dependent content and any application error |
| Evidence | Timestamped screenshots or logs with credentials, cookies and full IPs redacted |
Then configure Charles:
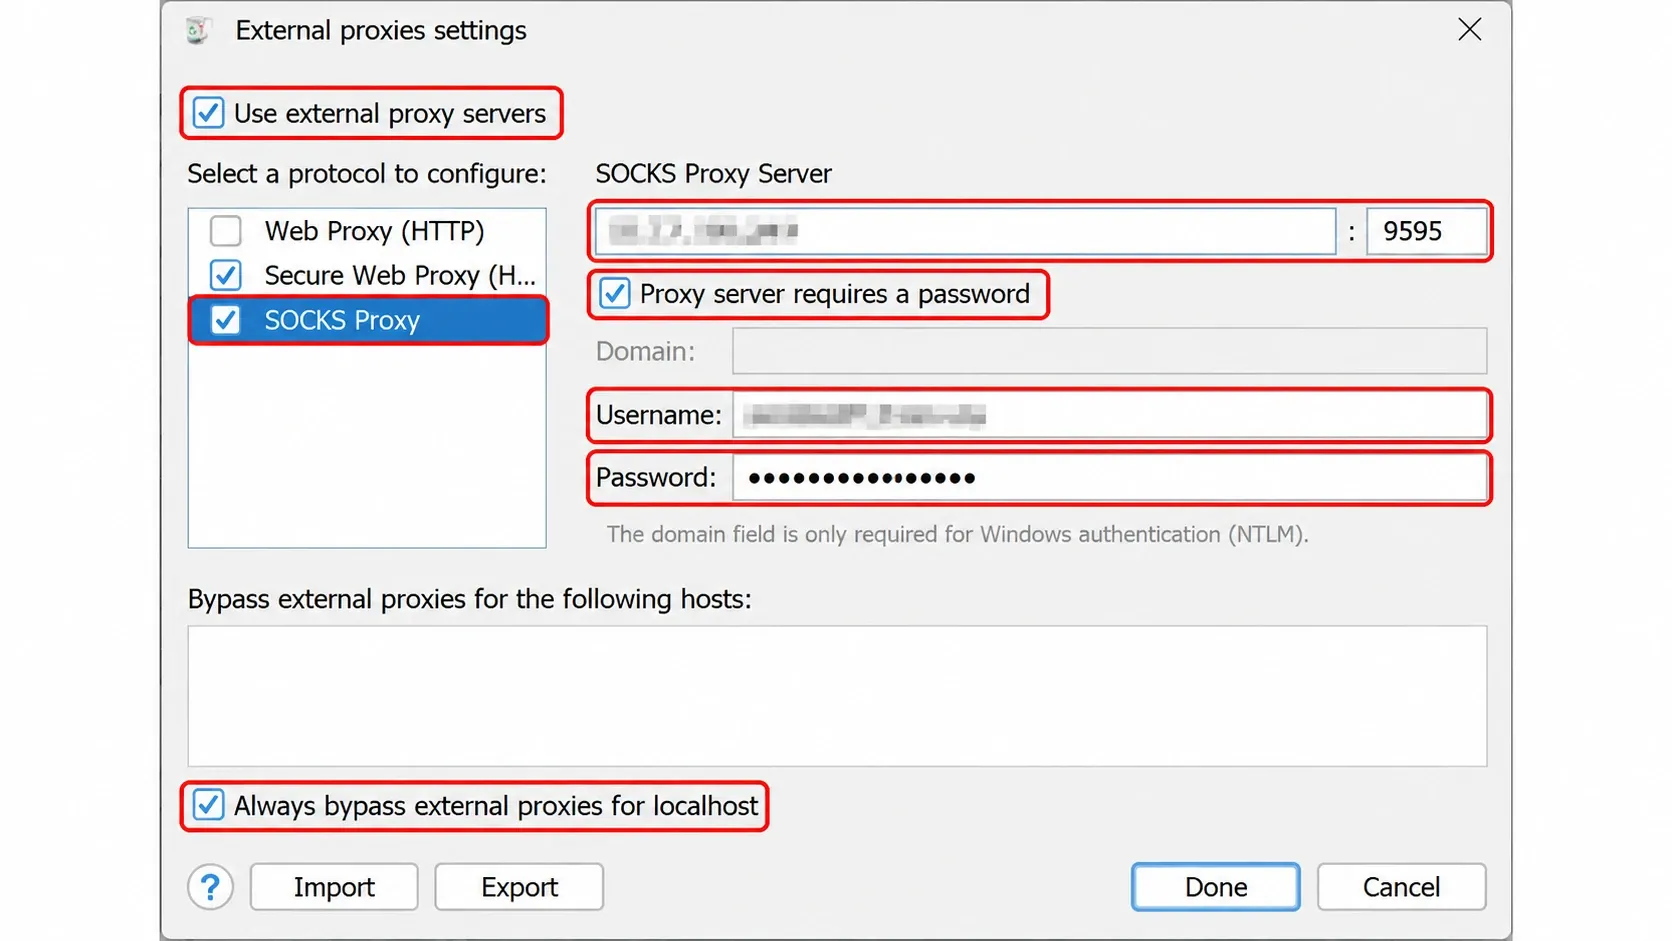
- Open Proxy > External Proxy Settings.
- Choose the upstream type that matches the Rola endpoint. For web traffic, configure the HTTP and HTTPS fields as required by the generated endpoint.
- Enter the Rola host and port without adding spaces or publishing the complete endpoint.
- Enable authentication and enter the proxy username and password. Do not use your dashboard login password unless the dashboard explicitly identifies it as the proxy password.
- Save the settings and make a request to an authorized IP-check endpoint.
- Confirm that the request appears in Charles and that the observed public IP matches the intended Rola exit.
Charles also offers a SOCKS external-proxy field. Its official documentation notes that an upstream SOCKS proxy is used for non-HTTP(S) traffic such as Port Forwarding. For a normal browser tutorial, an HTTP/HTTPS upstream is easier to reason about because Charles remains the client-facing HTTP debugging proxy. Match the protocol to the endpoint generated in your account.
Verify the Charles Proxy IP and upstream exit
Verification should prove each hop separately:
- Capture check: the request appears in the Charles Structure or Sequence view.
- HTTPS check: the selected test host shows readable request and response details rather than only a
CONNECTtunnel. - Exit check: a public IP endpoint returns the intended upstream exit.
- Location check: a second independent service reports the expected country or region.
- Application check: the authorized target behaves as expected with the selected session and location.
Record a direct baseline, then send the same request explicitly through the Charles listener. On Windows PowerShell, use curl.exe (not the curl alias) with these single-line commands. Substitute the listener port shown in your own Charles installation:
curl.exe --fail --silent --show-error --max-time 15 https://api.ipify.org
curl.exe --fail --silent --show-error --max-time 15 --proxy http://127.0.0.1:8888 https://api.ipify.org
On Linux and macOS, the same checks can use Bash line continuations:
curl --fail --silent --show-error --max-time 15 \
  https://api.ipify.org

curl --fail --silent --show-error --max-time 15 \
  --proxy http://127.0.0.1:8888 \
  https://api.ipify.org
The second command verifies the Charles hop because it names the local listener explicitly. If Rola IP is configured under External Proxy Settings, that request should continue through the upstream. Record both outputs privately and confirm that the proxied value matches the exit shown by the authorized Rola test source. If SSL Proxying is enabled for the IP-check host, configure curl to trust the exported Charles CA with --cacert; do not use -k to disable certificate validation. A changed address proves routing, but it does not prove anonymity, precise geolocation, account acceptance or legal permission.
When to use Charles Reverse Proxy
A Charles Reverse Proxy is a different feature. It creates a local web-server port that forwards to a remote HTTP or HTTPS server while recording the exchange. Use it when the client cannot be configured to use a forward proxy, or when you want the client to connect to a local address transparently.
Do not use reverse proxy mode merely to change the public exit IP. For that requirement, use External Proxy Settings. The official reverse proxy guide notes that HTTPS destinations require the client to connect to the local reverse-proxy port with HTTPS.
Common errors and the fastest fixes
| Symptom | Verify in order | Treatment | Retest signal |
|---|---|---|---|
| Connection refused or timeout before any request appears | Client proxy address and port, listener state, route/VLAN, firewall, Charles access control | Correct the local address or port; allow only the intended test client | A plain HTTP request appears in Charles |
| Upstream returns HTTP 407 | Charles capture, selected External Proxy field, Rola authentication method, account-generated username and password, whitelist state | Recopy the account-generated values and match the endpoint protocol | The same authorized IP-check request completes without 407 |
| Target returns HTTP 403 or 429 | Confirm the Charles and upstream hops first, then review target authorization, request rate, session state and published target rules | Reduce or stop the test as required; correct authorization or rate handling | A permitted request succeeds without changing controls to evade the target |
| HTTPS shows only CONNECT or a certificate error | Client CA trust, exact SSL Proxying host rule, debug manifest merge, certificate pinning boundary | Install the CA in the test client and add only the required host; do not bypass pinning | Authorized HTTPS request and response are readable in Charles |
| Chrome works but Firefox does not | Firefox proxy mode, extension overrides and Firefox certificate trust | Use system proxy settings or the correct manual listener; remove stale overrides | The same test URL appears from Firefox in Charles |
| Phone loses network after testing | Stale Wi-Fi proxy, stopped Charles listener or changed LAN route | Return Wi-Fi proxy to None, or restart Charles and remove the stale setting | Direct browsing works again without Charles |
Security and cleanup checklist
- Capture only systems and accounts you are authorized to test.
- Avoid decrypting banking, email, password-manager or personal browsing traffic.
- Use host-specific SSL Proxying rules.
- Redact cookies, authorization headers, device identifiers and proxy credentials before sharing logs.
- Stop recording and delete unnecessary sessions after the test.
- Disable the Android or system proxy when Charles is no longer running.
- Remove the Charles root CA from devices that do not need continued testing.
- Rotate any credential accidentally exposed in a screenshot,
.chlsfile or exported HAR.
Charles is the inspection layer, while Rola IP is the optional network-exit layer. Keeping those roles separate makes configuration and troubleshooting much easier: first prove that the client reaches Charles, then prove HTTPS trust, and only then add and verify the upstream proxy.