
Download Proxifier for Windows and Android: Official Links and Rola IP Setup

Nov 20, 2026 · Guides · 11 min read
TL;DR
Proxifier routes selected applications through a proxy, including apps without built-in proxy settings. It is the client; a Proxifier download does not include a Rola IP proxy subscription. This guide covers official downloads, connection details, Windows and Android setup, and four checks: proxy connection, application route, browser exit IP, and DNS.
Where to Download Proxifier
When searching for download proxifier, proxifier free download, or download proxifier for windows, use the official Proxifier download page. As checked on November 12, 2026, it lists Windows v4.14 and Android v1.18. Recheck the page when you install.
| Platform | Publisher’s listed version and OS support | Published trial terms |
|---|---|---|
| Windows | v4.14; Windows 7, 8, 10, and 11 | 31-day free trial |
| Android | v1.18; Android 8 or later | Free trial; duration not specified on the download page |
The listed OS range is the publisher’s support statement. Windows and Android trials have different published terms; do not apply the 31-day Windows period to Android.
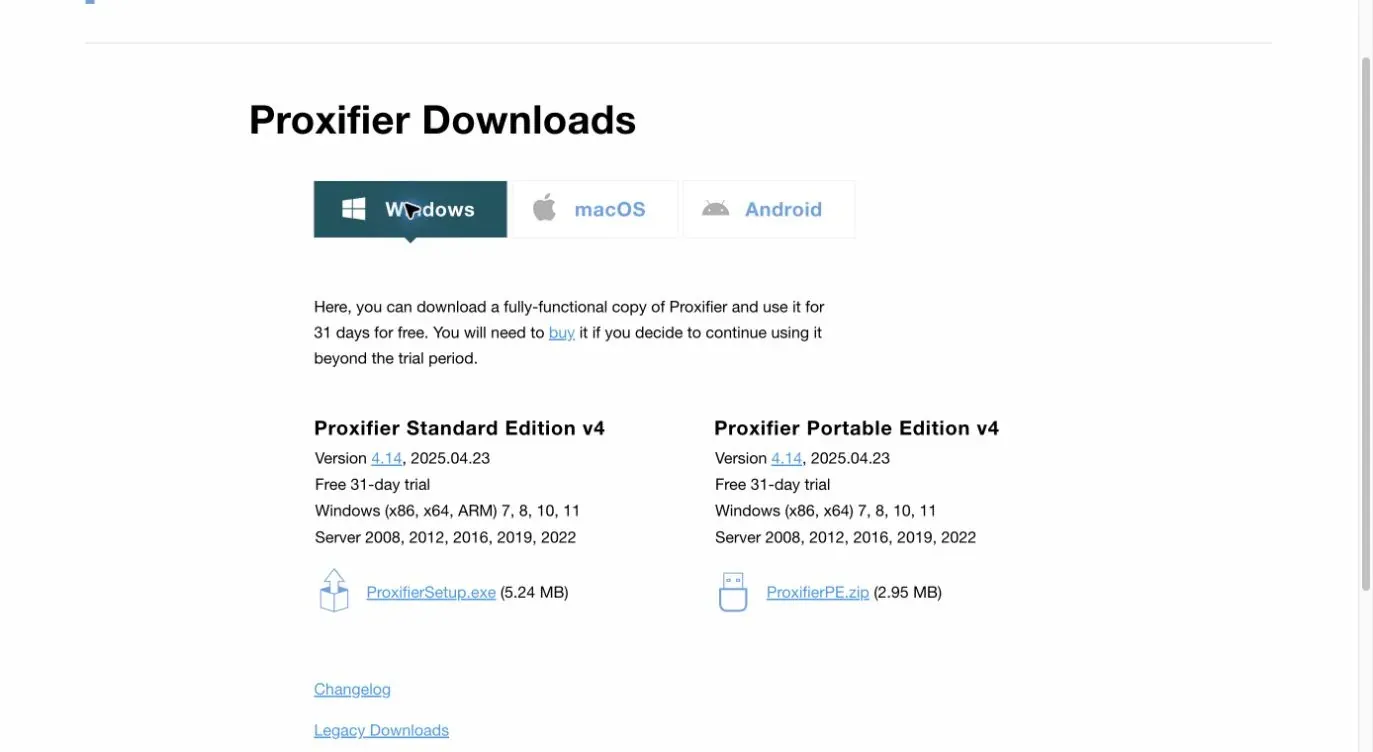
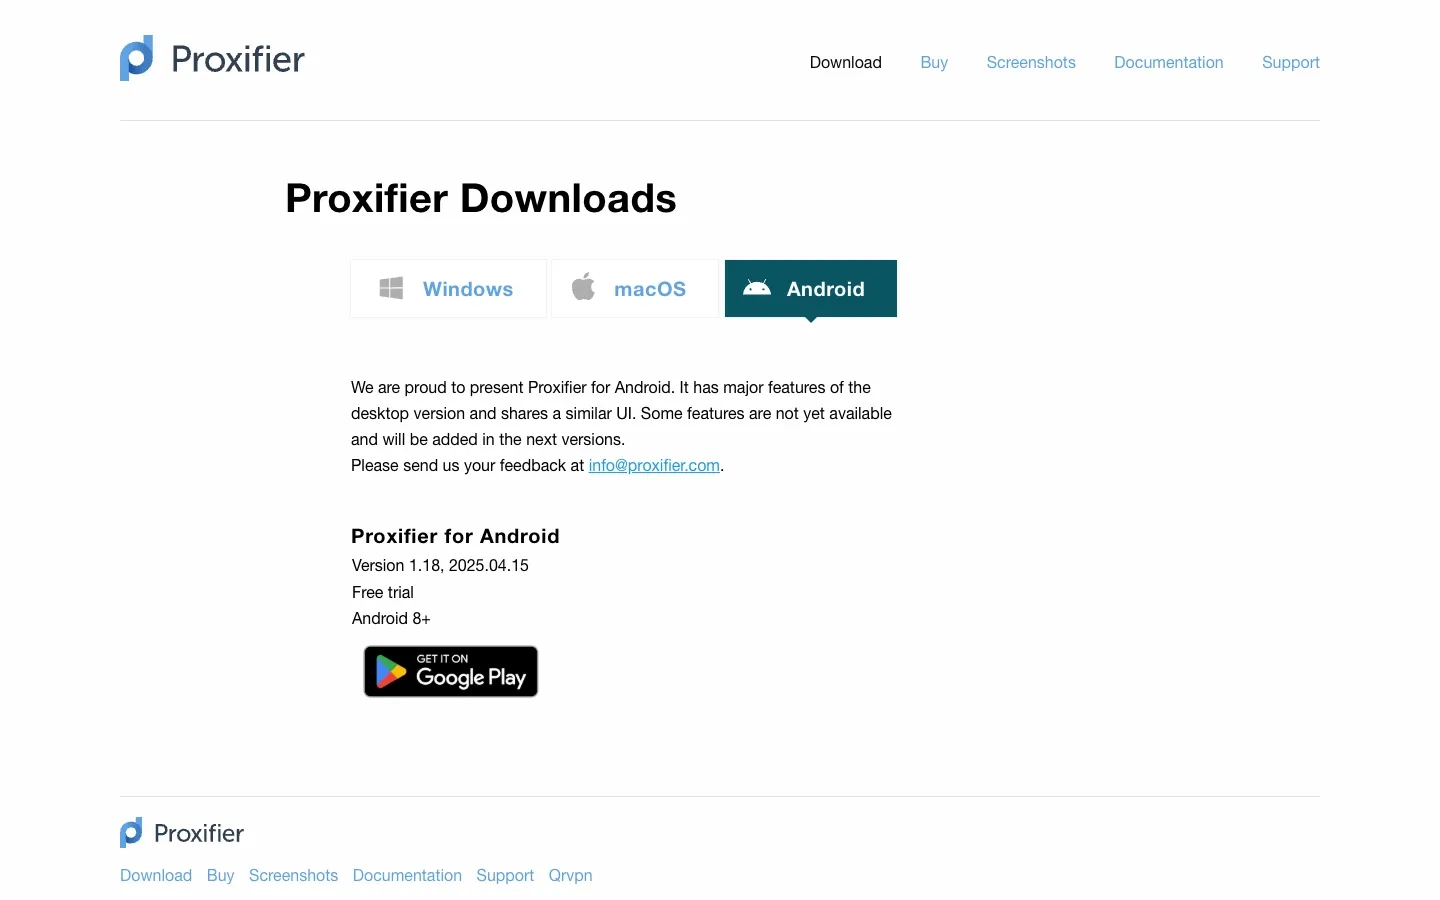
“Proxifier free” usually refers to a free trial, not a permanently free full version. Downloading Proxifier also does not include proxy service. Check your Rola IP account dashboard and product pages for current pricing and product availability.
How to Find Your Rola IP Connection Details
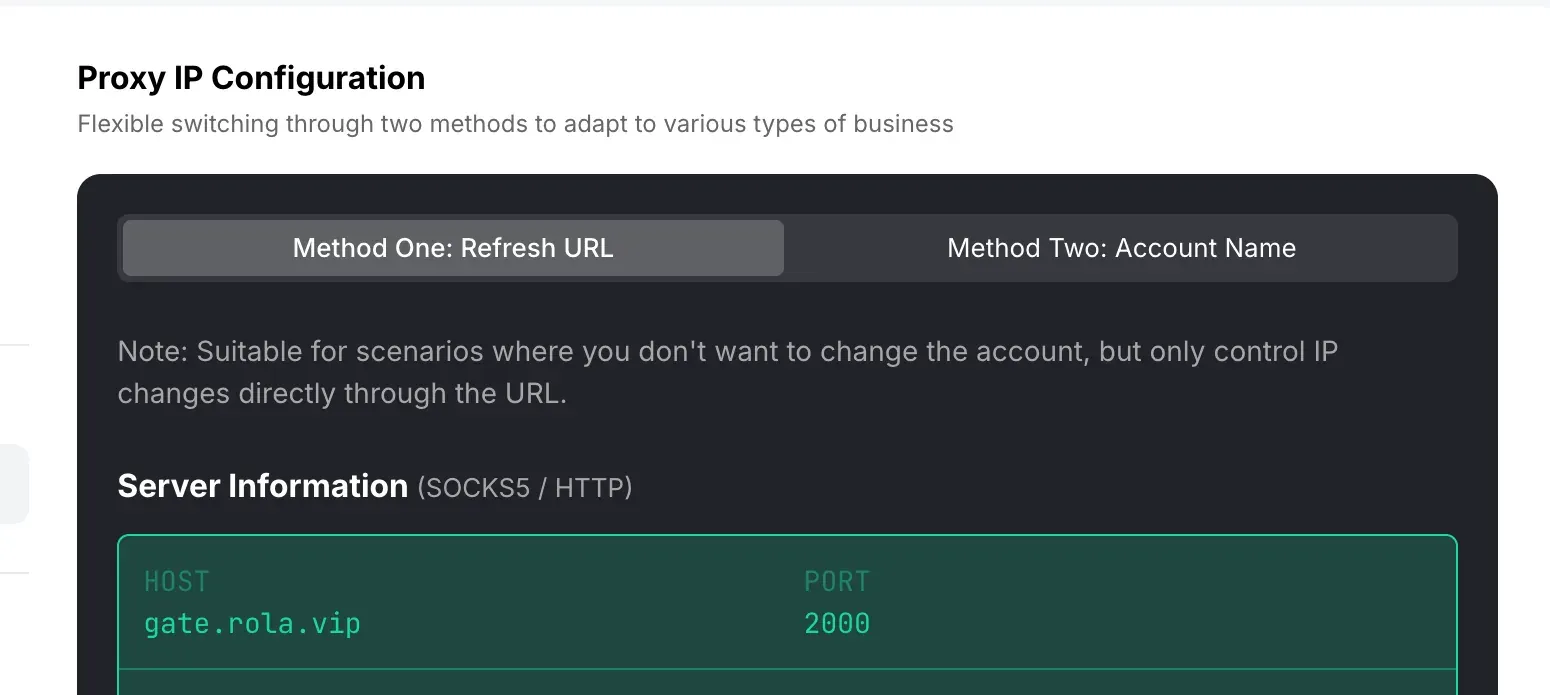
Open the Rola IP dashboard’s Proxy Setup for the product you intend to use. Select its available location, session setting, and authentication method, then copy the generated HOST and PORT. The Rola IP Quick Start shows where to find these fields. Use your own account’s values and check that the selected endpoint supports the protocol you will enter in Proxifier.
| Field | Where to find it | What to check |
|---|---|---|
| Host / Address | HOST in the Rola IP dashboard | Enter only the domain or IP address, without a protocol prefix. Do not copy the example values from a screenshot. |
| Port | PORT in the same configuration section | Match the selected product, protocol, and authentication method. Do not guess a generic port. |
| Protocol | SOCKS5 / HTTP option in the dashboard | This walkthrough uses SOCKS5. Proxifier’s HTTPS option requires HTTP CONNECT support; an HTTP-labeled endpoint is not automatically compatible. |
| Authentication | User & Pass Auth or IP allowlist settings | Copy the full username and password. If using an IP allowlist, register your current public IP first. |
For a persistent login session, check whether a sticky-session or static-IP product supports the duration you need. Rotating residential proxies may be suitable for authorized data collection across regions. Gateway addresses, ports, locations, and trial conditions can vary by product and account, so always use the parameters shown in your own dashboard.
Do not place production credentials in a public screenshot, article draft, or shell history.
Which Rola IP Proxy Works Best with Proxifier?
Choose by exit behavior, region, session length, and the endpoint’s protocol and authentication options. For permitted public-page collection across locations, compare Rola IP residential proxies. When a stable residential exit is required, review Rola IP static residential IPs. For stateless tasks that can use changing datacenter exits, see Rola IP rotating datacenter proxies. For an allowlisted or otherwise fixed server-based exit, review Rola IP static datacenter IPs and confirm the specific country’s stock, authentication method, IP retention, and order terms. A fixed IP does not guarantee acceptance by a login site.
How to Set Up Proxifier on Windows
Step 1: Add and Test a Proxy Server
After installing Proxifier for Windows, open Profile > Proxy Servers > Add. Enter your Rola IP HOST in Address and PORT in Port. Choose SOCKS Version 5 for a SOCKS5 endpoint. If the endpoint uses username-and-password authentication, enable Authentication and enter the generated credentials. Save the server. If Proxifier asks whether to use it by default, choose No for this one-browser setup; choosing Yes would route other applications through it. Select Check in the server list to test the endpoint. Check alone does not prove that the browser uses the proxy. The Rola IP Windows proxy setup illustrates the server fields.
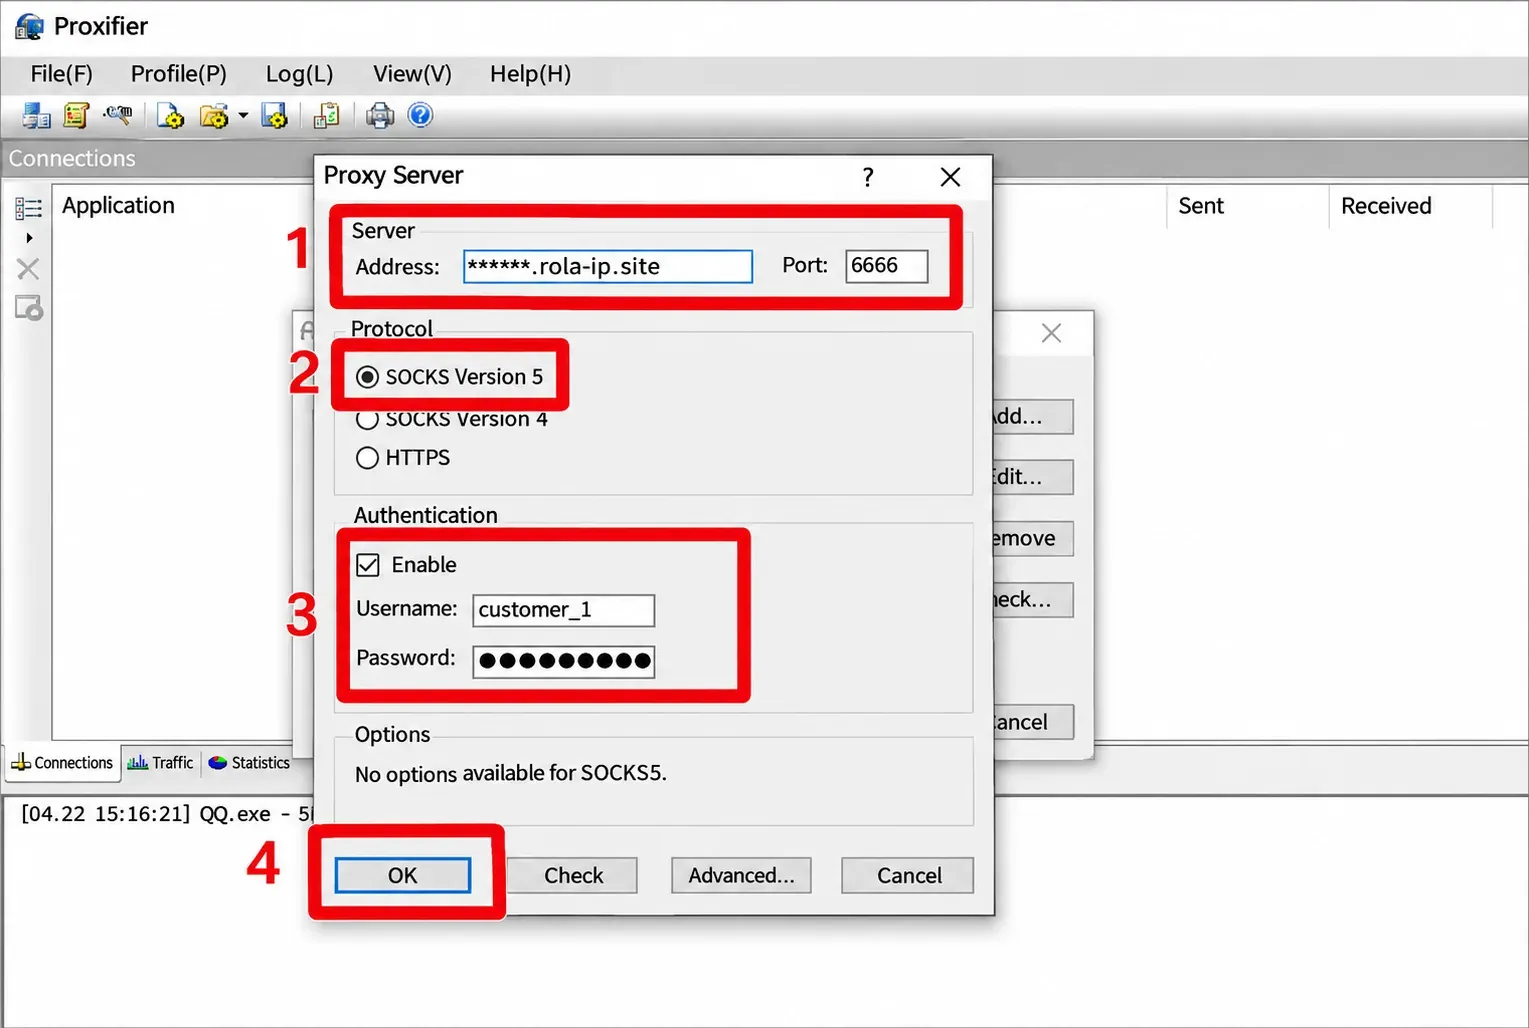
Proxifier’s Windows proxy settings help confirms that SOCKS5 accepts username/password authentication and its HTTPS type uses an HTTP CONNECT tunnel. If your Rola IP endpoint is listed only as HTTP, confirm its CONNECT capability before selecting HTTPS; the setting name alone does not establish compatibility. Help page checked November 12, 2026.
Step 2: Route Only the Target Application Through the Proxy
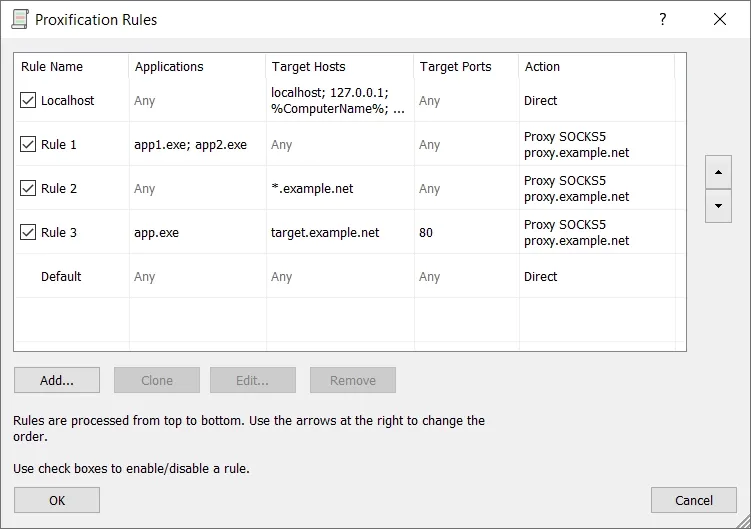
Open Profile > Proxification Rules. Keep Localhost and Default set to Direct. Add a rule named Rola IP browser. Under Applications, select the browser executable you will actually use, such as chrome.exe; set Target Hosts and Ports to Any, and choose your Rola IP server as Action. Place this rule above Default and save it. Fully quit and relaunch the browser, then inspect the connection log for that process. The official rules help explains that rules are processed from top to bottom; its example below shows application rules above Default: Direct. Help page checked November 12, 2026.
Step 3: Adjust Name Resolution When Necessary
If the browser connects using hostnames, open Profile > Name Resolution and review the resolution method. The official Name Resolution help explains remote resolution and local-host exceptions. Start with the default setting; if the browser fails to resolve a target or the controlled DNS check below suggests local resolution, change one setting, reconnect, and repeat the same checks. Remote resolution may affect internal hostnames or proxies without DNS support. Help page checked November 12, 2026.
How Do You Set Up Proxifier on Android?
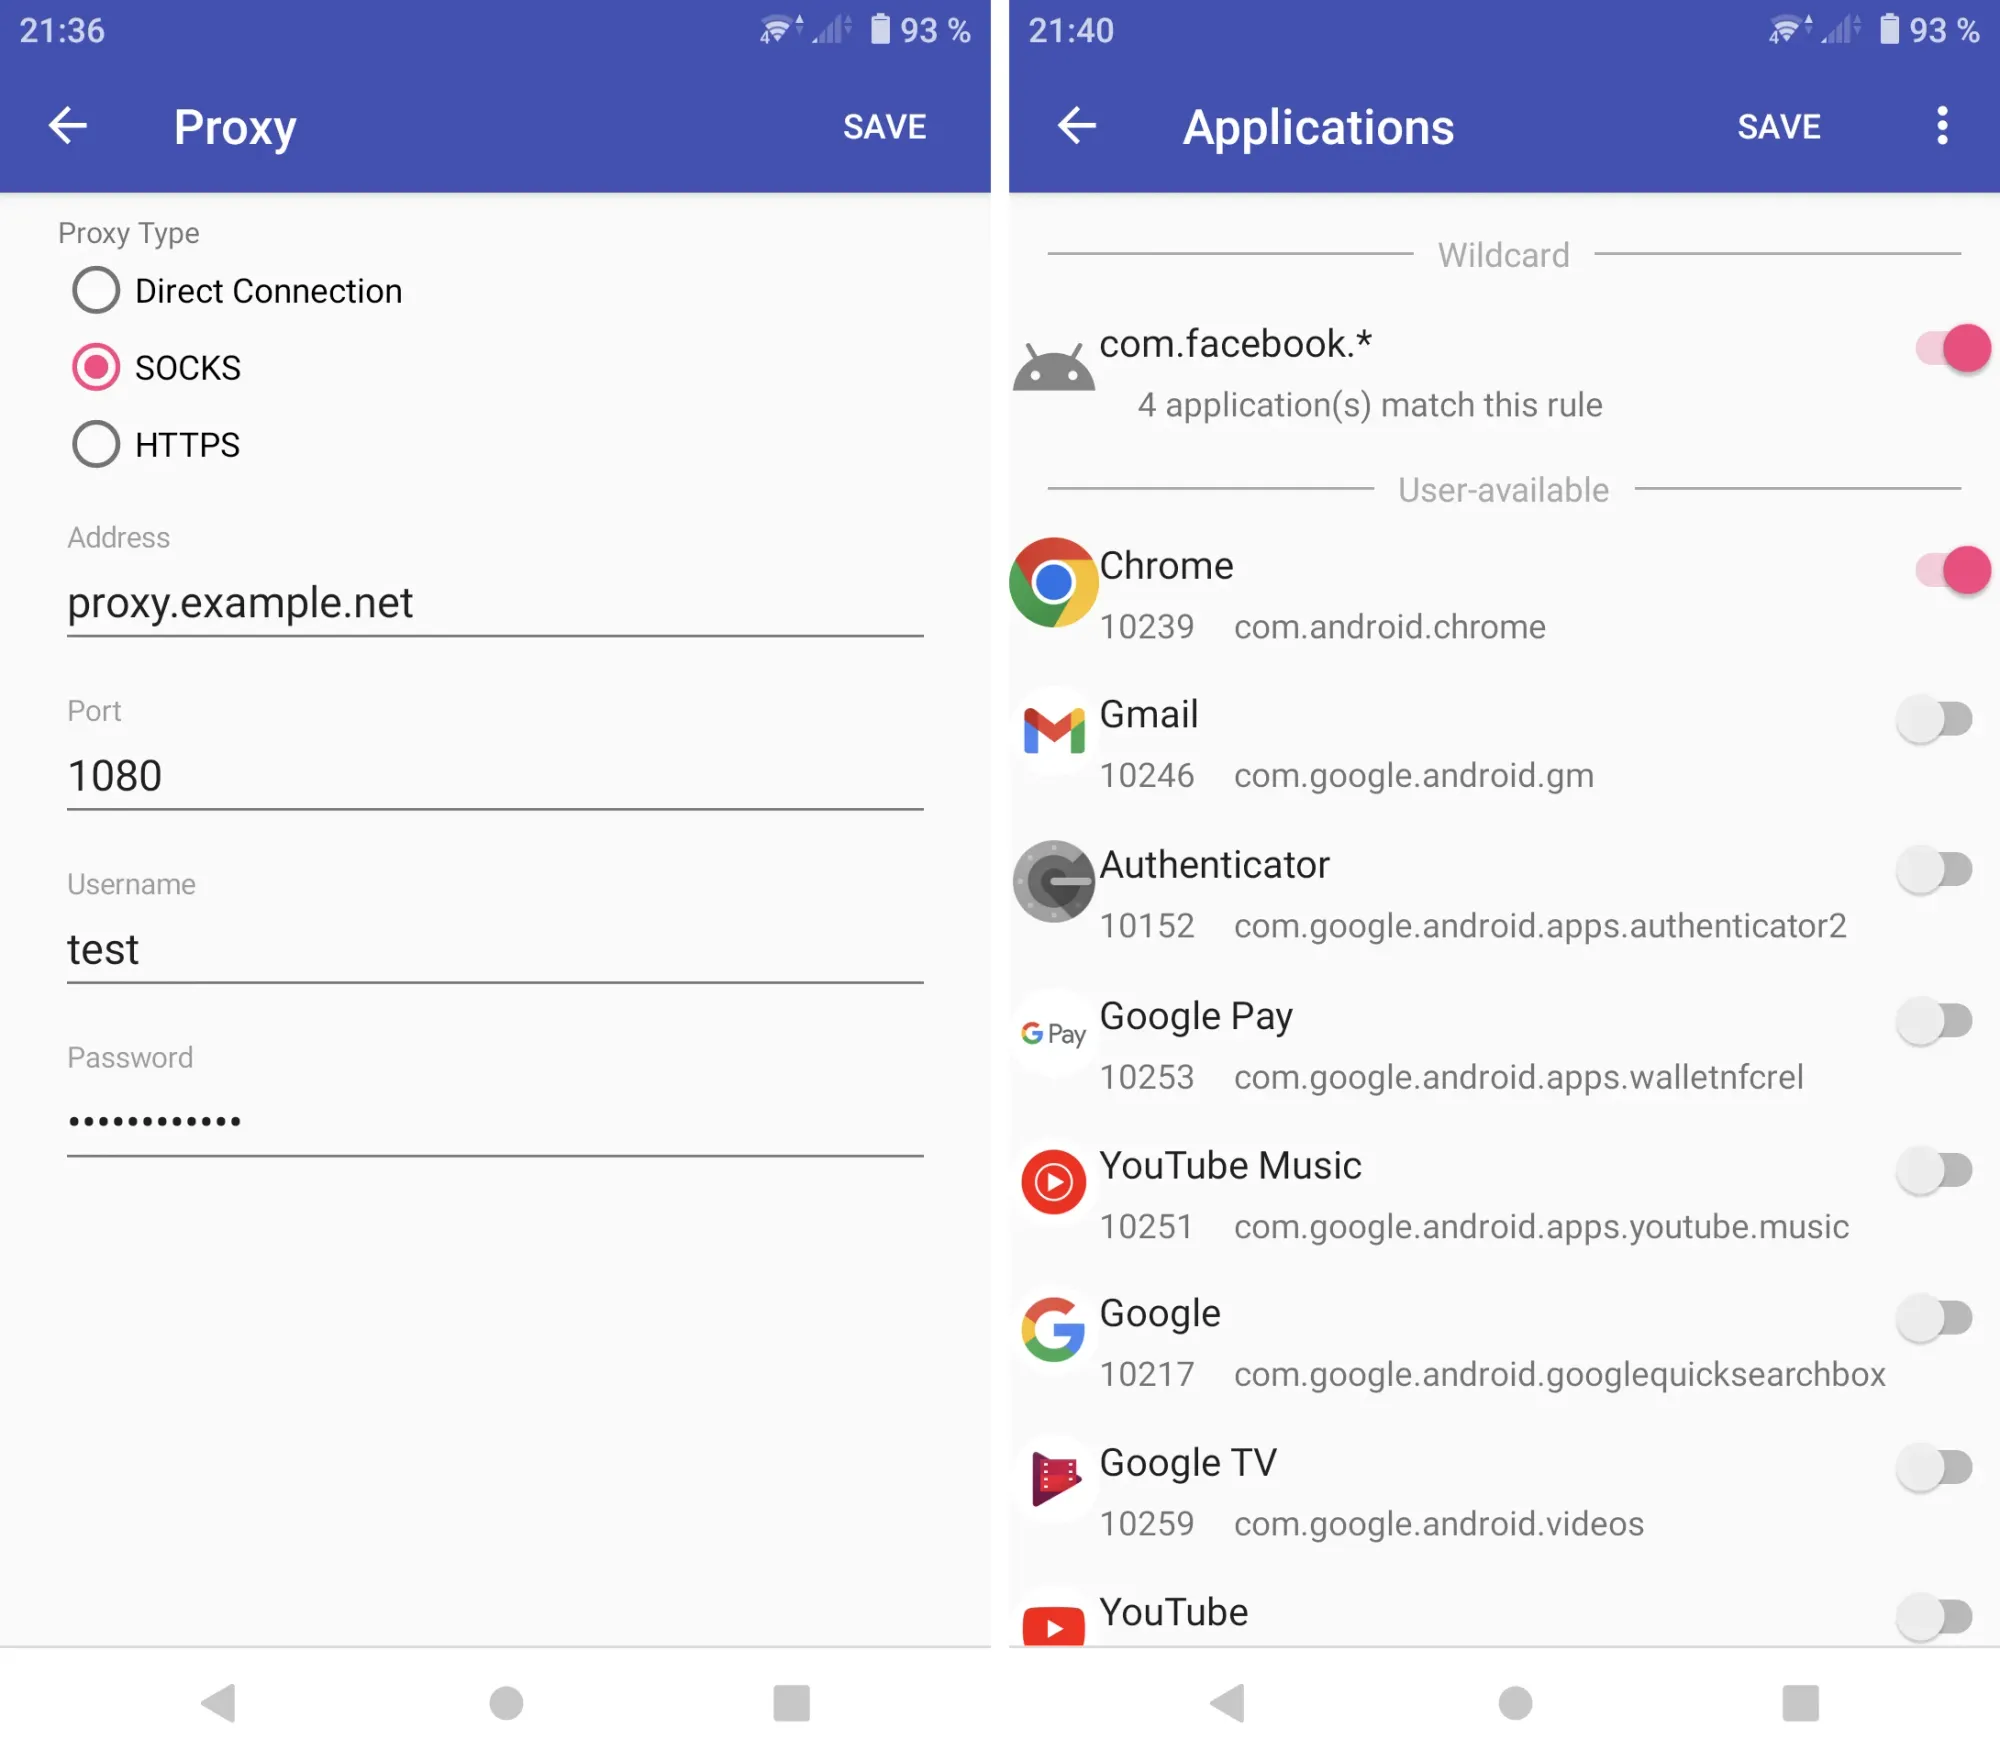
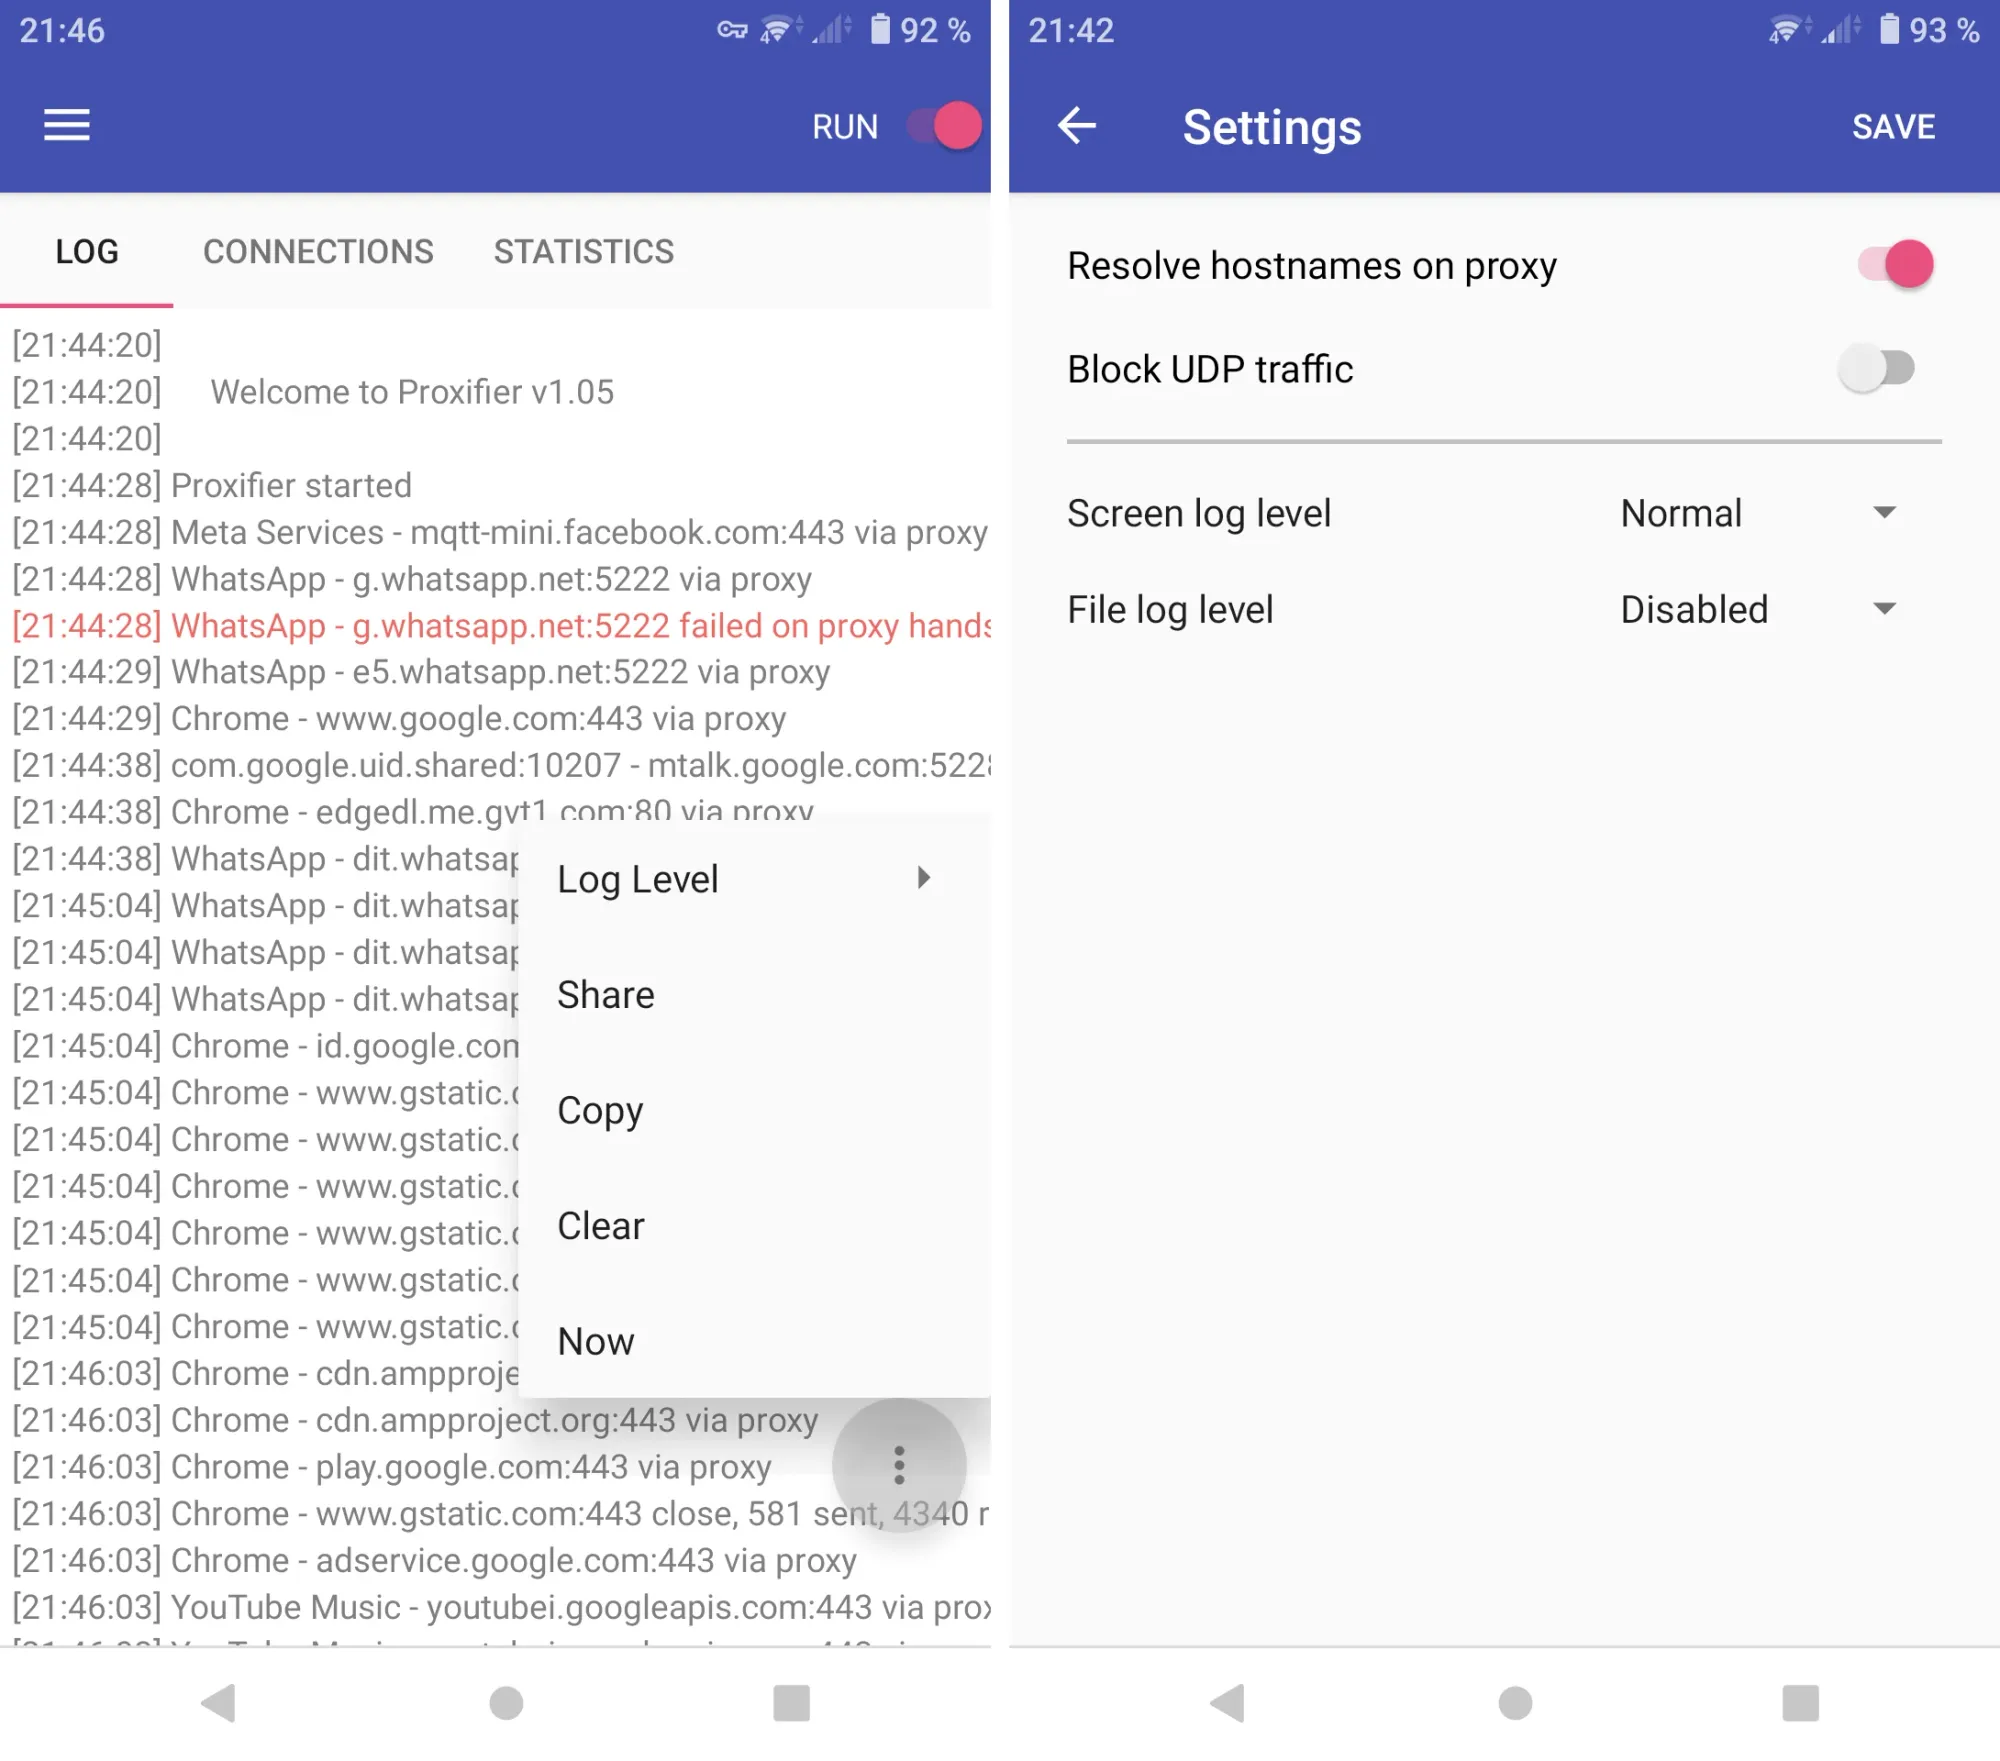
Install through the publisher’s Google Play listing, reached from the official download page. The screenshots below show a v1.05 interface; the download page lists v1.18, so check the controls in your installed app as you follow these steps.
- In your installed app, look for Proxy Server and add an entry. The pictured Proxy screen shows SOCKS, HTTPS, Address, Port, Username, Password, and SAVE. Enter the HOST and PORT from your Rola IP account, then credentials if that endpoint uses them. Match the protocol to your endpoint; a SOCKS label alone does not establish SOCKS5 compatibility.
- Look for Rules and an Applications selector. Select only the browser to test, save the rule, and confirm its action points to the added proxy rather than a direct connection.
- If your installed app provides RUN, turn it on and review any Android VPN permission prompt for Proxifier. Disconnect a competing VPN service if needed. Inspect the current app’s connection status and log for authentication or handshake errors.
- Open
https://api.ipify.org?format=jsonin the selected browser. Compare it with that browser’s result before enabling Proxifier. If LOG or CONNECTIONS exists, find the browser’s entry and record whether it used the proxy. A RUN indicator is not evidence of a routed request by itself. - If your version offers Resolve hostnames on proxy in Settings, leave its initial value unchanged for the first DNS comparison. Then change only that control if the DNS result calls for it, reconnect, and repeat the comparison described below.
- Turn the connection off using the installed app’s control, restart the browser, and check that its public IP returns to the direct baseline. If a pictured control is absent, use the equivalent setting in your installed version.
What Works Differently on Windows and Android?
| Capability | Windows desktop | Android (pictured v1.05 interface) |
|---|---|---|
| SOCKS endpoint | SOCKS Version 5 in official Windows help | SOCKS; confirm the installed version’s protocol behavior |
| HTTP CONNECT endpoint | Proxifier’s HTTPS type uses CONNECT; verify endpoint support | HTTPS; verify endpoint and installed-app behavior |
| Username/password | Authentication fields | Username and Password fields |
| IP allowlist | Depends on the Rola IP endpoint and current public IP | Depends on endpoint and device public IP |
| App routing | Proxification Rules and process actions | Rules and app switches |
| DNS control | Name Resolution settings | Resolve hostnames on proxy |
| Route evidence | Connection log and browser IP check | LOG/CONNECTIONS and browser IP check |
How Do You Verify That Proxifier Uses Rola IP?
Check the proxy server and target application separately. On Windows, record a direct public IP before enabling the browser rule. Use curl.exe rather than curl in PowerShell to avoid possible alias confusion.
curl.exe "https://api.ipify.org?format=json"
For an endpoint configured with an IP allowlist and no username/password, an optional explicit SOCKS5 check is:
curl.exe --proxy "socks5h://YOUR_HOST:YOUR_PORT" "https://api.ipify.org?format=json"
Replace the placeholders with your own endpoint. socks5h asks the proxy to resolve the destination hostname. For username/password authentication, use Proxifier’s interface instead of putting a real password on a command line, where it can enter shell history or process arguments.
Complete all four checks in the same session:
- Server: Windows Check succeeds. On Android, inspect the installed app’s log for a successful proxy connection and no authentication or handshake error. This tests only the endpoint connection.
- Rule: The connection log shows the selected browser using the configured proxy rather than Direct. On Android, inspect its rule and LOG/CONNECTIONS.
- Exit IP: The selected browser’s IP lookup differs from its direct baseline. Compare its reported location with the region selected in Rola IP; geolocation databases can differ.
- DNS: Run the controlled browser check below. A changed exit IP alone does not establish the DNS route.
How Do You Check DNS in the Same Browser?
Use the same browser, browser profile, network, and DNS settings for both runs. First disable the test proxy rule (or Android connection), open DNSLeakTest, and run its Standard test. Record the browser’s public IP from the IP lookup above and the DNS test’s resolver IPs, organizations, and countries. Note whether the browser’s Secure DNS or DNS-over-HTTPS setting is on.
Next enable the rule for that browser, restart it, and repeat the same IP lookup and DNS test. Record the Proxifier log entry for the browser and the Name Resolution setting on Windows, or the installed app’s corresponding DNS setting on Android. If the exit IP changes but the DNS result still lists your local ISP’s resolvers, investigate browser Secure DNS, Proxifier name resolution, and another active VPN or DNS tool. If the resolvers change, that is evidence for this browser test only; it does not prove that every application or the whole device resolves through the proxy. Finally disable the proxy and repeat the IP lookup to confirm rollback.
Keep a redacted record of UTC time, OS build, Proxifier version, Rola IP product and region, protocol, authentication method, browser rule and log action, direct and proxy IPs, DNS resolvers before and after, and rollback IP. Never publish credentials or full account identifiers.
How to Disable the Proxy and Restore a Direct Connection
When your test is complete, disable or delete the temporary application rule and confirm that Default remains Direct. Exit Proxifier and relaunch the target application. On Android, disconnect Proxifier first, then recheck the browser’s exit IP. After restoring the direct connection, you should see your original public IP again. Do not simply close the window while leaving active background rules in place.
What to Check When the Connection Fails
| Symptom | What to check first | Next step |
|---|---|---|
| Check fails or the connection times out | HOST/PORT, protocol, network reachability, and whether your current public IP is allowlisted | Recopy the endpoint from the dashboard and run Check again. |
| Authentication fails or a 407 error appears | Whether User & Pass Auth is selected, and whether the username suffix and password are complete | Copy the latest credentials again. If using an allowlist, make sure authentication methods have not been mixed. |
| The proxy test passes but the browser still shows your local IP | Browser executable, rule order, Default action, and old browser processes | Fully close and relaunch the browser, then inspect the rule and action shown in Proxifier’s connection log. |
| Android RUN does not start | VPN permission prompt or another active VPN service | Review permission, disconnect a conflicting VPN, and retry RUN and the browser rule. |
| A SOCKS endpoint works but the HTTPS entry fails | Whether the endpoint actually supports HTTP CONNECT | Select the setting that matches the endpoint; do not assume an HTTP proxy supports CONNECT. |
| A website does not load or DNS behaves unexpectedly | Name Resolution settings, browser secure DNS, and another VPN or DNS tool | Change one setting at a time, then repeat both DNS and browser IP checks. Distinguish a destination-site rejection from a proxy connection failure. |
| The target returns HTTP 403 after the proxy connects | Whether the target’s access rules reject this request, account, or exit IP | Confirm the Proxifier log and exit IP first. Treat 403 as a target response, review site permissions, and avoid repeated requests that the site rejects. |
| The target returns HTTP 429 | Request rate, target limits, and any Retry-After response header |
Pause for the stated interval, lower the request rate, and follow the site’s access policy. Do not retry indefinitely or rotate IPs to bypass the limit. |
| The location or session is not as expected | Dashboard region, rotation or sticky-session settings, cached connections, and existing sessions | End old connections and test again. If you need a long-term fixed exit, use a static-IP product. |
When troubleshooting, change one variable at a time and record the direct IP, proxy-test response, Proxifier log, and browser behavior. A 407 is a proxy-authentication problem; a 403 or 429 from the destination follows a different path after the proxy connection. Confirm which system returned the status before changing credentials or IPs.
Conclusion
Download Proxifier from its official page, match its proxy setting to the Rola IP endpoint in your dashboard, and route one test application first. A server check is only the beginning: confirm the application rule, browser exit IP, and DNS separately, then verify that switching Proxifier off restores direct access. Keep a dated, redacted result for your device and Rola IP account before relying on the setup for ongoing work.