Node Fetch Proxy Guide: Configure Rola IP in Node.js

Sep 9, 2026 · Guides · 17 min read
TL;DR
The correct way to configure a node fetch proxy depends on whether you’re using node-fetch or Node’s native fetch: node-fetch v3 should pass an HttpsProxyAgent into { agent }, native fetch should pass an Undici ProxyAgent into { dispatcher }, and Node 22.21+/24.5+ can also explicitly enable environment-variable proxying.
This article uses Rola IP as the proxy network, walking step by step through environment setup, protecting proxy credentials, exit-IP verification, HTML fetching, HTTP and SOCKS5 integration, rotating and sticky sessions, timeouts, limited retries, and troubleshooting. The code is written as ESM, and syntax checks, a local authenticated proxy tunnel, page parsing, and automated tests were all completed in a Node.js 24.19.0 environment; since the test environment doesn’t have real Rola IP account credentials, this article does not present the local proxy results as a live test of a Rola production exit.
| How You’re Running It | Correct Proxy Entry Point | Key Configuration |
|---|---|---|
| node-fetch v3 | HttpsProxyAgent | fetch(url, { agent }) |
| Node native fetch | Undici ProxyAgent | fetch(url, { dispatcher }) |
| Node 22.21+/24.5+ native fetch | Built-in environment-variable proxy | NODE_USE_ENV_PROXY=1 |
| node-fetch + SOCKS5 | SocksProxyAgent | fetch(url, { agent }) |
What Is a Node Fetch Proxy?
A node fetch proxy is a network-routing approach where server-side JavaScript’s HTTP requests first pass through a proxy server before connecting to the target site. The proxy changes the request’s exit point, network location, and session path; fetch() still handles sending the request and reading the response, while Cheerio, a JSON parser, or your business logic still handles extracting the data.
The Fetch standard is written for browsers and doesn’t define a unified proxy parameter, so different Node.js implementations use different interfaces. The official node-fetch README clearly provides a custom agent extension; Node’s native fetch is built on Undici and uses a dispatcher. This is exactly why many node fetch proxy examples throw errors — copying an option from one implementation into another.
What Problems Can a Node Fetch Proxy Solve?
- Verifying localized pages, prices, or search results through an authorized regional exit.
- Spreading high-frequency collection tasks across appropriate proxy sessions, instead of concentrating them on a single exit.
- Keeping the same exit IP for a fixed workflow, to support whitelisting and continuous sessions.
- Separating the request layer, proxy layer, and parsing layer in a data pipeline, making it easier to monitor success rate and cost.
- Meeting outbound-audit, network-boundary, or centralized-routing requirements through an enterprise proxy.
A proxy doesn’t automatically execute JavaScript, parse HTML, or save cookies, and it doesn’t grant permission to access restricted data. When you encounter a login, a paywall, a CAPTCHA, a 403, or a terms-of-service restriction, confirm authorization and your request strategy first — don’t just add more proxy rotation.
What’s the Difference Between Node Fetch, node-fetch, and a Proxy Agent?
node-fetch is a standalone npm package, while Node’s native fetch is a built-in runtime API — they look similar, but their proxy extension interfaces differ.
| Comparison | node-fetch v3 | Node Native fetch |
|---|---|---|
| Installation | npm install node-fetch |
Built into Node 18+ |
| Module type | v3 is ESM-only | The global fetch is callable from both ESM and CommonJS |
| HTTP proxy | HttpsProxyAgent + agent | Undici ProxyAgent + dispatcher |
| SOCKS5 | SocksProxyAgent + agent | Requires an Undici-compatible solution, or switch to node-fetch |
| Environment-variable proxy | Not read automatically | Newer Node versions can enable it explicitly |
| HTTP 4xx/5xx | Doesn’t throw automatically | Doesn’t throw automatically |
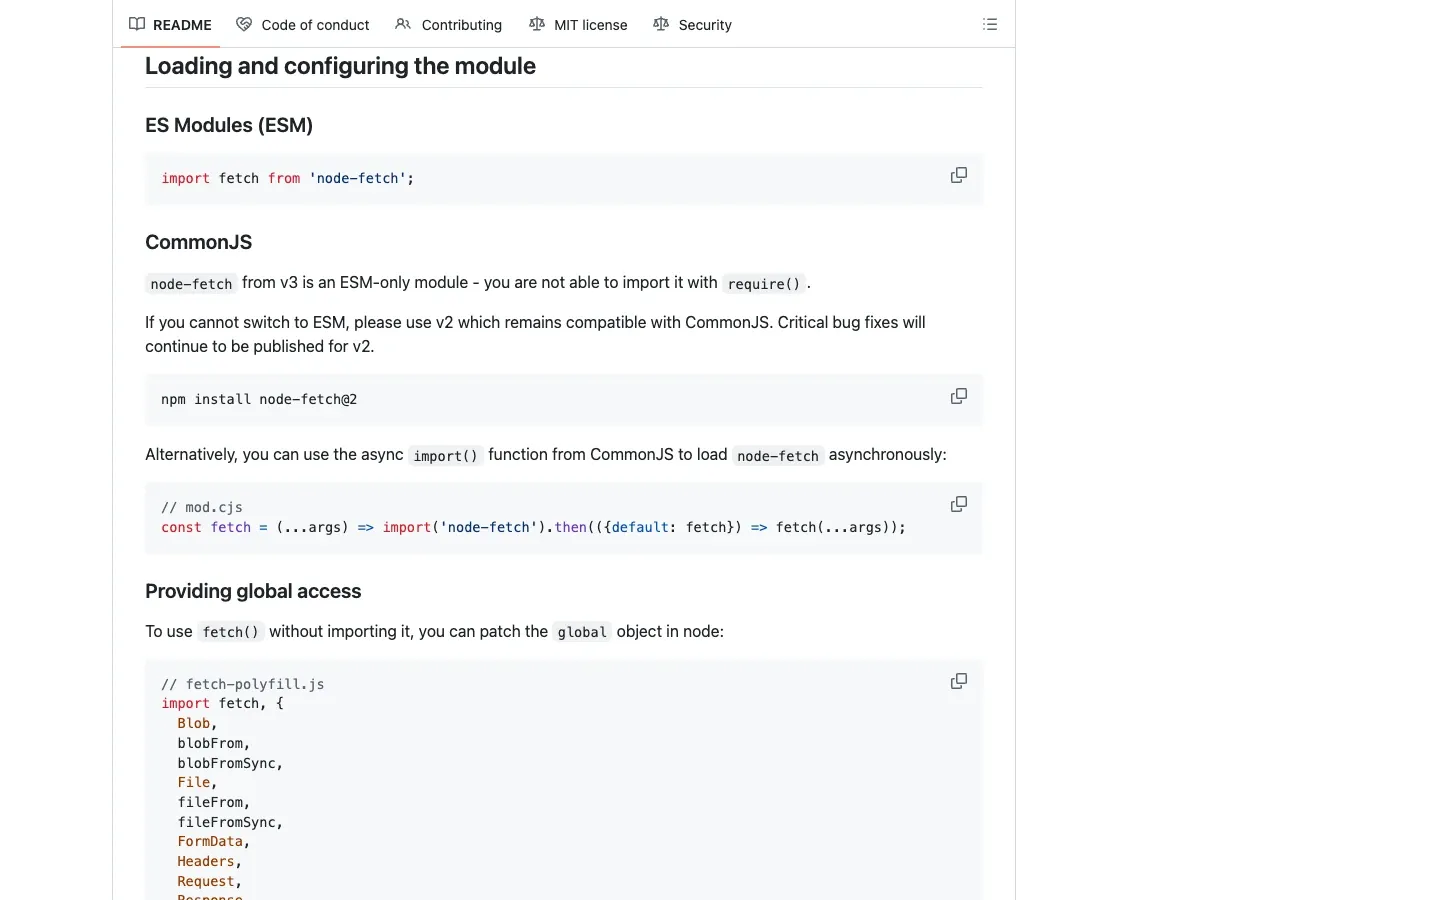
node-fetch v3 is ESM-only; if a legacy project must use require(), explicitly lock it to v2 — don’t directly copy v3’s import syntax into a CommonJS project. The official module-loading documentation explains this distinction clearly. Oxylabs’ Node-Fetch integration uses v2 to demonstrate CommonJS — when reading this kind of example, check the version first, and don’t mix it directly with this article’s v3 ESM code.
Why Use Rola IP for Node.js Data Collection?
Rola IP suits Node.js data-collection tasks that need standard HTTP/SOCKS5 access, regional selection, proxy rotation, or a stable session. It doesn’t require a proprietary SDK, so it can be integrated directly with node-fetch, Undici, Puppeteer, or any other tool that supports standard proxy protocols.
Rola IP web scraping proxy provides residential and ISP routing, regional selection, and rotating and sticky sessions. Coverage, available locations, protocols, and session options can change, so re-check the current product page, dashboard, and your account plan before publishing or deploying. For Node.js teams, the real value is being able to keep proxy strategy at the network layer: your business code keeps using the Fetch API, and switching networks or session strategies doesn’t require rewriting the parser.
Which Rola IP Should You Choose?
| Node.js Task | Network to Test First | Reason |
|---|---|---|
| Public static pages, large-scale low-sensitivity collection | Rotating datacenter proxies | Speed and concurrency cost are easier to control |
| Regional pricing, SERPs, retail and market research | Residential proxy | Regional coverage and residential network attributes better suit verifying local results |
| Continuous pagination, shopping carts, or authorized login QA | Static residential or sticky residential sessions | Reduces exit changes across a multi-step flow |
| Mobile content and carrier-difference testing | Mobile proxy | Closer to a real mobile network path |
The choice shouldn’t be based on IP count alone. Use the same target URL, concurrency, region, and session length, and log the valid-field rate, 429/403 ratio, P95 latency, traffic per valid record, and retry cost before deciding on the final network.
Product information can be checked separately on the English rotating datacenter proxies and residential proxy pages; the final selection should still be based on testing against your own target site.
Node Fetch Proxy Hands-On Environment and Project Structure
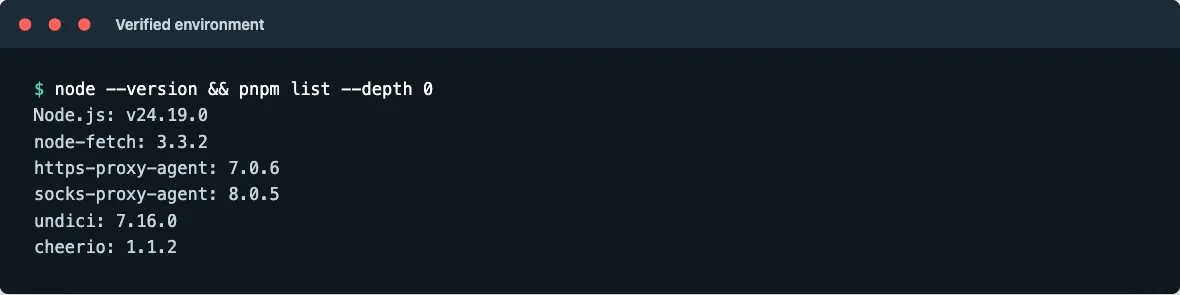
This tutorial uses Node.js 24.19.0 and an ESM project built on node-fetch v3, with all credentials passed through environment variables. The Undici 7.16.0 and Cheerio 1.1.2 packages installed in this article both declare Node.js >=20.18.1, so the complete project’s minimum version is Node 20.18.1; this is a requirement of the combined dependencies, not the minimum version of node-fetch itself. See the Node.js Fetch documentation for the official description of Node’s native fetch; the built-in environment-variable proxy only applies to Node minor versions that support the feature.
| Approach in This Article | Minimum Node Version Here | Proxy Entry Point | Authentication | Main Limitation |
|---|---|---|---|---|
| node-fetch 3.3.2 + HttpsProxyAgent 7.0.6 | 20.18.1 (set by the combined dependencies) | { agent } |
Credentials or an IP whitelist in the proxy URL | node-fetch v3 is ESM-only |
| Native fetch + Undici ProxyAgent 7.16.0 | 20.18.1 | { dispatcher } |
Credentials in the proxy URL | Doesn’t accept node-fetch’s { agent } |
| Native fetch + built-in environment proxy | 22.21.0+ or 24.5.0+ | NODE_USE_ENV_PROXY=1 or --use-env-proxy |
A proxy URL in an environment variable | You must confirm the actual Node minor version and NO_PROXY |
| node-fetch + SocksProxyAgent 8.0.5 | 20.18.1 (matching this article’s full project) | { agent } |
Credentials in the SOCKS5 URL | This article only verifies construction and syntax — a real exit needs account credentials |
mkdir node-fetch-proxy-demo
cd node-fetch-proxy-demo
npm init -y
npm pkg set type=module
npm install node-fetch@3.3.2 https-proxy-agent@7.0.6 \
  socks-proxy-agent@8.0.5 undici@7.16.0 cheerio@1.1.2
Recommended project structure:
node-fetch-proxy-demo/
├── package.json
├── check-proxy.mjs
├── scrape-quotes.mjs
├── native-fetch-proxy.mjs
├── socks5-node-fetch.mjs
└── fetch-with-policy.mjs
Method 1: Use node-fetch v3 With a Rola IP HTTP Proxy
The most direct node fetch proxy configuration is to create an HttpsProxyAgent from the complete HTTP proxy URL provided by the Rola IP dashboard, then pass it to node-fetch’s agent option.
Step 1: Get the Proxy Configuration From Rola IP
First complete account, network-type, and authentication-method setup following the English proxy quick start guide. Use the host, port, username, and password shown in the current dashboard page — don’t guess the format based on another vendor’s convention.
macOS or Linux:
export ROLA_PROXY_URL='http://USERNAME:PASSWORD@HOST:PORT'
Windows PowerShell:
$env:ROLA_PROXY_URL='http://USERNAME:PASSWORD@HOST:PORT'
Don’t commit a real proxy URL to Git. Production environments should use CI secrets, a container secret, or a cloud key-management service.
Step 2: Create check-proxy.mjs
import fetch from 'node-fetch';
import { HttpsProxyAgent } from 'https-proxy-agent';

const targetUrl = process.env.TARGET_URL ?? 'https://httpbin.org/ip';
const proxyUrl = process.env.ROLA_PROXY_URL;

if (!proxyUrl) {
  throw new Error('Set ROLA_PROXY_URL to the complete proxy URL from your dashboard.');
}

const agent = new HttpsProxyAgent(proxyUrl);
const startedAt = performance.now();
const response = await fetch(targetUrl, {
  agent,
  headers: { 'User-Agent': 'AuthorizedNodeFetchResearch/1.0' },
  signal: AbortSignal.timeout(20_000),
});

if (!response.ok) {
  throw new Error(`HTTP ${response.status} ${response.statusText}`);
}

const contentType = response.headers.get('content-type') ?? '';
const body = contentType.includes('application/json')
  ? await response.json()
  : await response.text();

console.log({
  status: response.status,
  finalUrl: response.url,
  elapsedMs: Math.round(performance.now() - startedAt),
  body,
});
The name HttpsProxyAgent is easy to misread: the Rola entry point here can be http://..., with the Agent reaching the HTTPS target through an HTTP CONNECT tunnel. You can check how this works in the https-proxy-agent package; ScrapingBee’s node-fetch proxy guide also distinguishes between the node-fetch Agent path and the native Fetch dispatcher path.
Step 3: Run It and Confirm the Exit IP
node check-proxy.mjs
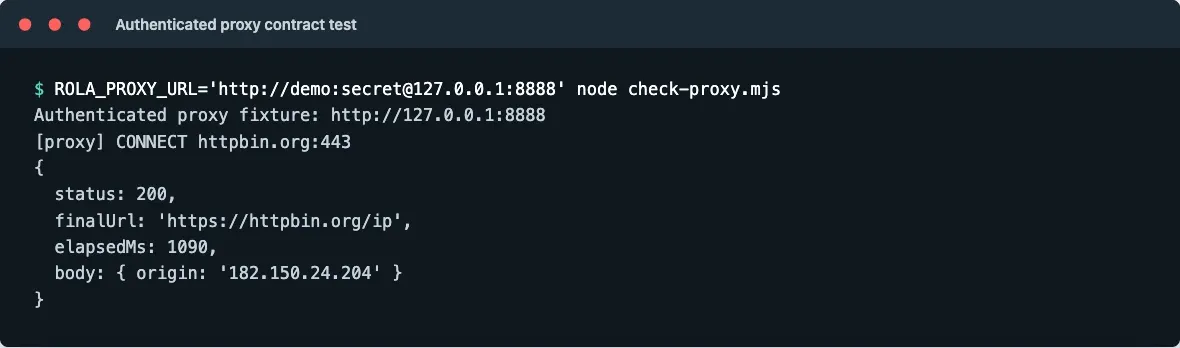
The output should include at least status: 200, the final URL, and the exit address observed by the IP-check endpoint. You can then use the proxy checker or an authorized IP information service to check whether the country, ASN, and network type match expectations.
Step 4: Safely Handle Usernames, Passwords, and Special Characters
Prioritize the complete proxy URL generated by the dashboard; if you must assemble it yourself, write the credentials through a URL object to avoid characters like @, :, and # breaking the URL.
const proxy = new URL(process.env.ROLA_PROXY_SERVER);
proxy.username = process.env.ROLA_PROXY_USERNAME;
proxy.password = process.env.ROLA_PROXY_PASSWORD;

const agent = new HttpsProxyAgent(proxy);
Example environment variables:
export ROLA_PROXY_SERVER='http://HOST:PORT'
export ROLA_PROXY_USERNAME='account@example.com'
export ROLA_PROXY_PASSWORD='p@ss:word'
The URL.username and URL.password setters encode reserved characters. Don’t print proxy.href in logs; if you need to log routing, only log the product, region, a hash of the session ID, and the gateway alias.
Hands-On: Fetch an Authorized Test Page Through a Node Fetch Proxy
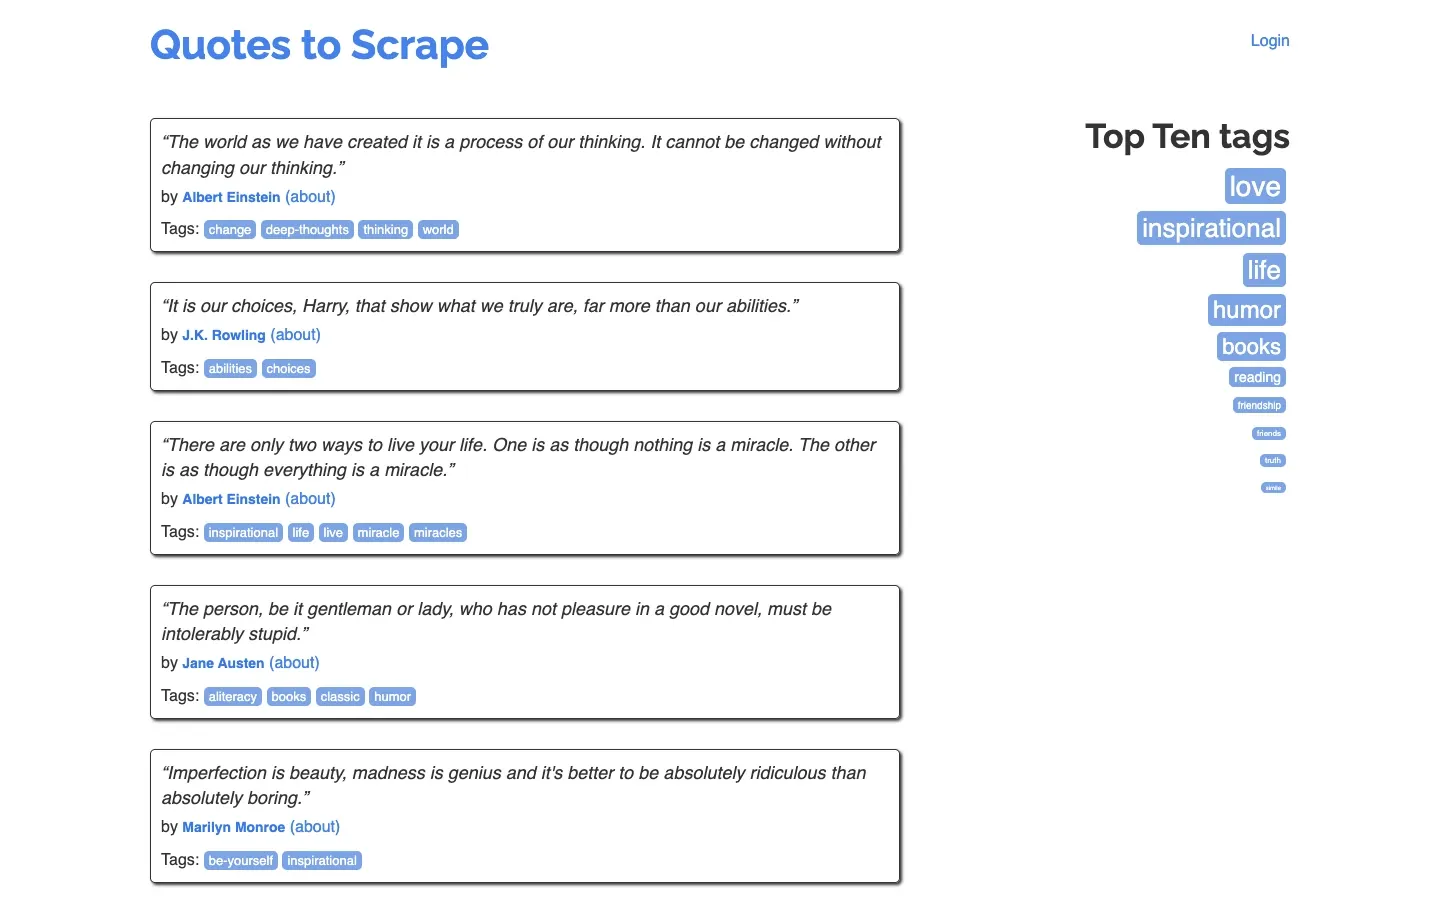
Below, using the Quotes to Scrape page designed for learning scraping as an authorized test page, node-fetch fetches the HTML through the proxy, and Cheerio then extracts the quote text, author, and tags. This workflow verifies the interface between the request, the proxy, and the parser — it doesn’t represent a right of access or data use over any arbitrary website.
Step 1: Confirm the Target Page and the Fields to Extract
Step 2: Write and Run the Extraction Program
Create scrape-quotes.mjs:
import fetch from 'node-fetch';
import * as cheerio from 'cheerio';
import { HttpsProxyAgent } from 'https-proxy-agent';

const targetUrl = process.env.TARGET_URL ?? 'https://quotes.toscrape.com/';
const proxyUrl = process.env.ROLA_PROXY_URL;
const agent = proxyUrl ? new HttpsProxyAgent(proxyUrl) : undefined;

const response = await fetch(targetUrl, {
  agent,
  headers: {
    Accept: 'text/html,application/xhtml+xml',
    'Accept-Language': 'en-US,en;q=0.8',
    'User-Agent': 'AuthorizedNodeFetchResearch/1.0',
  },
  signal: AbortSignal.timeout(20_000),
});

if (!response.ok) throw new Error(`HTTP ${response.status}`);
const contentType = response.headers.get('content-type') ?? '';
if (!contentType.includes('text/html')) {
  throw new Error(`Expected HTML, received ${contentType || 'unknown content type'}`);
}

const html = await response.text();
const $ = cheerio.load(html);
const quotes = $('.quote').map((_, element) => ({
  text: $(element).find('.text').text().trim(),
  author: $(element).find('.author').text().trim(),
  tags: $(element).find('.tag').map((__, tag) => $(tag).text().trim()).get(),
})).get();

if (quotes.length === 0) {
  throw new Error('No quotes found; inspect the response and selectors.');
}

console.log(`Status: ${response.status}`);
console.log(`Final URL: ${response.url}`);
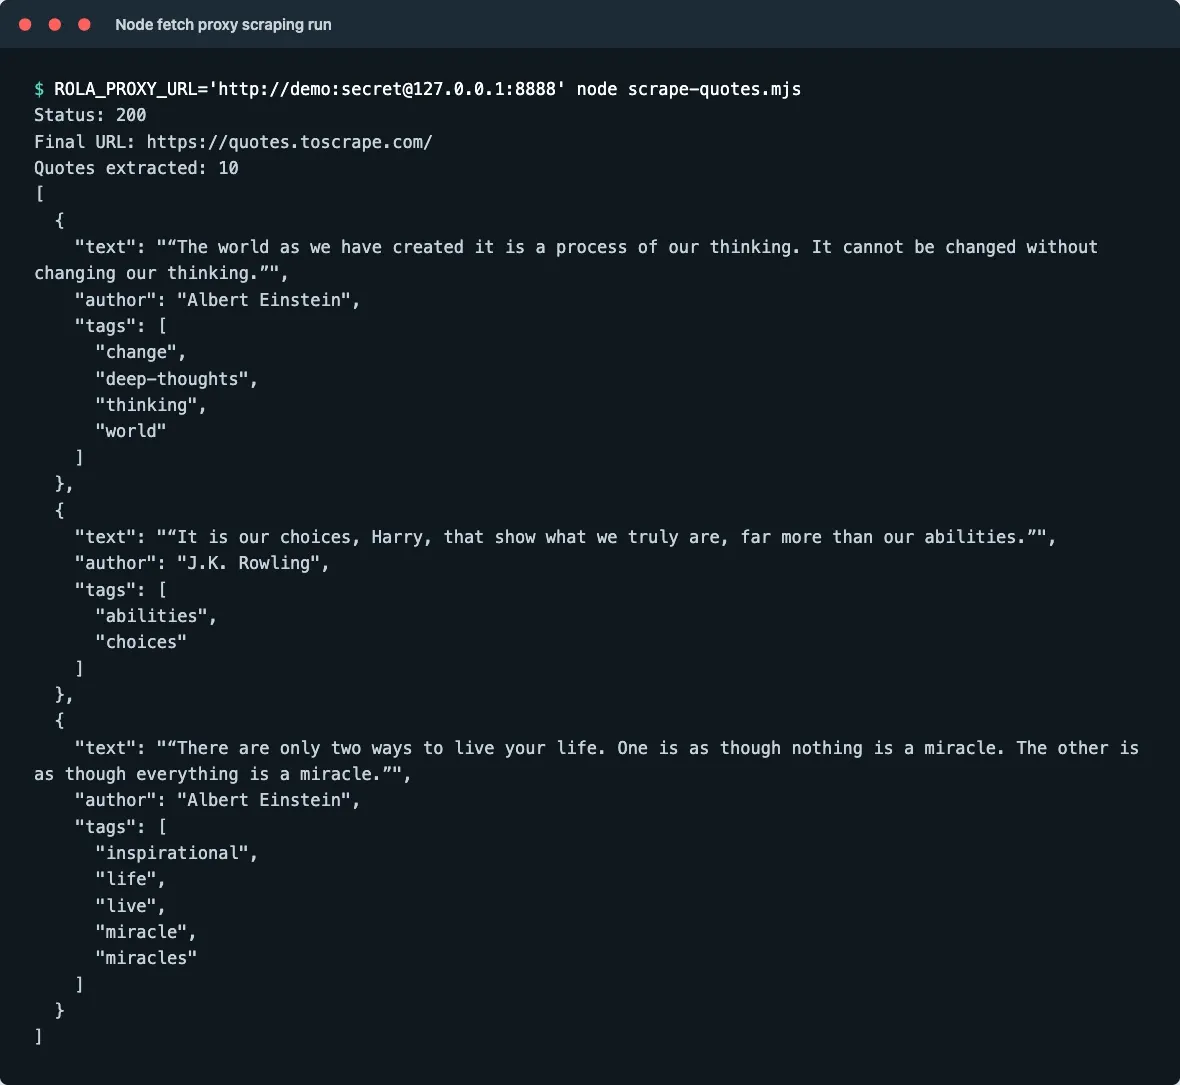
console.log(`Quotes extracted: ${quotes.length}`);
console.log(JSON.stringify(quotes.slice(0, 3), null, 2));
Run it:
node scrape-quotes.mjs
This example doesn’t treat HTTP 200 as the finish line — it continues validating the Content-Type, element count, and field content. If the target returns a challenge page, a login page, or an empty template, even with a 200 status, the content check will still surface the problem.
Method 2: How Do You Configure Rola IP for Node’s Native Fetch?
Node’s native fetch doesn’t use the agent option — you should install Undici and pass Rola IP through the ProxyAgent’s dispatcher option.
Step 1: Confirm Undici Is Installed
npm install undici@7.16.0
Step 2: Create native-fetch-proxy.mjs
import { ProxyAgent } from 'undici';

const proxyUrl = process.env.ROLA_PROXY_URL;
const targetUrl = process.env.TARGET_URL ?? 'https://httpbin.org/ip';
if (!proxyUrl) throw new Error('Set ROLA_PROXY_URL first.');

const dispatcher = new ProxyAgent(proxyUrl);
try {
  const response = await fetch(targetUrl, {
    dispatcher,
    signal: AbortSignal.timeout(20_000),
  });
  if (!response.ok) throw new Error(`HTTP ${response.status}`);
  console.log(await response.text());
} finally {
  await dispatcher.close();
}
The Node.js fetch documentation explains that the native implementation accepts a custom dispatcher compatible with the Undici Dispatcher. If you write { agent }, native fetch won’t use it the way node-fetch does.
Step 3: Run It and Verify the Proxy Exit
node native-fetch-proxy.mjs
The output should include the exit address returned by the IP-check endpoint. It should differ from the direct-connection exit, and match the region selected in the Rola IP dashboard.
Method 3: Use Node’s Built-In Environment-Variable Proxy
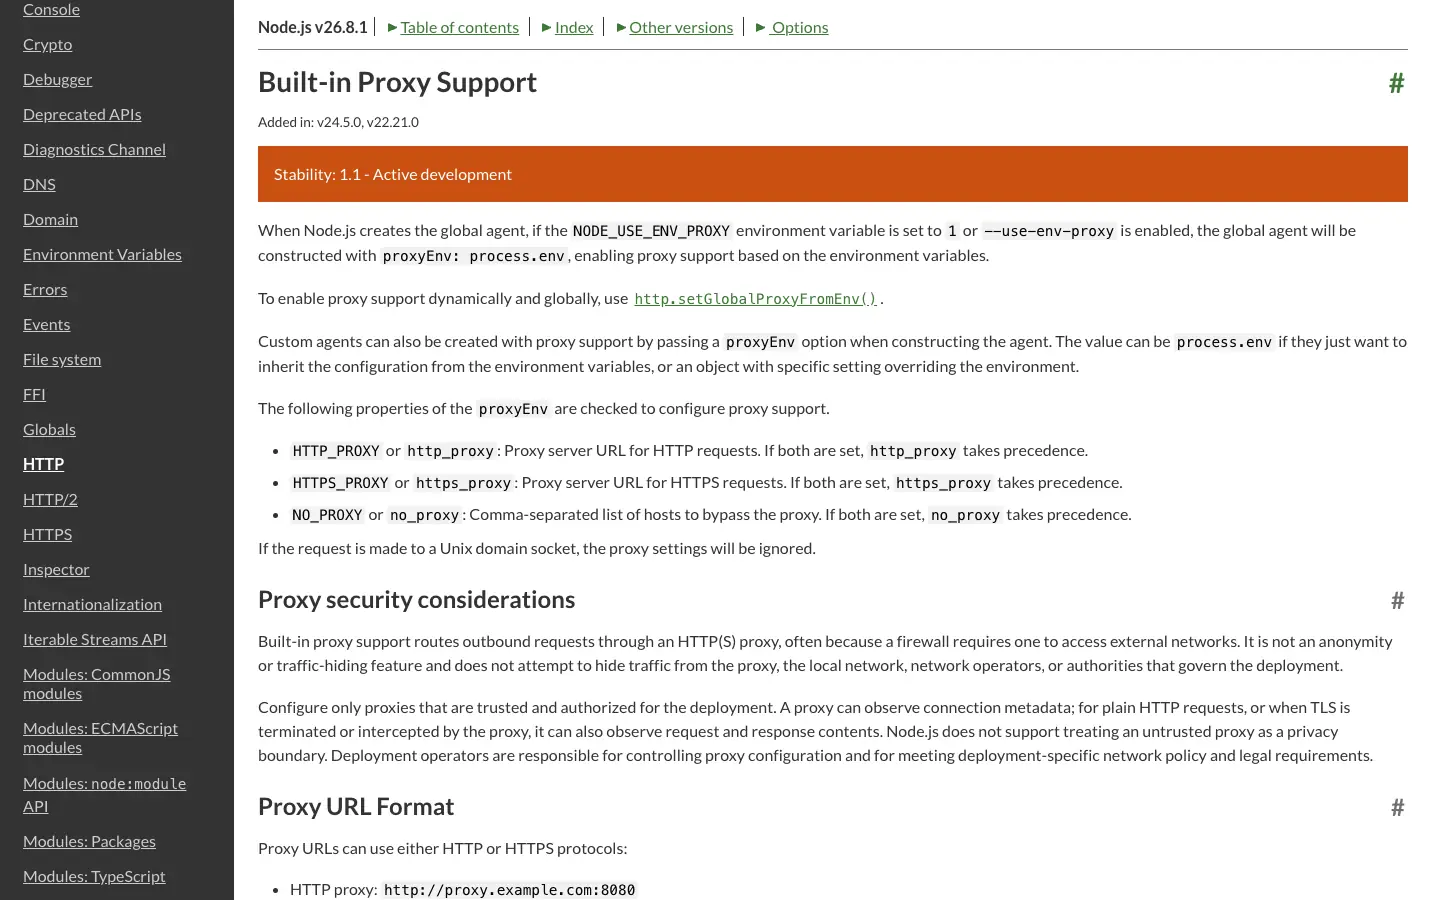
Node 22.21+ and 24.5+ can explicitly enable built-in proxy support, letting native fetch read HTTP_PROXY, HTTPS_PROXY, and NO_PROXY. This feature is currently still marked Active Development, so regression-test it against your actual Node minor version before deploying.
Step 1: Create native-env-fetch.mjs
const targetUrl = process.env.TARGET_URL ?? 'https://httpbin.org/ip';
const response = await fetch(targetUrl, {
  signal: AbortSignal.timeout(20_000),
});
if (!response.ok) throw new Error(`HTTP ${response.status}`);
console.log(await response.text());
Step 2: Enable the Environment-Variable Proxy and Run It
NODE_USE_ENV_PROXY=1 \
HTTPS_PROXY="$ROLA_PROXY_URL" \
NO_PROXY='localhost,127.0.0.1' \
node native-env-fetch.mjs
You can also use node --use-env-proxy native-env-fetch.mjs. Go by the Node.js built-in proxy support documentation for the specific version, proxy URL format, and NO_PROXY rules; the server-side JavaScript proxy comparison further explains that Node, Deno, and Bun don’t share the same proxy interface.
Which of the Three Node Fetch HTTP Proxy Configurations Should You Choose?
| Scenario | Recommended Approach |
|---|---|
| A new ESM project explicitly using node-fetch | HttpsProxyAgent + agent |
| Already using Node native fetch, proxying only some requests | Undici ProxyAgent + dispatcher |
| An enterprise process needs a unified outbound proxy | Node’s built-in environment-variable proxy |
| The same process needs multiple regions or multiple sessions | A separate Agent or Dispatcher per request/task |
Don’t set a global dispatcher, an environment-variable proxy, and a request-level proxy all at the same time, unless you’ve clearly defined the priority and have integration tests — otherwise it will be very hard to confirm the actual routing during troubleshooting.
How Do You Use SOCKS5 With a Node Fetch Proxy?
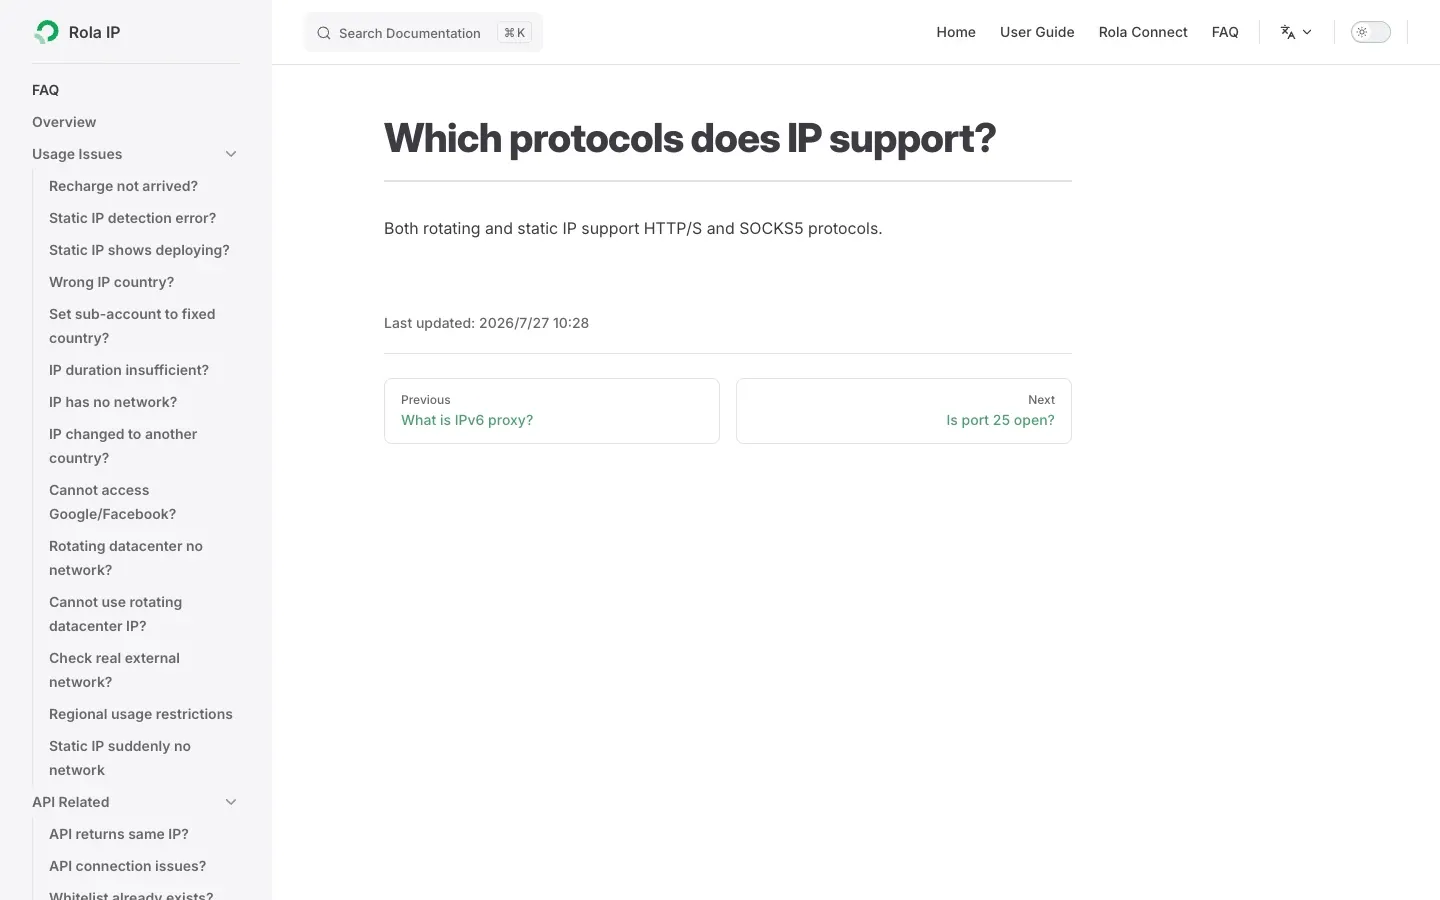
When using node-fetch, you can connect to a SOCKS5 endpoint provided by the Rola IP dashboard through SocksProxyAgent. The actual scheme, host, port, protocol availability, and authentication information should still follow the current dashboard — don’t turn an HTTP entry point into a SOCKS5 entry point just by changing the URL scheme.
Step 1: Install the SOCKS5 Agent and Configure the Proxy URL
npm install socks-proxy-agent@8.0.5
export ROLA_SOCKS5_URL='socks5://USERNAME:PASSWORD@HOST:PORT'
Step 2: Create socks5-node-fetch.mjs
import fetch from 'node-fetch';
import { SocksProxyAgent } from 'socks-proxy-agent';

const proxyUrl = process.env.ROLA_SOCKS5_URL;
const targetUrl = process.env.TARGET_URL ?? 'https://httpbin.org/ip';
if (!proxyUrl) throw new Error('Set ROLA_SOCKS5_URL first.');

const agent = new SocksProxyAgent(proxyUrl);
const response = await fetch(targetUrl, {
  agent,
  signal: AbortSignal.timeout(20_000),
});
if (!response.ok) throw new Error(`HTTP ${response.status}`);
console.log(await response.text());
Step 3: Run It and Check the Exit
node socks5-node-fetch.mjs
The program should return an IP-check result; then check the country, ASN, and network type against the Rola IP dashboard configuration. A successful SOCKS5 connection only proves the proxy link works — it doesn’t substitute for verifying regional and exit attributes.
How Do You Configure Region, Rotation, and Sticky Sessions?
Don’t guess Rola IP’s username parameter format in your code; first generate the region and session configuration you need in the current dashboard, then safely pass the complete URL to your program. The product side decides whether the exit rotates, how long a session can be maintained, and how regional parameters are encoded — the Node.js Agent is only responsible for connecting and reuse.
Rotation Per Request
Suits independent listing pages, public search results, or tasks that don’t need continuous state. Whether the gateway assigns a new exit after every request is determined by the Rola network configuration; creating a new Agent on the Node.js side doesn’t necessarily mean you get a new IP.
import fetch from 'node-fetch';
import { HttpsProxyAgent } from 'https-proxy-agent';

const proxyUrls = JSON.parse(process.env.ROLA_PROXY_URLS ?? '[]');
const targetUrls = JSON.parse(process.env.TARGET_URLS ?? '[]');
if (proxyUrls.length === 0) throw new Error('Set ROLA_PROXY_URLS as a JSON array.');
if (targetUrls.length === 0) throw new Error('Set TARGET_URLS as a JSON array.');

for (const [index, targetUrl] of targetUrls.entries()) {
  const proxyUrl = proxyUrls[index % proxyUrls.length];
  const agent = new HttpsProxyAgent(proxyUrl);
  const response = await fetch(targetUrl, { agent });
  if (!response.ok) throw new Error(`HTTP ${response.status}`);
  // Parse and persist the response before moving to the next URL.
}
Sticky Sessions
Suits continuous pagination, localized paths, and authorized stateful QA. The entire workflow reuses the same dashboard-generated session URL and Agent, while keeping the cookie jar, region, and request headers consistent.
import fetch from 'node-fetch';
import { HttpsProxyAgent } from 'https-proxy-agent';

const stickyProxyUrl = process.env.ROLA_STICKY_PROXY_URL;
const workflowUrls = JSON.parse(process.env.WORKFLOW_URLS ?? '[]');
if (!stickyProxyUrl) throw new Error('Set ROLA_STICKY_PROXY_URL first.');
if (workflowUrls.length === 0) throw new Error('Set WORKFLOW_URLS as a JSON array.');

const stickyAgent = new HttpsProxyAgent(stickyProxyUrl);

for (const targetUrl of workflowUrls) {
  const response = await fetch(targetUrl, {
    agent: stickyAgent,
    signal: AbortSignal.timeout(20_000),
  });
  if (!response.ok) throw new Error(`${targetUrl}: HTTP ${response.status}`);
}
How Do You Add Timeouts and Limited Retries to a Node Fetch Proxy?
Production code should explicitly set a timeout, only retry network errors, 429s, and temporary 5xx responses, and prioritize respecting Retry-After. fetch() doesn’t automatically throw for a 404, 429, or 500, so you must check response.ok.
import fetch from 'node-fetch';

const retryableStatuses = new Set([429, 500, 502, 503, 504]);
const sleep = (ms) => new Promise((resolve) => setTimeout(resolve, ms));

function retryAfterMs(response) {
  const value = response.headers.get('retry-after');
  if (!value) return null;
  const seconds = Number(value);
  if (Number.isFinite(seconds)) return Math.max(0, seconds * 1000);
  const dateMs = Date.parse(value);
  return Number.isNaN(dateMs) ? null : Math.max(0, dateMs - Date.now());
}

export async function fetchWithPolicy(url, {
  agent,
  attempts = 3,
  baseDelayMs = 500,
  timeoutMs = 20_000,
  headers = {},
} = {}) {
  let lastError;

  for (let attempt = 1; attempt <= attempts; attempt += 1) {
    try {
      const response = await fetch(url, {
        agent,
        headers,
        signal: AbortSignal.timeout(timeoutMs),
      });

      if (response.ok) return response;
      if (!retryableStatuses.has(response.status) || attempt === attempts) {
        throw new Error(`HTTP ${response.status} ${response.statusText}`);
      }

      const serverDelay = retryAfterMs(response);
      await response.arrayBuffer();
      const jitter = Math.floor(Math.random() * 200);
      await sleep(serverDelay ?? baseDelayMs * 2 ** (attempt - 1) + jitter);
    } catch (error) {
      lastError = error;
      if (attempt === attempts || /^HTTP 4(?!29)/.test(error.message)) throw error;
      const jitter = Math.floor(Math.random() * 200);
      await sleep(baseDelayMs * 2 ** (attempt - 1) + jitter);
    }
  }

  throw lastError ?? new Error('Request failed');
}
Retries must have an upper limit and work together with a domain-level concurrency limit. Rotating IPs for every error without evaluating it will mask 401/403 permission issues, parsing errors, and target-site redesigns, while also increasing your proxy traffic cost.
How Do You Control Concurrency and Cost per Valid Record?
Concurrency should be limited separately by target domain, proxy product, and response size, and the optimization goal should be cost per valid record — not requests per second.
It’s recommended to log at least the following metrics:
- Total requests, and the counts of 2xx, 3xx, 403, 429, and 5xx.
- P50/P95 for DNS, connection, time-to-first-byte, and total elapsed time.
- Exit country, session ID, and proxy product — but never log passwords.
- HTML byte count, parse success rate, and key-field completeness rate.
- Retry traffic, expired traffic, and cost per valid record.
- Whether the exit stays stable within the same session, and whether regional results match expectations.
Starting with 2 to 4 concurrent connections per domain is just a conservative engineering starting point — not a universal safe number. You should adjust it gradually based on your authorization scope, robots.txt, terms of service, response latency, and 429 ratio.
How Do You Troubleshoot Common Node Fetch Proxy Errors?
First distinguish between module, proxy authentication, TLS, protocol, and target-response issues before deciding whether to retry.
| Error or Symptom | Common Cause | Correct Handling |
|---|---|---|
| require() of ES Module | Loading node-fetch v3 in CommonJS | Switch to ESM, or explicitly use v2 |
| Set { agent } but native fetch isn’t proxied | Mixed up node-fetch and native fetch | Switch to Undici’s |
| HTTP 407 | Wrong username, password, whitelist, or auth method | Check credentials in the dashboard — don’t blindly retry |
| ECONNREFUSED | Wrong host/port, or the proxy is unreachable | Check the gateway, port, firewall, and network |
| ETIMEDOUT / AbortError | The proxy or target response timed out | Retry with limits, and log staged latency |
| TLS certificate error | A custom CA, an enterprise middlebox, or a certificate-chain issue | Install the CA correctly — never globally disable TLS verification |
| HTTP 403 | An authorization, policy, or access boundary | Stop and check permissions and request behavior |
| HTTP 429 | Request frequency exceeded the limit | Respect Retry-After and lower concurrency |
| HTTP 200 but empty data | A challenge page, a JavaScript page, or a selector change | Validate the title, Content-Type, and field count |
| The IP doesn’t change | Using a sticky session, or a misunderstanding of Agent reuse | Check the Rola session and rotation parameters |
NODE_TLS_REJECT_UNAUTHORIZED=0 disables TLS verification for the entire process and shouldn’t be used as a production fix. When a proxy connection fails, first check the gateway, port, authentication, whitelist, protocol, and local firewall, then use a minimal IP-check request to tell apart a proxy failure from a target-site response issue.
How Do You Test Node Fetch Proxy Code?
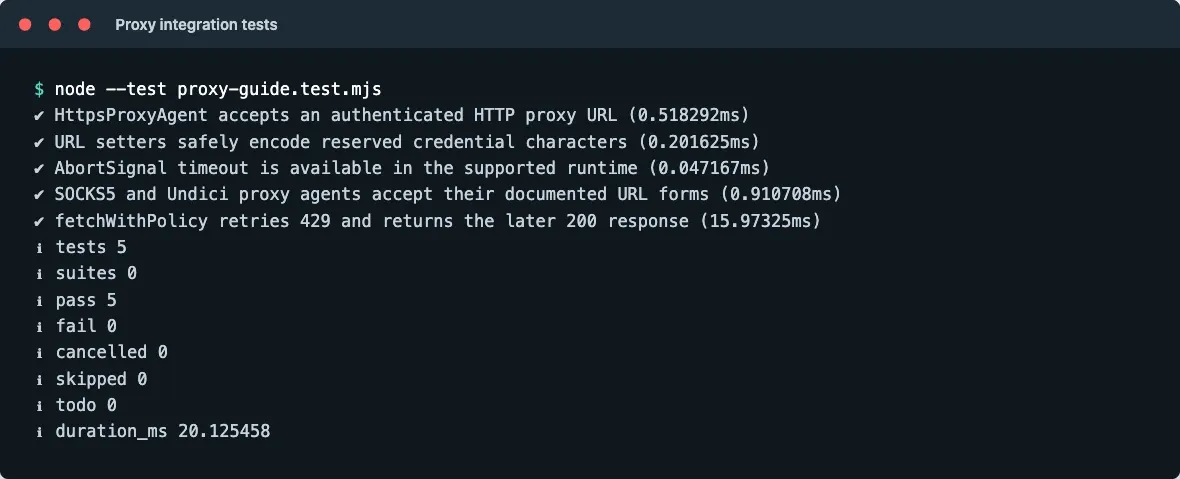
Tests should cover, at minimum, the proxy URL, special characters, HTTP and SOCKS Agent construction, timeout capability, and retry behavior after a 429. This article’s tests were run on September 8, 2026, in an environment of Node.js 24.19.0, node-fetch 3.3.2, https-proxy-agent 7.0.6, socks-proxy-agent 8.0.5, Undici 7.16.0, and Cheerio 1.1.2.
Run a syntax check first, then run the test suite and the proxy fixture:
node --check check-proxy.mjs
node --check scrape-quotes.mjs
node --test proxy-guide.test.mjs
The test suite has 5 items, with a result of 5 passed, 0 failed; the local authenticated HTTP proxy fixture observed an HTTPS CONNECT, a status of 200, and extracted 10 records from the authorized test page. This result verifies the code path, the proxy URL contract, parsing behavior, and limited retries — it isn’t proof of a live exit on a Rola IP production endpoint. Before actually going live, you still need to use your account credentials to log the observed IP, country, ASN, network type, status, latency, product type, and a hash of the session ID.
import test from 'node:test';
import assert from 'node:assert/strict';
import { HttpsProxyAgent } from 'https-proxy-agent';
import { SocksProxyAgent } from 'socks-proxy-agent';
import { ProxyAgent } from 'undici';

test('proxy agents accept documented URL forms', async () => {
  const httpAgent = new HttpsProxyAgent('http://demo:secret@127.0.0.1:8888');
  const socksAgent = new SocksProxyAgent('socks5://demo:secret@127.0.0.1:1080');
  const dispatcher = new ProxyAgent('http://demo:secret@127.0.0.1:8888');
  assert.equal(typeof httpAgent.addRequest, 'function');
  assert.equal(typeof socksAgent.addRequest, 'function');
  assert.equal(typeof dispatcher.dispatch, 'function');
  await dispatcher.close();
});
Security and Compliance Boundaries for a Node Fetch Proxy
Only access data you’re authorized to collect or verify through a trusted proxy, and treat proxy credentials as production secrets.
- Don’t expose usernames and passwords in code, screenshots, logs, or error tracking.
- Use HTTPS targets and keep TLS verification on — don’t send sensitive data through an unknown free proxy.
- Use NO_PROXY for local services and internal domains, to avoid accidentally leaking internal-network requests.
- Follow the target site’s terms, your authorization scope, privacy rules, and a reasonable request frequency.
- Build an allowlist for region, product, and session parameters, to avoid accepting an arbitrary proxy URL as user input.
- Review scraping, parsing, and data-use licensing separately — the proxy itself doesn’t grant a right to use the content.
A proxy only changes network routing — it doesn’t grant access permission, and it doesn’t invalidate a login, a CAPTCHA, robots.txt, terms of service, or data-use restrictions. When a target explicitly refuses a request, stop the task first and confirm authorization, rate, and data use, rather than treating a switch of IP as the default fix.
Conclusion
A reliable node fetch proxy implementation starts with correctly distinguishing between agent, dispatcher, and environment-variable proxying. node-fetch v3 paired with HttpsProxyAgent is best suited to a clear, request-level HTTP proxy; Node’s native fetch paired with Undici suits modern runtimes; the newer built-in proxy in Node suits unifying a process’s outbound traffic; and SOCKS5 can be accessed through SocksProxyAgent.
When adding Rola IP to a Node.js data pipeline, first verify the exit, region, session, and field-completeness rate with a small sample, then gradually increase concurrency. Keep credentials in secrets, check every HTTP status, set timeouts and limited retries, and measure your proxy configuration by cost per valid record — not just whether the request returned 200.